Boost your Reason productivity with indispensable keyboard shortcuts that make everyday jobs quicker and easier.
I've always loved Propellerheads' approach to software design, but navigating a huge Reason rack and editing in the sequencer can often feel annoyingly slow and labour‑intensive, requiring endless fiddly clicking, dragging and scrolling with the mouse. It doesn't have to be like this, though. A few well‑chosen keyboard shortcuts can achieve a great deal, allowing you to work faster and smarter, and look great in front of friends or clients! I'd suggest putting the following into practice a few at a time, while you're working on a song.
Transport
These are just about the most useful, fundamental keyboard shortcuts of the lot, and they're all conveniently based around the numeric keypad.
The 'stop' shortcut has some hidden abilities: hitting it twice stops playback and takes the wiper back to your previous start position, which is very handy if you're having to repeatedly jump back to rehearse a section or gather alternative takes. Hit it a third time and it places the wiper at the start of your song. Also, check out how the fast forward and rewind shortcuts work. Hold either down for more than a second or two, and the playback wiper goes really zooming off, making it quick and easy to relocate just a few bars, or a hundred.
The clutch of loop‑related shortcuts is really handy for the familiar task of building up an arrangement while playback cycles over a short section. But loop start and end indicators are good for general location tasks too. Turn off the loop, place the 'L' and 'R' loop start and end indicators at some important places you're working on in your song, and the keypad 1 and 2 keys give instant access to them with a single keystroke.![]() As well as being used for their intended purpose, as loop boundaries, Reason's loop indicators can also act as locate points.
As well as being used for their intended purpose, as loop boundaries, Reason's loop indicators can also act as locate points.
Environment
Shortcuts for navigating Reason's environment can save time and keep your workspace clear and organised (see table opposite top). The Maximise rack command actually works like a toggle, so hit it again to return to the familiar 'split pane' view. If you tend to work with the rack and sequencer separated, the same shortcut selects the rack instead of maximising it. OS X users might need to watch that F8 shortcut — so see the end of the 'Record Corner' box for more on this.
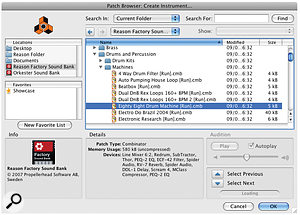
The 'Create' shortcuts are great. Instead of always choosing a default instrument or effect from the Create menu (or from a right‑click contextual menu), and then laboriously mousing to its patch‑selection controls, try the Command/Ctrl 'I' and 'F' shortcuts instead. Reason pops up a patch‑browser dialogue box, in which the Tab key jumps the 'focus' between the main patch column, the Search field, Locations and Favorites. You can use the up/down arrow keys to select list items, and the right and left arrows to move up and down through patch folders in the patch column. When you've found a patch you like, the Return key loads it. Voila! An instrument or effect, quickly created, without a mouse‑click in earshot. Shortcuts allow instruments and effects to be quickly created without the use of the mouse.
For an existing device, you can do something similar. In the rack, select it by clicking, or by moving the focus to it using the up‑down arrow keys, then hit Command‑B (Mac) or Ctrl‑B (Windows). If you're working with a track in the sequencer, hit Command‑1 then Command‑B on Mac, or Ctrl‑1 and Ctrl‑B on Windows, for super‑fast patch access.
There are some devices that you can't create from a keyboard shortcut — things like the Mixers, the Matrix sequencer, and the Spider merger/splitters, which are neither instruments nor effects. For these, a right click (or Ctrl‑click for single‑button Mac mouse users) and then a choice from the Create submenu is the quickest way forward. This technique is also essential when you need to create any device while overriding Reason's usual behaviour.
Say you've got a Redrum pattern that you want to pass through Thor's Ladder filter. Normally, a new instance of Thor will result in a corresponding sequencer track being created, and automatic routing of its outputs into your mixer, ready for use. But here neither is required, as Thor is simply going to be used like a glorified effects unit. So as you choose 'Thor Polysonic Synthesizer' from the Create menu (or contextual menu), hold down two key modifiers (Shift and Option on the Mac, Shift and Alt on Windows) to prevent the usual automatic routing and track creation from occurring. The Thor device then appears in the rack completely unconnected — at which point you can view the rear of the rack and re‑patch as required. Here, Thor was created while holding down the 'Create unrouted device' and 'Override track‑creation for device' modifier keys. That made it appear in the rack unconnected, and without a sequencer track, allowing it to be quickly hooked up to treat the output of the Redrum drum machine, modular synth‑style.
The 'fold all devices' shortcut is invaluable whenever your rack is starting to get unmanageable. You can then unfold just the devices you're working with, to keep things really clear. The final two shortcuts in the table do what they say on the tin, and the 'increase adjustment resolution' key modifier is great for really smooth, slow filter sweeps, amongst other things.
Sequencer
I always think that learning zoom shortcuts is absolutely essential, and in Reason they really make sense, being associated with the +/‑ keys. Tool shortcuts are nicely done too, the tool‑selection buttons in the sequencer window being a constant reminder of their QWERTY key shortcuts.![]() Reason's six tools can be selected with the QWERTY keys on your keyboard.
Reason's six tools can be selected with the QWERTY keys on your keyboard.
There are some hidden 'tool toggles' too. Hold down the Command (Mac) or Ctrl (Windows) key while any tool is selected, and you'll get its most useful counterpart. For example, the arrow, erase and razor tools toggle with the pencil tool. The magnify and hand tools toggle with each other, allowing rapid navigation around track lanes.
There's one other useful toggle: whenever the Magnify tool is selected, holding the Option key (Mac) or Alt key (Windows) makes it zoom out rather than in.
Record Corner

While this column is devoted to Reason, and will stay that way for the foreseeable future, I can't ignore the elephant in the room: Record is with us, and it's big! I'm hoping to include a 'Record Corner' every month, if possible, covering news and techniques specific to that application.
To kick off, and sticking with the general thrust this month, here's the skinny on keyboard shortcuts in Record. The great news is that they're nearly all the same as in Reason, so almost everything I've mentioned in this month's column works great! There are just a few differences and additions:
• Maximise Mixer, Rack and Sequencer commands have dedicated F‑keys: F5, F6 and F7 respectively (you did find those little yellow stickers in your Record box, didn't you?).
• F4 opens Record's handy on‑screen piano keyboard.
• Command‑T (Mac) or Ctrl‑T (Windows) creates a new audio track.
Mac owners watch out, though! By default, many recent Apple computers have the F‑keys assigned to specific operating system tasks printed on the key tops, so to get them (or Reason's F8) to work in Record without having to hold down the 'fn' key each time, go to System Preferences in the Apple menu, and click Keyboard & Mouse. In the Keyboard tab, tick the F‑keys option box. While you're there, click the Keyboard Shortcuts tab and un‑tick (or reassign) the OS‑level shortcuts for 'Turn VoiceOver on or off' and 'Spaces'. Some pretty wild things can happen if you don't!
Wot, No Keypad?
For laptop users, the sad fact is that most Reason transport shortcuts (and some others) are unavailable, unless you've got some sort of embedded keypad doing double duty with your other keys. You can, of course, add a USB keypad — I always take one with me when I use my MacBook outside the studio. Otherwise there's not much left: the space bar stops and starts playback, you go into record with Command‑Return (Mac) or Ctrl‑Return (Windows), and zoom horizontally with the 'G' and 'H' keys.
| Transport: | Mac | Windows |
| Play | Enter | Enter |
| Record | * | * |
| Stop, return to previous start | 0 | 0 |
| Go to song start | . | . (or ,) |
| Rewind | 4 | 4 |
| Fast Forward | 5 | 5 |
| Set loop start | Drag indicator, or Option-click in ruler | Drag indicator, or Ctrl-click in ruler |
| Set loop end | Drag indicator, or Command-click in ruler | Drag indicator, or Alt-click in ruler |
| Toggle loop on/off | / | / |
| Go to loop start | 1 | 1 |
| Go to loop end | 2 | 2 |
| Click on/off | 9, or C | 9, or C |
| Change tempo | +, - | +, - |
| Environment: | Mac | Windows |
| View front/rear of rack | Tab | Tab |
| Maximise (or select detached) rack | Command-1 | Ctrl-1 |
| Show/hide cables | L | L |
| Show/hide Tool window | F8 | F8 |
| Create instrument | Command-I | Ctrl-I |
| Create effect | Command-F | Ctrl-F |
| Create unrouted device | Shift + create device | Shift + create device |
| Override track-creation for device | Option + create device | Alt + create device |
| Fold/unfold all devices | Option + click fold triangle on device | Alt + click fold triangle on device |
| Reset parameter to default value | Command + click knob/fader | Ctrl + click knob/fader |
| Increase adjustment resolution | Shift + drag knob/fader | Shift + drag knob/fader |
| Sequencer: | Mac | Windows |
| Maximise (or select detached) sequencer | Command-2 | Ctrl-2 |
| Select track | Up-down arrow keys | Up-down arrow keys |
| Toggle Arrange/Edit view | Shift Tab | Shift Tab |
| Horizontal zoom | Command '+' and '-' (keypad) | Ctrl '+' and '-' (keypad) |
| Vertical zoom | Shift-Command '+' and '-' (keypad) | Shift-Control '+' and '-' (keypad) |
| Fold/unfold all tracks | Option + click fold triangle | Alt + click fold triangle |
| Follow song (autoscroll) | F | F |
| Quantize selected notes | Command-K | Ctrl-K |
| Turn grid snap on/off | S | S |
| Arrow tool | Q | Q |
| Pencil tool | W | W |
| Erase tool | E | E |
| Razor tool | R | R |
| Magnify tool | T | T |
| Hand tool | Y | Y |
