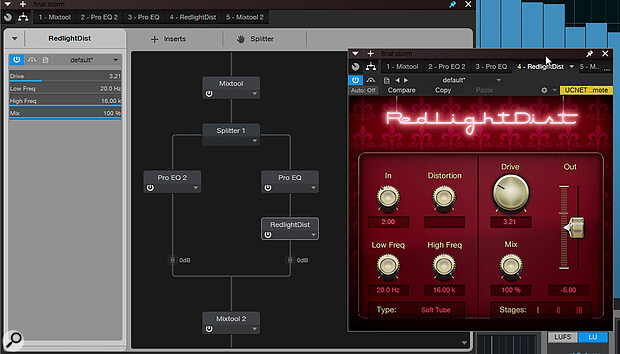
 The top and bottom Mixtool modules are encoding and decoding between L‑R and Mid‑Sides stereo, respectively. The Splitter tool then lets you process the Mid and Sides components separately.
Mid‑Sides processing is your gateway to creative manipulation of stereo sources.
Mid‑Sides processing is an easy way to do interesting things to stereo signals. Engineers have been doing it since the 1930s but sometimes it still feels a bit like a dark art. Studio One has been able to process the Mid and Sides components of stereo signals independently for a very long time, and the process has been streamlined over the last few versions. It’s the sort of thing that should be in everyone’s mixing toolbox and I’m going to show you how to make best use of it in Studio One.
What Is Mid‑Sides (M‑S) Processing?
It’s a neat idea where a stereo (Left‑Right) signal is matrixed into an alternative two‑channel format where one channel contains all the information that’s common to both left and right, whilst the other channel describes how the two differ. The Mid is also known as the Sum, because it’s the sum of the left and right channels; and the Sides signal is sometimes called the Difference, because it’s derived by subtracting the right signal from the left. So the Mid signal will contain everything that’s the same in both the left and right channels, and the Sides will lose anything that’s the same on both sides. If the left and right channels are identical, as they would be if you upmixed a mono recording to stereo, the Sides component will be silent as there’s no difference to represent.
Once a stereo signal has been converted to Mid‑Sides, you can process, compress, EQ, effect and generally mess around with those two parts separately, before it all gets put back together as a stereo signal. Centre‑panned mono sources such as kick and snare drums, bass guitars and lead vocals tend to feature predominantly in the Mid channel, and so M‑S lets you process those elements of your mix independently of widely panned elements such as hi‑hats, guitars, brass and keys.
 Applying EQ cuts to the Mid component of an instrument can help make room for the lead vocal in a mix.
Mixtool
The key to working in M‑S in Studio One is the Mixtool. It’s a useful little plug‑in that can do a number of things, but what’s interesting here is that it will do the M‑S Transform for you in both directions (encoding and decoding). You’d typically insert it before the plug‑ins you want to use for processing and again afterwards so that you get the stereo mix back.
So, start with your stereo track of whatever you want to play with. Drag Mixtool across from the plug‑in browser and hit the MS Transform button. You’ll now hear your mix split differently left and right, with your mono and central parts on the left channel and your wider parts on the right channel. Drop another Mixtool in after it, or copy‑drag the existing one, and normality will be restored to your mix. Now, anything that goes on between the two Mixtools will be in Mid‑Sides. However, if you drop any plug‑ins into the gap between them, you’ll find that they are still processing the Mid and Sides components as if they were the left and right channels of a conventional stereo signal. To get all this working, we either need to use plug‑ins that can operate in ‘dual mono’ mode with independent settings for each side, or we need to separate the two channels so that we can apply mono plug‑ins to the Mid and Sides signals independently.
Routing
This is where the Routing window comes into play. If you’re on the Song page (main track arrangement/session window), look at the top row of the Channel Editor or any inserted plug‑in and you’ll see a row of three icons and then tabs for all the plug‑ins. The first ‘hand of cards’ icon is the Overview or Channel Editor, the second ‘Pacman’ icon is for setting up MIDI and macro controls, and the third ‘Space Invader’ icon is the Routing view — that’s the one we want. (If you’re on the Project or Mastering page, you’ll find the space invader icon at the top left of any plug‑in GUI.)
The Routing window is an extraordinary place where we can construct complex networks of plug‑ins and signal chains. At a basic level it’s like an expanded view of the channel strip. But for our purposes, it gives us access to the all‑important Splitter tool.
In the Routing view, the Splitter tool sits at the top, waving at us in a very friendly way. Click on the word Splitter and drag it between our two Mixtools. You’ll see what it does immediately. By default, the Splitter sends the same signal down both legs, but we want to split off left and right. Over on the left, you’ll see Split Mode. Click on Channel Split and that’s exactly what we’ll have: Mid on the left and Sides on the right. You can use the Mute buttons on the left to turn off either leg so you can hear the Mid or the Sides by itself.
Here’s a tip/oddity. You can also mute a leg by clicking on it to break the connection, but you can only do this if there’s a plug‑in inserted into at least one of the legs.
Ticket To Wide
We are now set up for our M‑S experiments. Let’s test things out by dropping a Compressor plug‑in into both paths, and then muting one so we can hear what’s happening with the other. You wouldn’t often listen to each component by itself because it can sound a bit weird, but it can be useful when experimenting.
What’s interesting about Mid‑Sides processing is that it immediately feels different to applying processing in L‑R stereo, especially on a full mix. It brings a lot of focus to the middle of your mix, making it feel more solid without dulling it around the edges or losing the stereo width. Also, it’s good to push things when you’re experimenting, but M‑S is best used with a modicum of restraint, otherwise things can sound a bit strange.
When working with a mix, drop a Pro EQ onto each side and open up the Mid one. Find some low frequencies to boost in order to add a bit of warmth. On the Sides one, add some high boost to highlight the sparkles and add some high‑end width. At the same time, roll off the bass a bit. This will focus all the bass into the middle. You can do something similar by swapping the Mid EQ for a Compressor to add some punch to the middle.
Manipulating stereo width is fascinating, and you can do this purely by increasing the level of the Sides channel.
I must say that manipulating stereo width is fascinating, and you can do this purely by increasing the level of the Sides channel. I’ve been working with a cluster of harmonies, each of which has a bit of off‑axis panning, but as you push up the gain, they sort of scatter into a wide arc in the stereo field while the main drive of the music and lead vocal stays firmly in the middle. It’s probably more subtle to use EQ to do this rather than a massive boost in gain, but we’re learning and experimenting here.
Instrument Placement
Another great use for M‑S processing, when working with an individual instrument such as keys, organ or guitar, is to shape the Mid signal while leaving the Sides alone. Often, these sorts of instruments can be all over the same frequency range as the drums and vocals. If you roll off the bass in the Mid channel, it will feel less dominant and the kick drum will come through better. Rolling off the top will give you more room for the vocals, but you still have some of that instrument’s energy in the stereo component of the mix. Like we did before, we can push the Sides channel’s top end a little to keep the sparkles wide.
If your vocals seem a bit lost in the mix, rather than boosting them to try to get them to pop over the top of everything else, use some Mid EQ on the other tracks to carve out more space around the vocal frequencies. Then, perhaps, do a little boost just on the midrange of the vocal to give it more presence.
Drums
- One scenario could be that your kick has a lot of reverb that radiates to the sides and pushes it too wide. If you open an EQ on the Sides of the kick track, you can run a high‑pass filter to minimise the spread and keep the kick right in the centre.
- If you have your drum kit routed to a bus, then you could use the Pro EQ on the Mid to keep your kick and snare focused while boosting to the Sides to widen the percussion.
Side Saturation
Adding a bit of saturation to the Sides can bring a nice bit of bite and crunch to those bits around the edges of a mix or submix, such as reverb tails and delay taps, without muddying up the middle.
Use the RedlightDist plug‑in in its Soft Tube setting to add some drive. It will add some width, but also gives it a nice sense of grit. The VT1 also has a good preamp that works well, or use your favourite saturation plug‑in.
 Adding distortion to the Sides of a mix, while leaving the Mid intact.
Ambient Experimentation
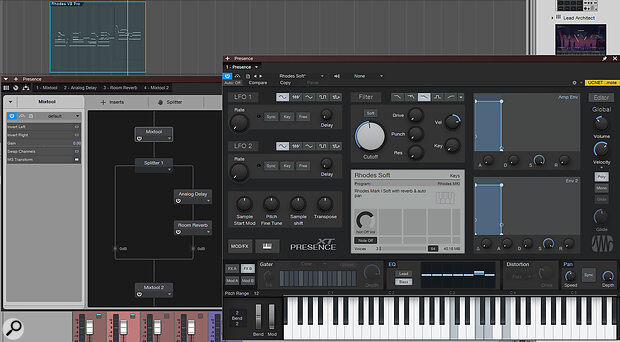
Perhaps my favourite use of M‑S processing is to add exploratory delays to the Sides of an electric piano. I use a little bit of chorus to spice up the stereo field, to give the Sides something to play with, and then drop Analog Delay and Room Reverb onto the Sides channel. This gives you the meat of the piano in the middle, with almost ghostly cascades of delays on higher‑frequency material around the outside.
 A Presence XT Rhodes patch, with reverb and delay applied to the Sides only.
This works beautifully with Presence XT’s Rhodes Soft preset, as it has some panning modulation built in, so you don’t even need the chorus.
I mentioned at the beginning that since Mid‑Sides encoding is essentially adding and taking away, you need to have some difference between the left and right signals in order for it to be worthwhile. But what if you’ve got a mono track, like a synthesizer or lead guitar? Try experimenting with some stereo effects. Adding the Chorus plug‑in is a good start, or the Surround Delay — anything that will give Mixtool some stereo width to chew on. And then you’ll have the opportunity to move these effects out of the Mid and into the Sides.
