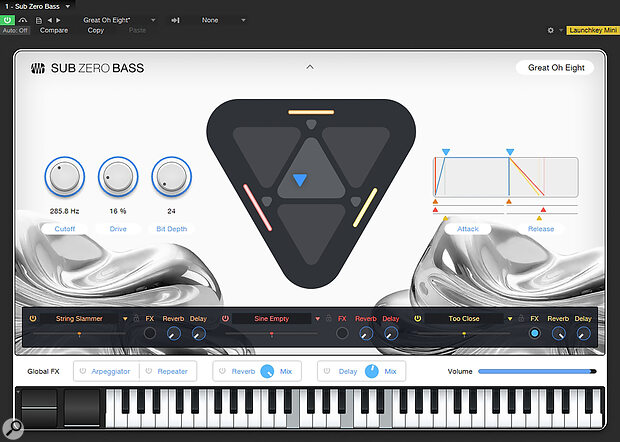
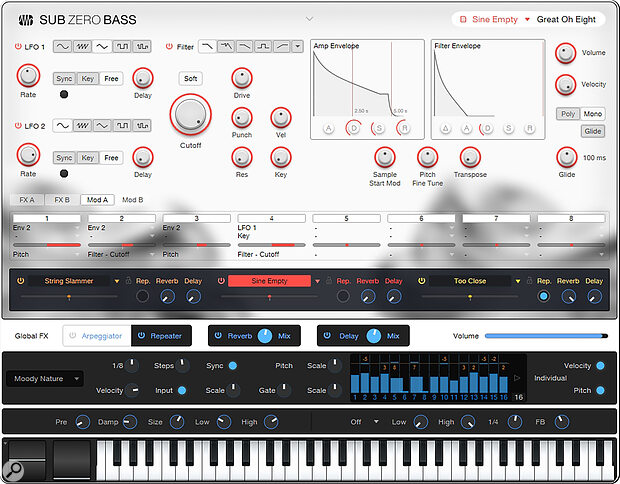
 Sub Zero Bass’ main plug‑in view.
We explore Studio One’s latest instrument, Sub Zero Bass.
PreSonus released version 7.2 of Studio One in early June 2025. This introduced Sub Zero Bass, a new virtual instrument that we’ll explore in this month’s workshop. Other improvements include a reworked Tuner plug‑in with support for open tunings, and the addition of the Nashville Number System to the Chord engine. Patterns now have an auto‑zoom function to focus in on the action, and the visuals have been cleaned up a bit. The other great thing to see is fledgling native support for the Windows ARM platform.
I have a note about updating Studio One that I felt was worth sharing in case anyone else trips over the same thing I did. Due to my general lack of organisation, I accidentally let my Studio One Pro+ subscription expire. When version 7.2 was released, Studio One informed me of the update and encouraged me to upgrade via an inviting Update Now button. I downloaded and installed the update and then found that Studio One wouldn’t open. It told me that “This computer cannot be activated.” There was no other explanation or information offered, and it was never suggested that I was trying to authorise a version of software I didn’t own. Once I’d downloaded and reinstalled version 7.1 everything worked fine, so I realised where the problem was and updated my subscription. The moral of the story is to check that you own the version of Studio One that PreSonus are encouraging you to update to before clicking Update Now.
Ice Ice Baby
This is the fourth new virtual instrument from PreSonus since version 6.6, and it follows a similar format to Cinematic Lights, Deep Flight One and Lead Architect. This one, as you can probably imagine, is focused on low and probably cold bass sounds, but there’s a lot more than just low end on offer here. You have ambient soundscapes, drones, weird noises and sequenced pulses alongside what they call the Attack Bass presets. On the whole, Sub Zero Bass has quite a moody vibe, with an emphasis on dark monophonic sounds within unsettling polyphonic calamity.
Here’s a quick tip on auditioning presets. Ignore the drop‑down preset selection menu in the instrument itself and instead expand the list of presets in the main Browser. You can either double‑click them or, to keep your fingers off the mouse, use the up and down arrow keys on your keyboard and press Enter to load.
Each preset is made up of three individual layers of sample‑based sound generation wrapped in a synthesis filtering and modulation engine. You have two ways of looking at them. The global page houses macro controls that affect the instrument as a whole, and then you have individual editor pages for each of the three layers.
Global Editor
Your eyes are naturally drawn to the big triangle in the centre of the instrument. It’s like a three‑way X/Y or vector pad that allows you to balance the levels of the three layers. Use your mouse to move the little blue triangle about and find your perfect blend of sound. There are some other helpful triangles that give you instant results. The ones at the top, left and right solo the three layers. They are subtly colour‑coded orange, red and yellow, so you can just about tell which is which. If you hover your mouse towards the corners of the triangle, another smaller triangle appears that lets you get the full effect of two layers while leaving the third with nothing.
If you turn on the arp or create a bit of a sequence, the triangular pad is a fun place to play.
If you turn on the arp or create a bit of a sequence, the triangular pad is a fun place to play. Unlike with vector synthesis, you are not blending oscillators; you are mixing entire synth voices. There’s no easy way to map a three‑way control to a hardware control, but you can record automation directly into your track.
With each new instrument, PreSonus seem to make some tweaks to the interface. This time, on the left, we have three clearly defined macro controls. The first one controls the filter cutoff for all three layers at once, and so its effect will be tempered by whatever filter type is active in each. The next two are Drive and Bit Depth. These control the level of the bit‑crusher and distortion effects, assuming they are active, in the three layers. If you’ve turned those off, then these controls will have no effect.
On the right side is an overview of the amplitude envelope. You can control the attack and release for all three layers either separately or together. These changes are reflected in the envelope in the layer editor page, but it’s a great way to quickly reshape your overall sound.
Running underneath are your three layer selections. These tap into an expanded choice of individual instruments that are not accessible through the preset list in the Browser. This adds elements such as hits, raw waveforms, sub‑basses, textures and bass guitar samples. Each one comes with a full editor page for tweaks and sound design. However, you can also load just the samples, leaving the editor as it is, which is a brilliant way of trying out new source material without messing with your programming. This is enabled through the little padlock icon next to each layer’s sound selection window. Underneath are unreasonably wide panning controls for each layer, and then alongside we have send amounts to the global reverb and delay effects, and an FX button which determines whether you want a layer to participate in the Arpeggiator and Repeater.
Lastly, at the bottom, we have a row of Global FX buttons that expand to show their functions if you click on them. Reverb and delay are simple enough, but the Arp and Repeater are a bit more interesting. The Arpeggiator has various playing modes or directions and will respond to whatever keys are held. You can vary the gate length and the velocity, add some swing or push it up a few octaves. But it’s the Pattern mode that brings the grooviest options. With Pattern enabled, the row of notes becomes a rhythmic playground where you can set individual gate lengths and velocities for each note. This is suitably demonstrated by the handful of presets you can select from the drop‑down menu. The Arpeggiator is global, so it’s acting on all three layers at the same; however, you can enable it for each layer separately, so you can have some layers grooving and others playing as normal.
The Repeater fools you into thinking it’s just a ratchet effect to repeat a played note. However, if you enable the Pitch and Velocity options, you can turn it into a 32‑step sequencer that plays and is transposed by every note you push. Again, there are some great presets here that show off the potential. Check out the two Scale knobs for some added spice.
Layer Editor
As we’ve come to know and love, Studio One will provide you with at least three ways to do a thing. So it should be no surprise that you can get to the layer editor by either clicking the little arrow above the triangular vector pad, clicking on the preset name at the top right, or clicking on the actual layers at the bottom. For the first two options, you will be returned to the last layer editor page you looked at. When you do so, a drop‑down list appears next to the preset name, giving you another handy place to select the sound for that layer. It’s also here that you have an opportunity to store an edited layer as a layer preset.
The layer editor looks a lot like a synthesizer, but as you look a bit closer, you realise that what appear to be the oscillators, with different waveshapes and whatnot, are actually LFOs for modulation. There are, of course, no oscillators because our sounds are constructed with samples rather than raw waveforms.
The two LFOs are identical, with sine, sawtooth, triangle and square waveforms, along with sample & hold. You have a Rate knob for free speeding, or you can sync to the project. A handy Delay knob lets the modulation drift in after a set amount of time.
Over on the right are two envelopes: the amp envelope and the misleadingly named filter envelope. The amp envelope is hard‑wired to control the level of the output. The filter envelope has no such connection and doesn’t do anything at all until you map it in the modulation matrix. Much time can be lost trying to get the filter envelope to do something when you have yet to familiarise yourself with the matrix. So, let’s do that.
It’s easy to overlook the mod matrix when simply using the presets, but there are 14 sources and 18 destinations for you to explore.
The Matrix
The modulation matrix is a really powerful element of these instruments. It allows you to route any two modulators to virtually all of the main parameters. And you have 16 slots, so things can get pretty wild in here. You won’t see the matrix initially because it will be hidden behind the FX panels. So click on Mod A, and you’ll get to the first eight. To direct the filter envelope to the filter, click in the first empty space in slot 1 and select Env2 from the list of modulation sources. Then you have a slider that looks a lot like the pan control, which you can use to set the amount, positively or negatively, that you wish to send to the destination. Finally, click in the space underneath the amount control to select a destination. In this case, we want Filter Cutoff. It’s easy to overlook the mod matrix when simply using the presets, but there are 14 sources and 18 destinations for you to explore.
 The modulation matrix is key to in‑depth editing of each layer. At the bottom of the GUI, the Repeater section has also been expanded to show its surprisingly powerful sequencing capabilities.
The filter in the middle has nine different types, including multiple low‑pass, high‑pass, band‑pass and notch filters. Along with resonance, you have control over drive, punch, velocity, key following, and you can enable soft‑clipping. The filter can get quite fierce under the right circumstances.
For layer effects, we get six little boxes. They include one modulation effect (from a choice of of chorus, flanging or phasing), the bit‑crusher and distortion that can be accessed from the global page, some EQ, a panning effect, and a gater that can add some rhythmic flourishes to your sounds.
Sub Zero Bass is a decent addition to what is turning into a nice library of sounds bundled with Studio One. It’s a very creative use of the Presence XT sound engine, and I hope PreSonus keep these new instruments coming. What would be even better would be for them to work a physics engine or movement recorder into the triangular vector pad, so you could send the little triangle off on a looping modulation journey...
