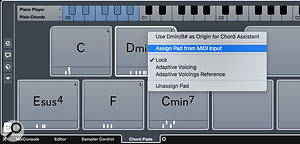
 Screen 1: A combination of Groove Agent SE and the Chord Pads feature can make live loop triggering possible in Cubase.
Live loop triggering may not be Cubase’s raison d’être, but it can be done...
Last month, I demonstrated how to use Cubase’s Arranger to trigger pre-configured song sections on the fly, whether in a gig setting or to improvise a performance of a particular song/project in the studio. This Arranger Track approach is perhaps best suited to triggering complete song sections, but what if short loops are more your thing? What if you want to layer different loops on the fly? Step forward Groove Agent SE!
GA SE Into The Abyss
GA SE, bundled with Cubase, is an easily overlooked gem. Its primary role is as a virtual drum instrument, but, as a number of the kit presets show, GA SE’s pads can also be used to trigger samples of all sorts — including audio loops. As you can also create your own ‘kits’, with different samples on each pad, there’s nothing to stop you building a complete GA SE kit comprising only audio loops.
To start from scratch, create a new Instrument track with an instance of GA SE. By default, this should give you a Beat Agent kit with no samples loaded; you just drop your loop samples onto a selection of the Instrument pads. There are eight banks of 16 pads, so you’re unlikely to run out of slots, though, as I’ll explain, you may run out of fingers! The default bank (bank 3) is a good place to start; MIDI note triggers start at an easy-to-remember C1, and extend up to D#2. If you intend to use an external MIDI controller with drum pad triggers, rather than a keyboard, you’ll need to match the MIDI note mapping to GA SE.
Audio loops can be dragged and dropped onto pads from the Project window, MediaBay or your OS’s file browser. Note that exactly where you drop a sample on a pad (top, middle or bottom) changes the way the sample is handled on import. A set of related audio loops can be imported as a single operation; simply select all the samples, drag them and hover the mouse over the lower third of the first empty pad to be used. Releasing the mouse button will place one sample onto each of a consecutive set of empty pads — very slick, quick and easy! One thing that’s worth noting is that you can drag-and-drop to create new kits and you can edit them, all while your Cubase project is playing back. Another thing to note is that if you use the scissors tool to split out a shorter section of a loop on the Project page, and then drag this region to GA SE, the sample start/end markers will match those of the region. So you can easily, say, trim out a kick or snare drum from a loop and assign it to a key via GA SE, without ever halting playback.
Sample Behaviour
GA SE offers a huge range of editing options for samples, but when working with loops the main options you’ll want to consider are those in the Samples tab. As shown at the bottom-left of Screen 1 (above), I’ve set the playback mode to Until Release. This forces your loop to play for as long as you hold down the MIDI trigger note. The Sync switch is linked to the Key On Del(ay) setting and can be thought of as a sort of real-time quantise. However, unless you set a very short bar division (for example, 1/32nd), it can make playing your loops feel a little unresponsive (I’ve therefore turned it off here). In the lower-right area, I’ve set the AudioWarp and Sync settings to Music and Tempo respectively. This combination simply means that your audio loop will be tempo matched to the project’s global tempo. But whether GA SE gets this right depends on GA SE’s ability to extract accurate tempo information from each of the original files. If things aren’t sync’ing nicely you can adjust the original tempo setting once the file has been imported, but it’s worth noting that life’s much easier if you get it right on import. The MediaBay offers the option for re-checking the original tempo of a loop, if required, prior to import.
Trigger Happy?
That can be enough to start playing: you simply start triggering loops in any combination you like and (the accuracy of your playing aside) they should stay in sync. Note that triggering is velocity sensitive, so you can also use your playing dynamics to adjust the mix balance between the various loops in your set.
I mentioned earlier that there are some cons, though, and one limitation will soon become obvious to anyone who’s used a dedicated ‘live’ loop-triggering device such as Novation’s Launchpad: loop playback doesn’t ‘hold’. This means that, rather than hitting (and then releasing) a note to trigger a loop, with playback continuing until you hit that same note again, with the GA SE setup I’ve described you must hold the note for as long as you wish the loop to play. In practice, when you just want three or four loops playing at the same time, this is no big deal, but by the time you get to seven or eight loops, it can start to feel like a game of tabletop Twister! As we’re trying to squeeze a function out of GA SE that it wasn’t really designed for, perhaps we shouldn’t be surprised by that. Nonetheless, Cubase’s Chord Pad feature gives us a workaround. I wrote about the Chord Pads back in SOS May 2015 (http://sosm.ag/may15-cubase — though it’s since been refined somewhat). When this is activated on a track, you can trigger even complex chords from a single MIDI note.
 Screen 2: By combining the various Chord Pad options, you can use a Pad to trigger useful combinations of your GA SE loops from a single MIDI note.One user option for the Chord Pad feature is to define exactly which MIDI note combinations are triggered by each Chord Pad. You do this by right-clicking on a Pad and using the ‘Assign Pad from MIDI input’ option (see Screen 2); hit some notes on your MIDI keyboard and the Chord Pad ‘learns’ them. You should then also disable the ‘Adaptive Voicing’ option and then engage the ‘Lock’ option for each Pad; with this done, only the notes you have linked to the Pad will be played when you trigger it.
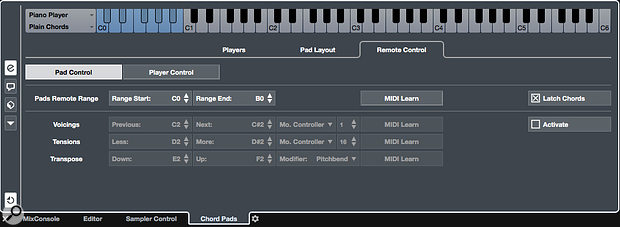
The trick is to set up a few Chord Pads with note combinations that trigger ‘good’ combinations of your GA SE loops, giving you a single finger trigger for those multiple loops. Providing you set the Chord Pad triggers to work in a different note range to that which GA SE is using for the individual loops (you do this in the Remote Control tab via the Pads Remote Range in the Chord Pad editor), then you get the best of both worlds: triggers for individual loops and, using the Chord Pads, triggers for particular loop combinations. Do note that Cubase will still try to work out the harmonic relationship between the various notes within your ‘chord’ —you just have to ignore the chord labels that it generates.
 Screen 3: The Pads Remote Range should be set so it doesn’t clash with your GA SE pad triggers. You can also engage the Latch Chords option to reduce the chance of broken fingers!
Holding On
As shown in Screen 3, the Chord Pad section has one further setting that, rather temptingly, suggests it might solve another limitation of our GA SE-based loop-triggering tool — the Latch Chords toggle. As mentioned earlier, a dedicated tool like Novation’s Launchpad ‘holds’ a loop active until you hit the trigger again; you don’t have to leave a finger on it all the time you want the loop to play. The Chord Pad’s ‘Latch Chords’ option sounds like it might offer something similar, and it does... but with the catch that, with ‘Latch Chords’ engaged, you can only ‘latch’ one Chord Pad at a time. As soon as you press another Pad, the previous one is toggled off. That’s not a huge compromise, though, as this behaviour allows you to ‘hold’ a single Chord Pad (which, in turn, ‘holds’ a set of your GA SE loops) while, at the same time, you can drop other individual loops in/out via the GA SE note triggers. And with this approach, our fingers don’t have to do quite so much dancing!
All Together Now
OK, so this GA SE approach to loop triggering might lack some of the bells and whistles offered by a dedicated (software or hardware) live looper setup, but if you like to keep everything ‘in house’ Cubase will get you up and running. And you can, of course, combine last month’s Arranger Track approach with the GA SE loop triggering I’ve described here.
There are some other possibilities to investigate in future workshops, though. For instance, given that all the triggers used can be derived from MIDI data, you could record that MIDI input so that you can edit the ‘performance’ later. However, if you want to capture an audio version of your performance, perhaps as a multitrack audio session that might later be mixed elsewhere, things aren’t quite so simple. Another avenue to investigate is what GA SE can do with MIDI loops, rather than audio ones: GA SE offers some really useful facilities for sync’ing playback, and you could, if you put your mind to it, build something quite special in GA SE for live performance. Anyway, all this relates to the Cubase and VSTi audio routing system, and that will have to be a topic for another article on another day!
