Sometimes, nothing beats the unpredictable swoosh and whoosh of the classic tape flanging effect. And you can recreate it in your DAW...
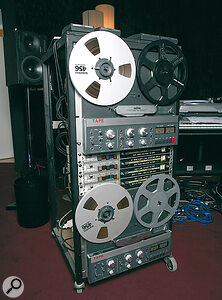
 The classic ’60s flanging effect employed two tape machines, one with varying speed to pull it ahead and push it behind the other during playback.You may recognise ‘flanging’ from plug‑ins or guitar pedals, but it was originally created with either two turntables or two tape recorders, each playing the same audio, and their signals then being mixed together. Importantly, one playback device had variable playback speed, and changing that speed caused phase additions and cancellations — it’s these that created the famous ‘jet aeroplane’ sound of the psychedelic ’60s.
Over the years, flangers became modulation effects in their own right, but they lost the vintage flanger vibe along the way. Specifically, classic flanging’s climax occurred at the ‘through‑zero’ point — that’s where the variable‑speed unit was polarity‑inverted, so that when it was sped up or slowed down to re‑sync up with the other device, the combined sound of the two devices briefly cancelled out. Digital delays can’t go into the future, of course, so unless designers specifically set out to emulate the through‑zero effect, their flanger’s sweep almost makes it to the climactic top of the flanging cycle — but always falls short.
Also worth noting is that tape flanging didn’t use LFOs: the physical motors had inertia, and that made the flanger sweep somewhat unpredictable. This in turn created excitement: you never knew when the sweep would hit the through‑zero point.
Unless designers emulate the through‑zero effect, their flanger’s sweep almost makes it to the climactic top of the flanging cycle — but always falls short.
Today, there are a couple of DAW plug‑ins that can emulate the through‑zero effect — Apogee’s Clearmountain’s Phases, for instance (reviewed in SOS March 2022) — and model some of the other features of vintage flanging, though most plug‑ins don’t do it all. Thankfully, if you have a DAW with built‑in parameter modulation, you can replicate the sound and excitement for yourself.
Below, I’ll do just that, using Cubase 14’s Modulators and Multi Track Presets, and this time as well as providing an audio example on the SOS site. I’ve made available a Cubase Multi Track Preset, so those who use the same DAW as me can dig in a bit deeper, available to be downloaded on the right of this page.
Basic Track Setup
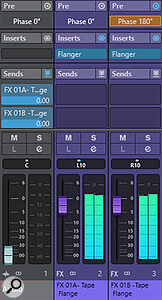
 My vintage flanger setup in the Cubase MixConsole. If you use Cubase, you can download this setup from the online version of this article as a Multi Track Preset.
To create the flanger effect, the Multi Track Preset requires two Cubase FX tracks to emulate different playback devices, one of which is variable in speed. In the first screenshot, you can see that the audio track on the left, with its channel fader pulled right down, feeds the two FX tracks with separate pre‑fader sends (note that these must be added manually if you download the Vintage Flanger.trackpreset file). The Pre section’s Phase button sets the signal polarity. You can see that the second FX track has this inverted (orange button, top‑right), and that will deliver the ‘hollow‑sounding’ negative flanging effect. For positive flanging (a more ‘zinging’ sound), switch that back. For classic, through‑zero flanging, we require inverted polarity.
The FX track panning is offset somewhat, simply because analogue machines never had perfect cancellation at the through‑zero point. This slight panning shift is a simple way to prevent 100 percent cancellation.
The Flangers
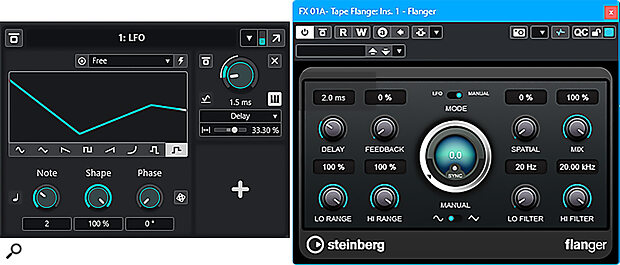
The main flanger track (FX Track 01A) includes Cubase’s stock Flanger effect, but this is controlled by a Modulator that varies the delay time. The Flanger in Track 01B has identical settings, but this one is not under Modulator control — it has a fixed delay time of 2ms. Note that both flangers are in Manual mode — so if you’re trying to recreate the settings from the screens manually, the Sync, LFO Rate, Lo Range and Hi Range controls are all irrelevant. Both Mix controls need to be 100 percent (all effect, no dry sound). Increasing the Spatial parameter creates a different type of sound, but this dilutes the flanging effect somewhat.
 The Flanger plug‑in settings for the variable‑speed flanger inserted in FX Track 01A.
The Modulator is the key to vintage flanging. Here, it sets an initial delay time of 1.5ms, which is ahead of the Flanger with the fixed delay (2ms). The random waveform, and long sweep time, are characteristic of vintage flanging. Setting Shape to 100 produces a smooth, continuous flanging effect.
As the Modulator varies the Flanger’s delay time, though, it occasionally overtakes the 2ms fixed delay, then crosses over it again on its way down to a longer time, producing the through‑zero flanging effect. Like real flanging, you’re never quite sure when that through‑zero is going to happen, which just adds to the sense of drama — which you can hear for yourself in the audio example.
Finally, note that there is an inherent 2ms delay in this effect. In most cases, you won’t notice this. But if you find that it’s an issue, simply move the track being processed 2ms earlier on the timeline.
And now you have the sound of ‘Itchycoo Park’, ‘Bold As Love’, ‘Life In The Fast Lane’, ‘Head Over Heels’, and so many more! Grab your bell‑bottom pants, Nehru jacket and love beads, and head back in time to when flanging was a mechanical — not an electronic or digital — effect.
True Confessions: I Burned Out The Hendrix Tape Machine!
The sound of true tape flanging was burned into my brain from sessions in 1968 at the Record Plant, which followed the sessions for Hendrix’s Electric Ladyland. The flanging setup was complex, so engineer Tony Bongiovi (who worked night sessions for Hendrix and engineered our album) left it set up for us to use. Yes, of course we used it — and to Record Plant co‑founder Gary Kellgren, wherever you are now, I’m still sorry that I burned out the tape recorder’s capstan motor by being too aggressive with the variable speed control!
