![]() Screen 1: My Control Bar configuration, including six Custom module buttons.
Screen 1: My Control Bar configuration, including six Custom module buttons.
Speed up your work by tailoring Sonar’s look and feel.
Everyone has different needs, and the ability to customise a program can help optimise its interface to your specific requirements. Although you can’t exactly dig into the code to create the features you want (well, at least I can’t), there are still many ways to make the latest version of Sonar do your bidding.
Take the customisable Control Bar, for example. This offers editable module position, size and order, as well as ‘single-click’ function buttons. I posted a thread called ‘Show Us Your Control Bar’ in the Sonar forum, and was surprised by the variety of user customisations. I tried out several, but particularly liked one from forum member Spencer. As he stated in his post, “The Custom module is at the left, where I would instinctively look for menu functions. The Mix module is aligned with the [track view’s] mix functions. The Playback module ties together the tracks pane and the clips pane. Tools, snap, loop and markers are right above the clips pane for minimal mousing distance. The Event module is before screensets, to space things out a little.”
This seemed like a useful layout, but I did make some changes, mostly for the Custom module single-click functions (the six buttons on the left of the Control Bar in Screen 1). I already use custom key bindings extensively, so I chose functions that didn’t have existing key commands, or that were a few layers down and would benefit from single-click functionality. I also set the module size to medium, because more than six buttons isn’t necessary (at least not yet, but I can always set it for nine buttons later on).
When you right-click on a button, you can assign menu items or commands to it. All the ones you can see in the screen are menu items, except for the Solo All Selected Tracks command (note that when the daunting list of commands appears, you can just type ‘S’ until you hit Solo All Selected Tracks).
- Show Icons (Views / Icons / Console / Show Icons) makes it easy to toggle the console icons; turning them off opens up a little more vertical space in a channel strip.
- Settings (Process / Nudge Settings) simplifies the nudge settings.
- Full Screen (Window / Full Screen) is one click away.
- Solo All Selected Tracks (Command) is something I don’t use often enough for a key command, but when I do need it, I want to be able to access it quickly.
- Info (Project / Info). This page is the ideal place to write lyrics, add notes and document sessions.
- Gain (Process / Apply Effect / Gain): for applying gain changes when working on vocal phrases, it’s easier to click this than to go through the menus.
Colour Supplements
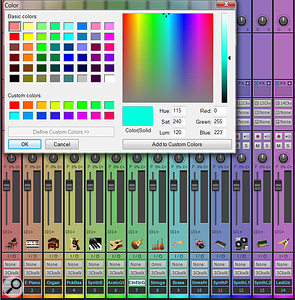
Some Sonar users have requested more vivid track colours as an update, but in fact it’s possible to do that in Sonar’s current incarnation. Click on the Track Color bar in the Console or Track View to bring up the colour picker. You’ll see 12 default colours, but click on ‘Other’. Choose a colour, then for the brightest coloration, enter 240 for Saturation and 120 for Luminance. Click on OK. Screen 2: Maximising the saturation and choosing mid-level luminance can really make colours pop.
You can also ‘brighten’ an existing track colour. When you first click ‘Other’, you’ll see the current colour parameters. If you modify them as described above, having first picked a custom colour box and created your colour, clicking on Add to Custom Colors will add the colour to that box. You can fill each of the 16 boxes with your favourite custom colours, and the colours will persist so you can use them in multiple projects.
Also note that entering different values for Red, Green and Blue can give ‘purer’ colours. For example if you want yellow to be really yellow, enter 255 for Red and 255 for Green so that there are equal amounts of each colour in the mix.
But this isn’t just about looks. The more intense the saturation, the easier it is to differentiate subtle colour differences. For example, all guitars could be slightly different shades of blue, all vocals shades of green, and so on.
Project Templates
Project templates have been around since the dawn of Sonar time, but some people still just call up the default ‘normal’ template. You wouldn’t build your studio from the ground up each day — and you needn’t do that with a virtual studio, either. I have templates dedicated to pop songwriting with MIDI instruments, orchestral writing, guitar-based song recording, dance music and so on. Even a simple template, like one set up to record guitar and vocals for songwriting, can shave minutes off your sessions. It’s best not to define a Project Template too restrictively, though; you don’t want it to force you in a particular direction. Think of a template as a way to set up for a session.
Location, Location
The more I use the browser, the less I leave the Sonar environment. As I often drag files to and from the desktop, the desktop is an ideal candidate for the browser’s Content Location drop-down menu. You can choose any folder as a content location (although you can’t specify entire drives); to do so, navigate to the desired folder using the browser, then double-click on it to open it. If the folder name shows up in the browser’s drop-down menu, you can save this location — just click on the floppy disk icon.
You can delete any location you create by selecting it, then clicking on the red ‘X’. Locations created by Sonar can’t be deleted that easily, but Sonar expert Steve Cook has come up with a way to delete them if you’re comfortable with editing the Registry. Open regedit.exe, and note that the browser locations are stored in HKey_Local_Machine/Software/Cakewalk Music Software/Sonar/Platinum [or whatever your version is]/ContentLocations. Click on ContentLocations. In the right-hand pane, right-click on the entry you want to delete, then choose Delete. As always, it’s prudent to back up the Registry before you attempt to modify it — one wrong keystroke, and you could be in serious trouble!
Slim Down The Drum Maps
When you select a drum map, there’s a long list of options, so why not slim it down to only the drum sounds you actually have? The Drum Maps default to C:/Users/[your user name]/AppData/Roaming/Cakewalk/Sonar [your version]/Drum Maps, but you can modify this in Preferences. Although you can delete the drum maps, you can also create a folder in the Drum Maps folder called ‘Unused’ (or whatever name strikes your fancy), then dump all the ones you’re not using in there. The folder won’t show up when you want to select a drum map, but the maps will still exist if you ever need them.
Control Yourself
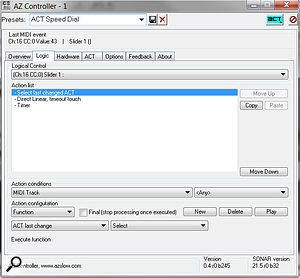
Several Sonar users have developed utilities for the community, and Alex Zhelezov’s AZ Controller plug-in is one of the most deep, useful and interesting ones. It’s a control surface plug-in that offers a huge array of features, and is currently free of charge. Sonar already include plug-ins for specific control surfaces such as the Mackie Control, StudioMix, Roland VS20, PreSonus Faderport and so on, but some of these are fairly dated, and with the proliferation of controllers, it becomes increasingly difficult to support so many. Screen 3: The AZ Controller plug-in can provide deep integration between Sonar and just about any hardware controller.
AZ Controller is like the Cakewalk Generic Surface plug-in on steroids (and maybe with a couple of Red Bulls, too). Although the layout may look user-hostile at first, stick with it — the AZ Controller web site at www.azslow.com has thorough documentation but, more importantly, includes quite a few tutorials that can cut through the complexity and let you uncover useful functionality in a short period of time.
I became convinced of the value of AZ Controller when I couldn’t control Sonar’s transport with the transport buttons on Akai’s Advance 49 MIDI controller. I tried all the conventional options, but then thought to give AZ Controller a try. Within about 10 minutes of completing the quick-start tutorial (and discovering I had to set the transport controls in the Advance 49’s global menu to CC), Sonar and the Advance were talking to each other.
AZ Controller’s ‘Speed Dial’ mode for ACT control can also be helpful and easy to set up. If trying to use ACT makes your head explode, with Speed Dial you just change a virtual control slightly, then turn a hardware control to map the two temporarily. You don’t have to do ACT Learn, call up the ACT templates, or anything like that. It’s quite simple. There are additional options, like having direct parameter control where the on-screen control jumps to the position of your physical control, or a ‘catch’ mode where the hardware control has to go past the current software control position to change it.
Don’t be scared off by the length and detail of the main documentation. Just because AZ Controller can do just about anything doesn’t mean you have to use everything it can do. It will take you an afternoon of playing with it and going through the tutorials before getting up to speed, but the payoff is worth it.
