Pro Tools’ MIDI capabilities continue to evolve.
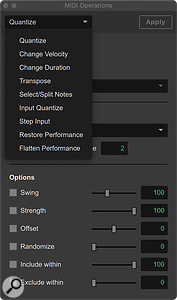
 MIDI Operations floating window.While Pro Tools has long been held in high regard for audio post and professional music production, it’s fair to say that its MIDI capabilities have lagged behind those of some other DAWs. Yet, in recent releases, Avid have given Pro Tools’ MIDI features sustained attention, with suites of changes introduced in Pro Tools 2024.3 and then in the more recent 2025.6 update. In addition to the introduction of Ableton‑style non‑linear composition and arrangement, courtesy of Pro Tools Sketch, the arrival of MIDI plug‑ins in 2024.3 was a notable development, and more practical enhancements introduced in 2025.6 add workflow and technical refinements to Pro Tools’ MIDI features.
MIDI Operations Window
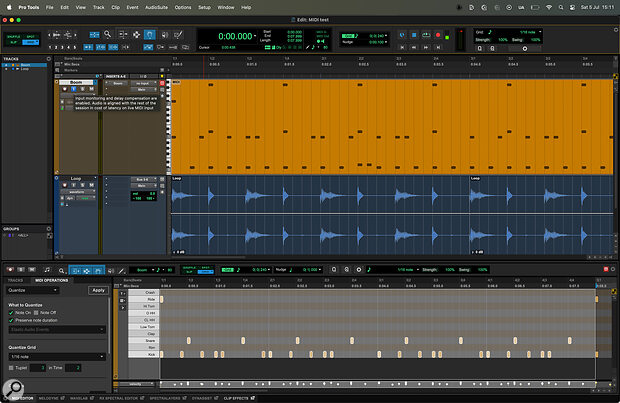
A key part of this is the reworking of the Event Operations window, now renamed MIDI Operations and given a more logical placement within the MIDI Editor. Previously these tools for refining MIDI data were tucked away in the Event menu, with the unintuitive title of Event Operations giving no immediate indication that it was used for MIDI. This has been moved to the place it’s most likely to be needed: a tab in the MIDI Editor itself. There are of course two MIDI piano‑roll editors in Pro Tools — the docked and floating editors — and the MIDI Operations tab is available in both, tabbed together with the Tracks List at the left of the piano roll. However, it’s not available in the Score Editor or the MIDI Event List, which also function as MIDI editors.
 The MIDI Operations window replaces the old Event Operations menu, and brings together a host of useful MIDI tools. It can be opened as a floating window (see above), or within the docked MIDI Editor (shown here).
The contents of the old Event Operations window have been inherited wholesale by the MIDI Operations window, but the layout has been updated to a drop‑down, menu‑based interface. The previous interface used a system of disclosure triangles to show and hide sections of the window, but the version before that used a drop‑down menu interface, so this could be seen either as an update or as reverting to an older layout!
In practice the new window is just as easy to get around as long as you know that using Command+up/down (Control+up/down on Windows) can be used to step through the different pages. Be aware that if you are using the on‑screen MIDI keyboard and it has keyboard focus (indicated by the minimise and close buttons in the top left being coloured), this will interrupt these shortcuts, stopping them from working in both the MIDI Operations tab and the docked MIDI Editor. This is true of any floating window, but the keyboard window doesn’t need to be focused to respond to key presses.
The floating MIDI Operations window is accessed from the Event menu or by using Option+Numpad 3 (Alt+Numpad 3 on Windows). The availability of the floating MIDI Operations window has a couple of other benefits. With the drop‑down menu interface, it’s no longer possible to display two sections at the same time. For example, I might want to have Quantize and Select/Split Notes visible simultaneously, and while this was possible with the disclosure triangles in Pro Tools 2024.10, it can’t be done in 2025.6. A workaround is to use both the tabbed and the floating MIDI Operations windows at the same time. Another floating window‑specific feature is the use of keystrokes to access each page directly. if you look in Event / MIDI Operations you’ll see that keystrokes such as Opt/Alt+0 for Quantize and Opt/Alt+T for Transpose are available. The MIDI Operations menu in the docked editor is useful and is a good addition, making Pro Tools more useable, particularly for those who are new to the platform. But, as already discussed, there are still good reasons to use the floating MIDI Operations window.
Custom Note Labels
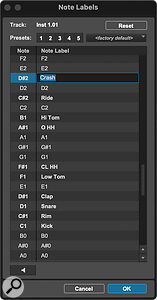
 You can now give MIDI notes custom names — very useful when working with drum instruments and samples!
The MIDI experience is also enhanced by the introduction of Note Labels. The ability to assign custom names to MIDI notes when using unpitched samples is particularly beneficial for drum programming and non‑tonal MIDI instruments, and the implementation allows for custom naming of notes directly on the piano‑roll keyboard or from the Edit Note Labels Window. Labels are retained with the session and also in presets, offering a much‑needed layer of clarity. Anyone who has ever found themselves playing an impromptu chromatic scale hunting for a sample will appreciate this one. A dedicated Note Labels view lets users filter the display to show only labelled notes, making navigation in densely populated sessions far more manageable.
MIDI Thru
If you want to use a MIDI controller or the on‑screen keyboard for live control of instruments in Pro Tools, you’ll need the MIDI Thru option, enabled under the Options menu. If you are using a hardware synth as a MIDI controller, you should also set Local Control to Off on your instrument to break the internal connection between the keyboard and sound engine, or you’ll trigger the sounds twice — once on the instrument itself and once more via Pro Tools.
A Default Thru option was removed when Input Monitoring for instrument tracks was first introduced, but it is now back and more flexible than before. Any MIDI or instrument track can now be designated as a Default Thru destination, enabling monitoring of designated MIDI inputs when no other tracks are explicitly record‑armed. To do this, Command‑click on the Input Monitoring button in the desired track.
MIDI Delay Compensation
Like audio tracks, instrument tracks in Pro Tools are automatically placed into Low Latency mode — with delay compensation disabled — when record‑enabled or set to input monitoring. This ensures a more responsive playing experience when using a MIDI controller, as the system bypasses plug‑in‑induced latency on that track to reduce monitoring delay.
However, there are cases where you may want to override this behaviour and keep delay compensation active even during input monitoring. A common example is when using instrument plug‑ins that have internal sequencers. For instance, if a drum machine plug‑in is running in sync with an audio drum loop, and other tracks in the session include latency‑inducing plug‑ins, Pro Tools’ delay compensation keeps everything in time during playback. But if the instrument track is record‑armed or input‑monitored, delay compensation is suspended for that track, and the internal sequencer’s clock is no longer offset to account for system latency — causing it to play out of time with the rest of the session.
To prevent this, you can right‑click the track header and select MIDI Delay Compensation. The ‘i’ button in the track header will turn blue to indicate it is active. With this enabled, delay compensation is restored on the input‑monitored track, keeping sequencer‑driven instruments locked in time with whatever else is in your session.
There are also times when you might want the opposite to happen, and for these cases, Pro Tools 2025.6 introduced MIDI Live mode.
MIDI Live Mode
This feature directly addresses a long‑standing issue in Pro Tools: the mismatch between the timing of MIDI note recording and the audio output of virtual instrument tracks during live performance.
To understand the purpose of MIDI Live Mode, consider a common scenario. When recording MIDI into an instrument track that hosts a virtual instrument, Pro Tools usually records note events precisely at the time you press keys on your MIDI controller. However, because virtual instruments are subject to system buffer latency, what you hear during performance is actually slightly delayed relative to when the MIDI was recorded.
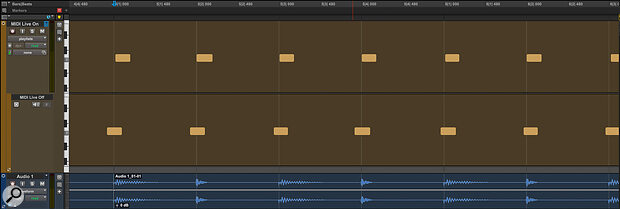
 MIDI Live Mode will compensate for the delay between a MIDI note reaching your virtual instrument and the instrument outputting audio. It’s enabled on the top track, and you can see that the Note On messages line up exactly with the audio at the bottom.
If you’re the kind of player who always quantises their MIDI as a matter of course then this doesn’t represent an issue, but if you don’t quantise, it can be significant because for such musicians, this discrepancy can lead to recorded MIDI appearing slightly ahead of the beat. This isn’t necessarily due to poor timing, but because some players intuitively adjust their timing to compensate for buffer latency, playing slightly early so the sound feels in time. The result is that the latency compensation that Pro Tools imposes results in MIDI data that doesn’t reflect what was heard during the performance. This discrepancy can become especially noticeable if you are recording the audio output of the instrument simultaneously: the MIDI and the printed audio don’t line up.
MIDI Live Mode changes this by shifting the recorded MIDI to align with the audible output of the instrument as heard during performance. In other words, what you hear is what you get: the MIDI now matches the audio timing, which is especially useful for performers who rely on their ears rather than a grid when playing in real time. MIDI Live Mode is enabled by a global toggle located in the Options menu, allowing users to choose the behaviour that best suits their session context.
These features aren’t headline grabbing but they arguably make more difference than any number of bundled virtual instruments would.
How our DAWs handle latency is something we as users would rather not have to think about. Anyone who has used an HDX or Carbon system knows that, while we can work with latency, it’s really nice not to have to! These features aren’t headline‑grabbing but they arguably make more difference than any number of bundled virtual instruments would. Taken together, these changes mark a worthwhile evolution in Pro Tools’ MIDI handling, focusing less on flash and more on everyday usability and timing accuracy.
