When you're thrust into the driving seat for a tour with Scotland's biggest rock band, you need a desk that's not only powerful, but also quick to learn and easy to use. Enter Allen & Heath's flagship live mixer...
I'm known as a fan of analogue desks, but needs must, and when a tour came in where the only practical choice was digital, I looked around for what to use. There is a fair selection of choice in the upper end of the market and as the shows were headline festival slots, I had the luxury of being able to choose from any of the more commonly available desks.
Having recently been out on a small theatre and club tour, picking up a different desk every night, I had already ruled out some models. I won't name names, but some I didn't like the sound of, while some I found just lacked the flexibility and power I needed. In the end it came down to just two or three choices. And when a colleague phoned me up having just got back from a tour raving about the Allen & Heath dLive, it tipped the scales.
I have to say that I do have a relationship with Allen & Heath. I have lent them some of my effects units and mic preamps to be modelled. In return, they loaned me a mixer for a tour to mix effects returns. It was the entry-level Qu–Pac, and it was so simple to use. Even better was that everyone said that the dLive shared its sibling's simple user-friendly interface — see the 'Perfect Harmony' box. I had never mixed a show on an Allen & Heath digital console, however, so it was a leap of faith, but one I was willing to make, with some reservations.
As an engineer who rarely gets any pre-production time, I needed a console that I could get to grips with quickly. I was going straight into a festival run with Scottish rock giants Biffy Clyro, whom I had not worked with before, so I had to be confident I could achieve a mix quickly, and one that matched the band's and my expectations. So I headed down to Allen & Heath's HQ for a day with the dLive, a hard disk of live tracks in my bag.
Patch Work
Allen & Heath are based in Penryn, Cornwall, where they have a nice modern facility that houses the offices, R&D, and some manufacturing. The main manufacturing is based in China, but tightly controlled from the UK. I was greeted by Lead DSP Engineer Anthony Evans, who ushered me into the mix room, a curtained-off office deep in the building, with a small PA system and a dLive S5000 for me to try. After a bit of almost inevitable messing around with networking we had connected my MacBook Pro to the desk and set it up in 'virtual soundcheck' mode. For those of you unfamiliar with the concept, a virtual soundcheck allows you to record the desk channels via a network such as Dante or, in this case, Waves SoundGrid, onto a laptop. This recording can then be played back through the same input channels, allowing you to seamlessly switch between recorded and real-time inputs. This is invaluable when you don't get enough time with the actual instruments, such as in my case where there would be little or no time for soundchecks.
 The dLive S5000 getting a workout with Biffy Clyro at Indie19 festival, Ireland.Using a show recorded the year before by the band's previous engineer, I was able to patch the channels to the desk as I would when doing it live. Patching the dLive is easy. A dedicated I/O button on the surface opens the patching window. This tells you which stagebox is connected — in this case a DM64 stage rack, which gives you 64 mic/line inputs and 32 outputs. The DM64 also has three card slots, one of which was taken up with the Waves V3 SoundGrid network card that we were using to connect my laptop. Patching takes place in a standard grid–style page, but that page is easily zoomed in on if, like me, your eyesight is not too good, or you have sausage fingers! This is all done through the right-hand touchscreen.
It is best practice to name channels and outputs before patching and this can be done either on the I/O page or via the channels. I had actually prepared the patch and named the channels using the free offline editing and control software Director at home to save time. My basic show loaded, I was ready to start listening to audio.
At Your Surface
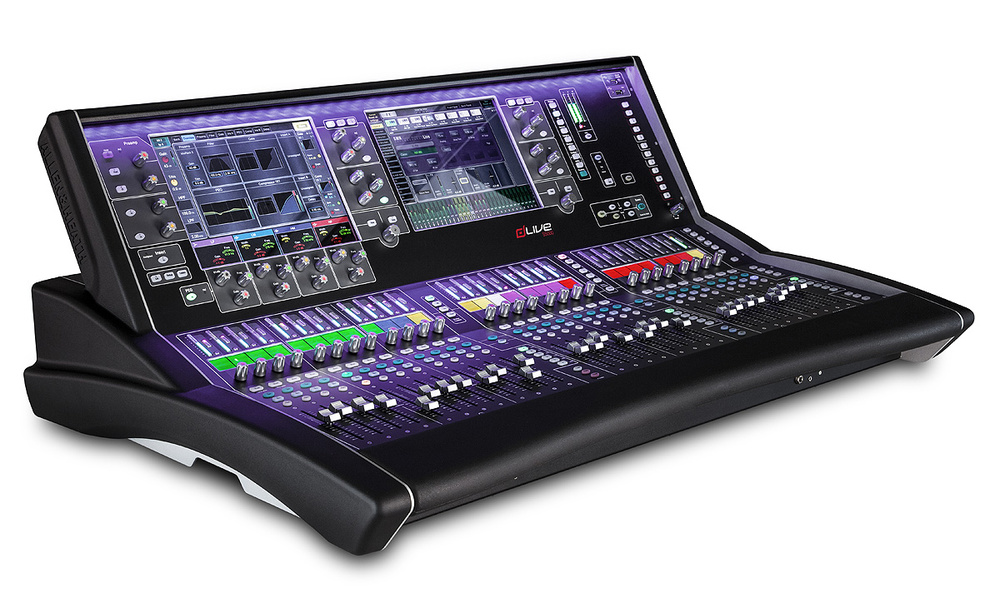
The dLive's strength, for me, is the ease of setting up. Everything is pretty much where you think it will be, the surface is sparse but functional, and there are enough shortcut buttons to get to where you need reasonably quickly. All models in the dLive series share much the same surface controls, but with the larger models giving you more faders, screens and a bit more direct control. I had opted for the second–largest frame size, the S5000, which gives you 28 faders and dual 12–inch capacitive touchscreens. I wanted a reasonable number of faders and this seemed a good compromise between size, weight and features.
The desk comes with various templates that give you a starting point for how to set up the desk. "Templates for what?" you may ask. Well, the surface has 28 faders and 26 soft keys that are fully assignable, and you need to tell them what they are, either by loading one of the ready-made templates or building up from scratch. I opted for a FOH template that gave me a good starting point, with roles assigned to all the faders, and the faders laid out in banks. Under the left screen are 12 fader strips, and each of those has four soft keys, a single rotary, an LED meter and a mini display screen providing channel/fader information. The next bank has just eight faders, laid out in a similar fashion, and to the right is another bank of eight. Between the banks are more soft keys that give you direct access to different layers. The concept of layers is a common one but in case you haven't used a digital desk before, it's like having several mixing desks piled on top of one another. Each layer allows you to control a different set of 12 or 8 channels, depending on which bank you are on. This increases the flexibility as it allows you, with simple switching on the surface, to control up to 168 assignable faders. Each fader can be assigned to a variety of uses. Here starts the fun.
 The rear of the console, showing the eight local analogue inputs and outputs as well as two AES inputs and three AES outputs. The two I/O Port slots are for optional cards, in this case Waves Soundgrid and Dante networking cards. Connection to the stage racks is via the two gigaAce network ports. To the right the dual redundant power supplies add reliability.
Fader Assignments
I am a great believer in the idea of setting out one's stall, and by this I mean arranging everything in a clear and logical way. The phrase comes from market traders, where a well-presented stall would be more appealing to customers as they could see what was on sale easily and choice was laid out in a logical way: veg on one side, fruit on the other. I always strive to lay my desk out in a similar way, so that it made sense to me. I have always preferred inputs on my left, outputs to my right and any important channels to fall close to my right hand. Most analogue consoles were laid out this way, and so to a certain extent I have chosen to follow that layout, often grouping things so they were closer to hand. With a desk like the dLive any fader can control any channel, so any fader can govern any output, any subgroup, any DCA (Digital Control Amplifier or control group) or effect return. With all this choice it was good to start with a basic template or I would never make a decision!
Having assigned all the faders how I wanted, I immediately changed my mind. For example, instead of having a single fader control the left and right output bus, I decided to switch to two separate faders. There are many reasons to do this, especially if you are providing lots of outputs for subs, side hangs, front fills and so on, as you can control and mute each individually. I had decided to use the digital equivalent of VCA groups so I could group various channels together and control them with one fader. This is a great way of mixing, especially with a large channel list — and on this gig I needed 58, which is a lot, and another reason for my choice of digital.
One of the great things I found about the dLive was how easy it was to adapt the surface to my needs. I decided to use the left-hand bank of 12 faders exclusively for the input channels, and this I did in blocks. The first bank comprised the drum channels, which on my channel list was channels 6-19, as the first five channels were used for trigger lines: contact mics on the drums that could be used to open the noise gates on the associated drum. As I could set and leave the trigger channels, I missed them out, so my surface would start with bank 1, fader 1, kick drum. A nice traditional start! The next 11 channels were taken up with drums and cymbals and a nice woodblock. The next layer (B) had some electronic drums and the overheads as well as the bass channels. Layer C was dedicated to guitar channels (see box), including the main guitar rig and the channels for the second guitarist. Layer D handled backing tracks and backing vocals. On layer E I placed the spare guitar channels and my iPod. The last layer I used as a dumping ground for rarely accessed sources, or things I wouldn't need to adjust, such as the drum triggers.
DCA Groups
Having now assigned all the inputs to a fader, and the faders to banks in a way that made sense to me and that I could find quickly, I turned my attention to the middle bank of faders. This would be my control area: faders I would normally assign as control groups. I started off by making a DCA group for all the channels in a way that made sense musically and ergonomically. I like to group rhythm parts such as kick and snare and bass so I can push up the beat with one fader. I made a series of assignments and filled up the bank. After an hour or so of mixing it occurred to me that I was using one group just for the lead vocal. Why not just swap out that group with the vocal channel? This is easy to do and something I would almost feel confident doing on the fly during a gig. Decisions about the surface have a dedicated button and that brings up an option screen. Choose Strip Assign and it brings up a little graphic of the layout. You can then drag and drop strips onto the bank of your choice. It's easy!
With my seven DCAs and one vocal channel set up in the middle of the desk, I started to get adventurous. My effects DCA I swapped out for my main reverb return. I routed input channels to audio groups, and placed the groups on the surface instead of the inputs. Why? Well, a DCA is just a controller and doesn't display the audio content in any way. By using a subgroup, I could get a meter appearing beside the channel showing any activity on that group, which would be useful in working out whether stuff was happening on the electronic kit or backing tracks.
By now I had a fairly heavily customised layout. I had buried all the various outputs on their own layer, which included discrete outputs for recording, for PA left and right, for subs, for in-fills, and even a mix for the lighting designer. On the top layer I still had control of the left and right master faders that were feeding all these mixes via an easily assignable matrix.
On The Road
By now you will have got the idea that this is an extremely customisable console, which it is, but what does it sound like? At this point I'm going to jump forward two weeks until after the line check at the first festival. The band were headlining the Isle Of Wight Festival, which was being filmed and recorded by Shapland Mobile. To assist on what was going to be a hectic hands-on mix, my system tech Richie had been volunteered to sit in the truck and contribute.
 For the Biffy Clyro tour, the S5000 console was paired up with a DM64 stage rack to provide 64 mic/line inputs and 32 outputs."I'd better see what you have done on the desk," he announced. We then spent 10 minutes going over the channels looking at the EQ, the compression, the gating and so on. Bass drum, a bit of low–mids taken out; snare top, high–pass filter set at 80Hz, no EQ, no gate; snare bottom, filter set but in bypass (my mistake). Looking through most of the channels, not a lot was going on with the equalisation. Most channels had no inserts. For the lead vocal and the bass I chose one of the onboard insertable compressors from the library, otherwise I had just used the channel compressor, if anything at all.
I think this lack of equalisation and plug-ins tells you a lot about the desk. It just sounds pretty good! You stick a microphone in and it sounds OK. You choose the right mic, put it in the right place and you don't need to do anything! I was pretty impressed with my lack of adjustments.
Where I had dived into a channel and used one of the library plug-in–style devices on this console, they had all worked just as I expected. There is a choice of a dbx compressor, a good OptTronik compressor, an excellent Mighty compressor, even a retro–looking one with a VU meter (I'll let you guess the inspiration). I found patching easy and the sounds matched my expectations. I have a huge collection of analogue outboard and I know what these units sound like, so it was refreshing to find plug-ins that emulated the originals in a convincing way. There are also a few specialist units which need to be inserted rather than just recalling from the channel strip. Amongst these are Dyn8, a powerful multiband compressor/dynamic equaliser. This took a bit of getting used to but repaid the effort — the Dyn8 matched the power and flexibility of some of my favourite plug-ins.