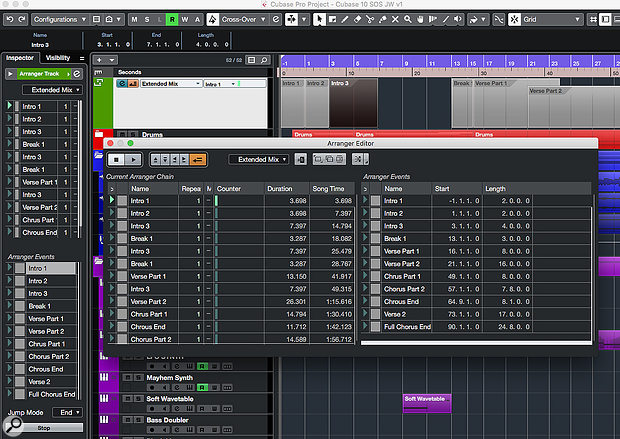
 The Arranger Track now allows you to construct multiple Arranger Chains — alternative arrangements of your track — in a single Cubase project.
Need to export different mixes from the same project? Cubase Pro 10 makes it easy…
Engineers often need to create alternative mixes of a project. It's common, for example, for a professional engineer to be required to provide a 'vocal up' version of a mix, but there are various reasons any of us might want to create alternative versions of a project — different arrangements that extend or shorten a song, different effects options, or perhaps broadcast-friendly edits to disguise expletives! Whatever the reason, Cubase has a number of tools that can help, and in this article I'll explain how the Arranger Track and Cubase Pro 10's MixConsole Snapshots can help you create alternative mixes and arrangements more easily. Most of what Cubase offers is good, but I'll also discuss workarounds for a few 'cons'.
Power Arrangers
I looked at the Arranger Track (in Pro, Artist and Elements) in SOS July 2010 (https://sosm.ag/cubase-0710), when considering how to create advert-friendly, 30-second cues from a longer project. It basically provides a way to move the playhead to different points in your arrangement on playback, so it can be used for any kind of timeline-based re-sequencing of a song's structure. Having created an Arranger Track (in the same way you create any other kind of track), creating a new arrangement requires just a few simple steps.
First, create some events on the Arranger Track. Each one defines a time/bar range, and they can be played back by the Arranger Track in any sequence you define. Events can be given unique names to replace the defaults (A, B, C etc.), and it's fine for events to overlap — for instance, you could create separate four- and eight-bar events starting at bar 12, beat one. Next, in the Arranger Inspector panel or in the Arranger Editor window, create a chain of these Arranger events; add and move them into the sequence you want to hear on playback. For each instance of each event, you can choose the number of times it should loop before moving to the next event in your chain. Finally, toggle on the Activate Arranger Mode button (next to the 'e' edit button for the Arranger Track in the Project window's channel list). Now, on playback, instead of playing in linear fashion along the timeline, Cubase will follow the nonlinear sequence of events specified in your Arranger chain.
This is all super-easy to do, but it's a really powerful feature because it allows you to experiment with all sorts of timeline-based variations of your musical arrangement without dragging parts around your arrange page. There are a few more detailed considerations though...
Since I first wrote about this in my SOS July 2010 article, Steinberg added the ability to create multiple Chains via the Arranger Track's Inspector panel. Individual Chains can also be duplicated and renamed. So, assuming your Project contains all the necessary materials (audio tracks, virtual instruments, etc.) for all the different mix versions you wish to create, you can now keep all your arrangements in a single master project, simply switching between the different Chains to choose which you'll hear on playback.
 Arranger Chains can be 'flattened' into a traditional linear arrangement prior to audio export.
At some stage, you'll want to render your various arrangements using Export/Audio Mixdown, and there are three steps to this process. The first requires you to use the Flatten Chain option (in the Arranger Editor window or the Arranger Track's Inspector). This lays out the current Arranger Chain as a conventional linear project on the timeline. You can choose in the Arranger Editor to create this flattened version in a new Cubase project or, if you prefer to keep everything in a single master project, you can select the Current Project option as the Destination. Once flattened, you can use the Export/Audio Mixdown command, as usual. A third step is to visit your project's History panel and move back to the step where you flattened the project — this will return you to the un-flattened version in the Project window while, critically, retaining the audio mixdown you just created via the export process.
Even if your Arranger Track sequence plays back smoothly, listen carefully to the flattened version prior to the final export. Problems can occur, for example, where audio or MIDI clips have elements that are cut at the start or end of any Arranger Events, and you might find that some minor editing tweaks are needed to address this. If the flattened version requires any major surgery, this is perhaps one occasion when flattening to a new project is a more sensible choice, since it would otherwise require you to undo a lot of steps to move back to another arrangement.
Snap To It
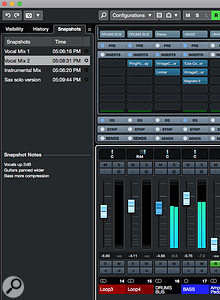
 Cubase Pro 10's new MixConsole Snapshots system makes it easy to experiment with different level, pan and processing options, amongst other mixer settings.But what if you're happy with the arrangement and simply want to create and recall different mix versions? This is where Cubase Pro 10's new MixConsole Snapshots feature comes in to play. You can create up to 10 MixConsole Snapshots in a single project, and these are saved within the project file. They're set up via a dedicated tab in the main MixConsole's left zone (alongside the MixConsole History tab, which can also be useful when experimenting with different mix options). The MixConsole toolbar has a button (the small camera icon) for creating Snapshots, and there's a dropdown menu for other Snapshot tasks, such as selecting, updating or renaming. In the main MixConsole tab, you can add notes to each Snapshot too, and that's a great habit to get into, as it's easy to lose track of lots of specific mix changes in different Snapshots.
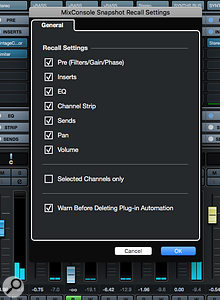
 The key thing you need to note if you're to get the best from this new feature is what information is and isn't stored as part of the Snapshot. Obviously, basic volume and pan settings are stored in a Snapshot, so typical mix-variation tasks (eg. vocals up, guitars panned wider, drums down) can all be managed using Snapshots. More impressively, though, all the main insert, EQ, Channel Strip and send settings are also included. So you can easily audition different send levels to a reverb/delay, different EQ settings or different combinations of insert effects on any tracks. The last of these is a great way to try out different compressor plug-ins on, for example, your drums or lead vocals, or for exploring different stereo-bus processing chains.
What's Not To Like?
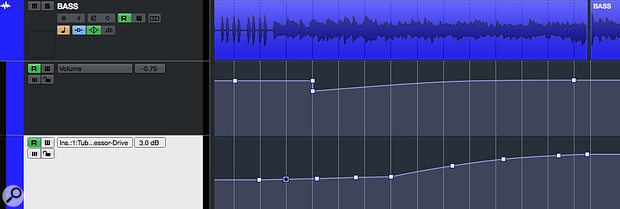
It's important to understand that Snapshots recall settings of the MixConsole only, not of the Cubase project as a whole. In particular, note that you can't try different automation moves on, say, a track's volume or send levels and store each version in a Snapshot. And for every track that remains Read enabled, any automation data in your project will override the static settings of your Snapshots. The exception is if you've created automation for an insert effect and then load a Snapshot that doesn't include that instance of the insert effect — in this case, the insert's automation data will be deleted. Cubase can warn that this is about to happen, but it's well worth being aware of! The workaround is to use and save the bypass status for insert effects, sends and the main Rack sections, rather than actually removing the plug-ins. If you want to retain the sort of detailed level automation you might use for a lead vocal, but still create a 'vocal up' mix, then another strategy is to use a VCA Fader to boost/attenuate the vocal track — store the static VCA Fader setting in the Snapshot.
The status of the channel Mute, Solo, Read and Write button are not (yet?) stored/recalled by Snapshots, something which would have been really useful. Taking the Mute buttons as an example, storing the mute status would be handy if you wished to experiment with alternative tracks. Say you had two completely different lead vocals, or perhaps a guitar solo and a sax solo to choose between — you'd be able to simply mute the required combinations of tracks in different Snapshots. Of course, you can achieve the same end result using fader settings and insert/EQ/Channel Strip/send bypass buttons, but that's a little more fiddly.
 The MixConsole Snapshot system doesn't include automation data. This is only an issue for insert effects, and then only if you add/remove insert effects via Snapshots when those inserts already have automation data created for them.
Make Your Mind Up
While creativity and experiments are good fun, we all have to exercise a little discipline eventually — you do actually need to declare a mix 'finished' at some point! But having the ability to keep some fairly major mix and arrangement options open until the very end can be incredibly useful in some projects. Despite a few limitations, the Arranger Track and the MixConsole Snapshots facility are incredibly powerful tools that make this possible with a minimum of fuss, and without littering your drive with different project files.
