Consequently, the optimum reference level for smaller rooms needs to be significantly lower, on a scale which is dependent on the enclosed volume of the room in question. You can work out the volume of a room simply by multiplying together its length, width and height, of course, so a home studio which is four metres wide, six metres long and 2.5 metres high has a volume of 60m³. If you prefer to work in imperial measurements, the example above would be roughly 13 x 19.5 x 8 feet, and 2028 cubic feet in volume.
The recommended reference monitor SPLs for different room sizes are shown in the Room Size vs Reference Level Table below.
For the example room cited above, this table suggests the ideal monitor calibration level is 76dB SPL. It should be noted, however, that these figures are recommendations rather than absolutes, so consider them as starting points and if you find that you prefer working with a slightly higher or lower reference level, that's fine. Just keep a note of the level you've calibrated your system to work at so that you can match the level if you need to recalibrate for new monitors at some future point.
Step 6: All that's needed now is physically to set the monitor chain's gain structure to set the correct reference level. Start with the individual monitor or power‑amplifier volume controls at their minimum position, and if you have a variable output on the computer interface or D‑A, set that to maximum. The SPL meter should be placed in the listening position, and most SPL meters are intended to be used with the microphone pointing at the ceiling, not at the speaker! There shouldn't be any obstructions or reflective objects around the meter or between the meter and speaker (including you!) and make sure the meter is set to C‑weighting and slow/average response. Start with the volume setting on the monitor controller at minimum until we've established correct gain-staging in the DAW.
We now need to replay the appropriate pink noise from the DAW to just one of the speakers. However, there is a potential trap here, since most pan controls alter the level slightly at the extremes relative to the centre. This is where that ‑20dBFS sine‑wave tone signal becomes useful because it's the level at the output meter that matters. So play the tone, and offset the channel fader slightly to compensate if necessary for any panning loss or gain. You need to get the output meter for the selected channel to read precisely ‑20dBFS.
With the DAW gain staging correct, substitute the ‑20dBFS RMS pink noise signal for the tone and carefully increase the monitor controller volume control to its reference position. With the active monitor or power-amp controls at minimum the acoustic level will probably be too low. You can now start adjusting the input sensitivity of the active monitor or power amp gradually to raise the acoustic level up to the chosen reference SPL level indicated on the SPL meter. It is important to change the gain slowly to allow the meter time to react (because it is set up for slow averaging).
If necessary, it's permissible to juggle the interface/D‑A output level and the monitor/amplifier input sensitivity against one another to achieve the correct SPL with the monitor controller volume control at its reference position.
Once you're happy with the calibration of this first speaker, route the pink noise signal to the other speaker and repeat the process. Both monitors are now calibrated to the chosen reference SPL, and if the SPL meter and your alignments have been accurate, everything should be spot on. In practice, though, small discrepancies may exist and as little as a 0.5dB error is enough to offset the phantom image centre position slightly.
To correct for this, route the pink noise signal equally to both speakers (ie. pan centre) and listen carefully. The noise should come from a point midway between the two speakers. If it is offset slightly to the right, decrease slightly the input sensitivity control on the right monitor (or amplifier) and check again (and vice versa if the offset is to the left). Be aware that the amount of adjustment required will be very small!
Ready To Rock!
Having followed steps one to six, you can now get used to working with your newly calibrated monitors.
Step 7: You should find that material that hovers around or just above the digital operating level on the DAW's meters is comfortable to listen to, without being too loud or too quiet. Moreover, material that replays high up on the meters should sound too loud, and material that is well below the operating level is correspondingly quiet. As you get used to this arrangement you should find that you are able to build mixes entirely by ear without looking at the meters at all — and find that they actually sit well in relation to the defined digital operating level.
However, I must issue one very important warning at this point. When using commercial CDs as reference material, or when mastering your own material within the peak‑normalisation paradigm, the normal working headroom margin is absent because it has been deliberately stripped off. The signal will be banging against the digital end‑stops and the average level will therefore be some 12 to 15 dB higher than expected in a system aligned for a digital operating level of ‑20dBFS. It's therefore essential that you turn down the monitor level in advance, or attenuate the source material within the DAW to make it compliant with your standard operating level.
This is another situation where a calibrated monitor volume scaled in decibels is quite useful, as the amount you need to turn the level down to restore the expected loudness indicates just how much louder the music is compared with the system reference. In this way you can compare the loudness of mixes in progress with reference tracks in a meaningful way. Bob Katz has an 'Honor Roll' of well‑mastered pop CDs on his web site (www.digido.com/honor-roll/), listed with the appropriate monitoring level settings for equal perceived loudness.
What About Headphones?
 How loud should you listen on headphones?
Of course, many home studio enthusiasts feel that they need to use headphones more than most to take the room out of the equation. So what is a sensible level when working in this way?
It's actually very difficult to accurately measure loudness on headphones at home. Therefore, the best approach is simply to set sensible speaker levels, as discussed in the main article, and then adjust your headphones to give a similar subjective level — and, if needs be, make a mark at the reference level on your headphone amp's level control.
Alternative Reference SPL Method
If you'd rather define your own reference SPL, instead of accepting the pre‑defined value for a given room volume, this alternative approach can be employed. It is a perfectly valid option for individual project studios, where absolute conformity with other studios is not important. The only difference in approach is that you determine the preferred reference SPL by ear, but every other aspect of the alignment process is identical to that described above.
So, in place of Step five, replay some well‑mixed material from the DAW with the replay level adjusted such that the average level hovers around or slightly above the digital operating level chosen previously. In other words, adjust the track level in the DAW so that it looks right relative to the chosen digital operating level on the meters.
Next, adjust the monitor volume controls as necessary so that the track sounds appropriately loud — the level at which you would typically mix. Bear in mind that you will be working at this reference level for long periods, so don't get carried away; a little quieter is far preferable (and safer) to a little louder.
Now, without touching any of the monitor controls, replay the calibrated pink noise file appropriate to the chosen digital operating level over just one loudspeaker, and use the SPL meter to measure the actual acoustic level received at the listening position. This is the value that you will use as your preferred monitor SPL calibration level. You can now follow Step six to optimise the gain staging through the monitor chain with the operational volume control set at its reference position.
Sensible Digital Meters
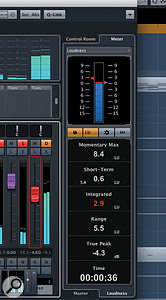
 A BS.1770‑style meter that displays LUFS values, such as the one built into Steinberg's Cubase (pictured) becomes much more useful when you have calibrated your monitor levels.An acoustic reference monitoring level has to be related to something tangible in terms of source signal levels, and that basically means a reference operating level on the system meters. Some engineers like to use DAWs in conjunction with analogue consoles, partly because the familiar and practical analogue‑desk metering encourages sensible gain staging, and analogue meters all have a readily apparent reference level (0VU, PPM4, or whatever). In the digital world many manufacturers offer alternative meter scales or colour coding of standard digital sample meters, while the BS.1770 loudness standards throw away conventional sample meters completely, replacing them with a 'target loudness' level on an integrated loudness (LUFS) scale.
I'd recommend that everyone acquire and start using a BS.1770‑style loudness meter because this is likely to become the standard in the future. A colour‑coded digital sample meter can also be useful, though, and I've described in the main article a typical arrangement with green increments up to ‑20dBFS, then yellow up to ‑10dBFS, and red above that. This kind of configuration naturally encourages the user to set levels to loiter mostly around the boundary between the green and yellow regions — the digital operating level — with transients and intentionally louder sections kicking towards the top of the yellow area. Incursions into the red region inherently look wrong and so the optimal gain structure and headroom margin is encouraged semi‑subconsciously.
Bob Katz, the American mastering engineer, took this approach a few steps further in his K‑System metering. First, he relocated the '0' mark to provide a very definite 'nominal operating level' indication with a defined headroom margin above. This '0' reference level is always aligned with an acoustic monitoring level (notionally 83dB SPL in large control rooms), providing a fixed correlation between what the meter shows and what the ear hears. The K‑System is quite elegant and popular, although in many applications the BS.1770 loudness standard makes it as obsolete as every other historical form of metering. Nevertheless, any metering scheme that defines a sensible operating level and headroom margin is acceptable for a calibrated monitoring system — we just need to tie the meter reading and its nominal operating level to a reference acoustic level reaching the ear.
Room Size vs Reference Level
|
Room Size |
Room Size |
Reference Level |
|
Cubic Metres (m³) |
Cubic Feet (ft3) |
dB SPL (C) |
|
> 566 |
> 20,000 |
83 |
|
284 - 566 |
10,000 - 20,000 |
80 |
|
143 - 283 |
5,000 - 10,000 |
78 |
|
42 - 142 |
1,500 - 5,000 |
76 |
|
< 42 |
< 1,500 |
74 |
