Thinking of collaborating with other musicians/engineers? Here's how to prepare and share your Cubase project data.
Last month we looked at backups and basic future-proofing of projects made in Cubase Elements, Artist and Pro, from the perspective of personal data security and peace of mind. Some different considerations can apply, though, when you want to export your project to share it with collaborators. In this article, I'll consider the sort of data export processes that this typically requires, whether your collaboration involves working remotely with a musical partner, sending your project to a professional mix engineer, or perhaps dealing with a mastering engineer. To avoid confusion, I'll highlight any overlaps with the data-security side of things that I explored last month.
With Or Without You
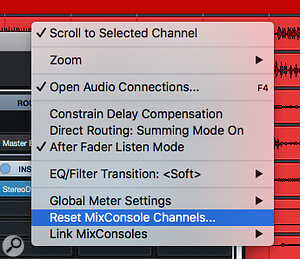
 If sending a mix engineer your raw tracks, resetting the MixConsole can save a lot of time.If you and your collaborator both use Cubase and the same plug‑ins, the Back Up Project process described last month may be all you require. And if you each use different DAWs but your collaborator will only be adding a few overdubs, last month's audio render process (including all the channel-level processing) would give them plenty of scope to create a cue mix.
When sending your project to a mix engineer, though, an audio render of each audio and virtual instrument track, without any of your own channel-level or mix-bus processing applied, and all starting at bar 1, beat 1, will almost always be the format of choice. Before applying the rendering approach described last month, you could first bypass any insert effects and Channel Strip processing on the tracks you're exporting, but in this context a 'mixer reset' will be quicker and probably more effective.
To do this, first save a new copy of your project with a suitable 'for the mix engineer' name. Then, from the Functions drop-down menu in the top-right of the MixConsole (left of the Racks menu), select Reset MixConsole Channels and choose 'all channels'. This will zero the MixConsole, rather like putting all the controls of a hardware mixer back to their default position. It removes all insert plug‑ins, including those on the Group, FX and Stereo Output tracks, and resets all Channel Strip settings, including the EQ. It will pan every track to the centre, and set all faders to the 0dB (unity gain) position. Then you can render all of the audio and virtual instrument tracks to provide a clean slate for your mix engineer.
All Out Drums
Multi-channel VSTis can require more work, the most obvious candidates being drum instruments like Groove Agent (GA) SE. By default, such instruments have internal mixing options and present only one stereo output to Cubase, but a mix engineer will usually want separate tracks for each virtual mic.
 As shown here for Groove Agent SE, you can configure your multichannel virtual instruments so that separate audio renders can be made for each sound.
The first step is identical in all versions of Cubase: you need to configure your virtual instrument to use multiple outputs, and inside the VSTi route each 'mic' to the desired output track. Taking GA SE as an example, you can see how I've set things up in the screenshot. I used the drop-down menu to activate five additional outputs — these manifest themselves as Tracks in the Project window and MixConsole. Right-clicking on a drum pad in GA SE pops up a further menu where you can route individual pads to any one of these outputs. It's also sensible to ensure that any default insert or send effects in your VSTi's internal mixer are bypassed (unless they're integral to the sound you want the mix engineer to work with).
 Once you have your VSTi configured for multichannel output, Pro and Artist make it easy to generate audio renders for each channel.Then you can render audio for each of these new outputs. In Elements, simply follow the (repetitive, yet effective) process I described last month: solo one output channel of your VSTi at a time, and use Export Audio Mixdown to render each one in turn. Artist and Pro make this step easier: select the main Instrument track in the Project window and execute the Edit/Render In Place command. For the 'Render Settings', selecting 'Dry' will bypass any channel-level processing to ensure your mix engineer gets unprocessed audio. Audio from each of the VSTi output channels will appear on new audio tracks in the project, and the audio files will reside (by default) in the Project's audio folder.
Note that Cubase's Export/Audio Mixdown command allows you to export only mono or stereo, but not both simultaneously, and some mix engineers prefer mono files for mono parts, so you may have to do two export passes.
Stemming The Flow
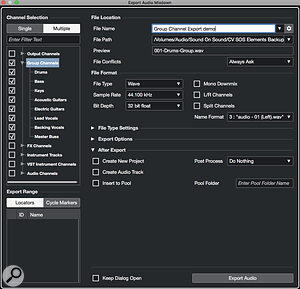
Your export needs will be different for mastering. Most commonly, you'll supply just a final stereo mix, via Export Audio Mixdown (perhaps with and without any stereo-bus processing you've used). An alternative scenario is when the mastering engineer will be working with 'stems', and you're asked to supply stereo submixes of drums, bass, guitars, keys, vocals, backing vocals, etc. This is easier if you've already used Group Channels while mixing: in Elements and Artist, each Group Channel can be soloed in turn and rendered via File/Export/Audio Mixdown; Pro's multichannel batch export capability lets you generate a stereo audio render for all Group Channels simultaneously.
 Cubase Pro's batch processing options in the Export Audio Mixdown dialogue allow instrument group stems to be created with ease.If you don't normally use Group Channels, a little more care is needed when creating stems. A visual reference can be helpful, so colour-code all the project channels by instrument group (red for drums, blue for bass, etc). Then, one colour-coded section at a time, solo just the tracks within a single instrument group and perform an Export Audio Mixdown process to create an audio file for that stem. This process will work in all versions of Cubase.
Don't forget to bypass any master-bus processing while you do this — it's intended to apply to your full mix rather than individual stems from that mix. You're OK leaving master-bus EQ intact if you've been mixing through it, but always make sure any dynamics processors (compressors, expanders, limiters) are bypassed.
Time For MIDI
Moving raw MIDI data between collaborators is generally straightforward; all versions of Cubase can export a standard MIDI file, and this will contain data from the Tempo track. This might be useful if, for instance, a collaborator will be trying to create a better MIDI-based drum performance in a third-party instrument based on what you created with GA SE.
All versions of Cubase can export a standard MIDI file, and this will contain data from the Tempo track.
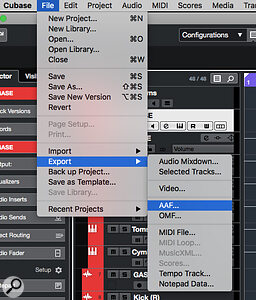
 Cubase Pro supports both AAF and OMF export and import — neither's a perfect format, but some collaborators might request these formats.If your collaborator is importing into another version of Cubase, they should start without a new project open and use the MIDI File Import menu option. This creates a new project and ensures the tempo data is imported alongside the other MIDI data, and they can then import any audio into that project. In other DAWs, though, your collaborator may need to check some preferences/settings. For example, in Logic Pro, they'd need to enable the Import Tempo option under Preferences/General/Notifications. This kind of detail aside, the most time-consuming aspect of MIDI imports will usually be configuring virtual instruments to match the desired playback character. Notes will be fine, but control parameters (even velocity mapping) and any keyswitching can vary enormously.
Industry Standards?
I've deliberately avoided mention of Open Media Framework (OMF, available in Cubase Pro only) and Advanced Authoring Format (AAF, available in Artist and Pro). Both are standard industry formats, intended primarily for the exchange of audio and video data between different applications, but they each have limitations. Neither is anywhere near being a complete 'audio, video, MIDI and plug‑ins' solution.
So unless a collaborator specifically requests OMF or AAF, I'd stick with project backups, rendered audio and exported MIDI. These low-level formats are reliable, straightforward to use and will, I suspect, have a longer shelf life too.
