
This month we help you work with Logic Control, as well as offering advice on importing REX files.
Since the review of Logic Control back in SOS April 2002, many Logic users have invested in this hardware control surface to speed up their work flow. However, although the extra hands-on control does make working with your sequencer more tactile, it can take a little while to get the best out of the system, so this month's column is here to help.
Setting Up Effects With Logic Control
It's fairly common to want to set up a send/return effects loop, for example when you want to have a global reverb which can be used on all tracks. You can do this via an aux send and return. First insert the plug-in effect you need into a spare Buss Audio object — for this example I'll use buss one. You can do this directly from Logic Control, or in the conventional way by accessing the Buss Audio object's Inserts menu.
Next, set up the Sends to the Buss Audio object for each of the Track and Instrument Audio objects — these will serve as your channel aux send controls in exactly the same way as on a conventional mixer. To do this using Logic Control, select your first audio/instrument track and, making sure that you're not in Global View, hit Send once to configure the V-Pots to select the send destination. In all there are four parameters for sends: destination buss, level, pre-fader/post-fader position, and mute. After setting the destination buss, you can use Logic Control's cursor keys to select the next parameter to edit. For example, to change the pre-fader/post-fader position, you cursor right twice. Alternatively, press and hold the Send button and select the parameter you would like to edit directly using the V-Pots. Repeat for each channel that needs to have a send.
To use your newly created sends, select a channel while in Send View to display all the sends relating to the selected channel across the top of Logic Control. Use the cursor keys to access any that are on pages beyond the right-hand end of Logic Control's read-out. Even unassigned sends are shown, but with dashes in the parameter value slots, allowing you to configure them if required. You can also select a View option where you can see the values of a single send across different channels, if you'd prefer, letting you, for example, compare send levels to buss one. To experiment with these View options, hold down the Send button and press the relevant V-Pot to select the desired View. To control the send level from the fader and the destination buss from the V-Pot, hold the Send button and press V-Pot seven.
Logic Tips
- The button with the chain links icon at the top left of most of Logic's windows has three modes, indicated by the colour of the button: off (gray), Link (pink), and Contents Link (gold). In Link mode, the window's view will change in synchronisation with the top window. In Contents Link mode, its view will change in synchronisation with the selected object in the top window. Link mode is handy for windows that display similar objects, such as two MIDI editors. Contents Link mode is handy for synchronising MIDI editors to the Arrange window. The Sample Editor window is an exception — it only offers Link mode, which causes it to show the contents of the audio region selected in any other window. Len Sasso
- By default, Logic creates 32-bit Freeze files, but Logic can't load and play 32-bit files directly. If you want to use Freeze files from one Song in another (for example, to take Frozen virtual instrument tracks to another studio), use Logic's Audio Preferences to change the Freeze file format to a lower resolution. Len Sasso
- Here's a little function that comes in extremely useful when editing tempos. Inside the Options menu of the Tempo List Editor you can store and switch between up to nine different tempo lists. This means that, once you have arrived at something you are relatively happy with in one of them, you can use another if you want to carry on experimenting. At the end of the procedure you can then quickly review a few different solutions back to back and make a decision. Ingo Vauk
- Each Arrange track can be muted individually using the Track Instrument's Mute button, but this is no use if you've chosen to suppress display of the Mute buttons using the Arrange window's View menu. When the buttons are hidden, you can mute the track by clicking close to the left-hand edge of the Track Instrument — watch for the cursor to become a hand with five fingers. A dot indicates the track's muted status. With either method, Apple-clicking will mute and unmute all tracks. Len Sasso
- Alt-dragging an audio region in the Arrange window creates a new region with the same boundaries and Anchor point as the original. Shift-Alt-dragging results in a new instance of the same region. Len Sasso
- The Environment's Delay Line object automatically cycles its output through all connected outlets, which allows you to route its delay 'taps' to different destinations. If there are more repeats than outlets, the output cycles back to the top. The cycle starts over again with each new input to the Delay Line, so you will always get predictable results. Len Sasso
Transport Tips
Although Logic makes it easy to drag regions into position, it is sometimes useful to be able to nudge them forwards or backwards in small, precise increments. To set the desired nudge value, hold down the Nudge button on Logic Control and rotate the V-Pot labelled Nudge to set the required nudge increment value. Once that is done, nudging a selected track object requires you to press Nudge (a light will come on above the Nudge button) and then use the transport fast wind controls. You can also move sequence objects by holding down the Nudge button and rotating the V-Pots in increments of bars, beats, divisions (user-definable fractions of a beat), MIDI ticks, SMPTE frames and SMPTE half-frames.
Logic has a range of looping modes, and it's easy to set these from your controller. To set the normal Cycle mode, use the jog wheel to place the Song Position Line at the start of the section you wish to repeat. Press and hold the Cycle button, then wind the jog wheel forward to the end of the section you wish to cycle. Note that if you wind the Song Position Line backwards instead, you define a Skip Cycle, denoted by a thin white line at the top of the Time Ruler. If you hold down the Drop button instead of the Cycle button, you can define an Autodrop region.
For recording in Cycle mode, you can define a longer loop length than the Autodrop region to allow for pre-roll and post-roll. If you want a new track to be created for every recording pass, you need to tick the Auto Create Tracks In Cycle Record option in the Recording Options window (available from the Song Settings submenu of the main Options menu) — only the last recorded audio track is played, as it is the 'top layer' of several takes stored to the same track. Earlier audio regions recorded as part of the Cycle are automatically muted.
Recording Multiple MIDI Parts Live
![]() If you want to record several keyboard players at once, ensure that each connected MIDI instrument is sending on a different MIDI channel, and make sure the Track Instruments on the tracks you wish to record match these channels. It is important that you tick the Auto Demix By Channel If Multitrack Recording option in the Recording Options window. Select one of the tracks to be recorded, but also activate the Record buttons on the other tracks. All tracks will then record their parts separately, and with their own allocated Track Instrument sounds audible during recording.
If you want to record several keyboard players at once, ensure that each connected MIDI instrument is sending on a different MIDI channel, and make sure the Track Instruments on the tracks you wish to record match these channels. It is important that you tick the Auto Demix By Channel If Multitrack Recording option in the Recording Options window. Select one of the tracks to be recorded, but also activate the Record buttons on the other tracks. All tracks will then record their parts separately, and with their own allocated Track Instrument sounds audible during recording.
If Auto Demix By Channel If Multitrack Recording is not ticked, the MIDI streams will be merged onto one track. You could also use a similar technique to export complete MIDI arrangements from a hardware sequencer or keyboard workstation, especially where the hardware sequencer won't save Standard MIDI Files for whatever reason. Paul White
Controlling Instruments & Effects
To load a plug-in using Logic Control, press Instrument after which the V-Pot above the channel allows you to select from a list of virtual instruments and effect plug-ins. Press the V-Pot to load the selected plug-in, which should also open the plug-in window for you. Note that you may have to create a stereo track for some plug-ins to become accessible. V-Pots now control parameters directly, though this may not work or may not be properly annotated if the selected plug-in is not an Emagic plug-in. The cursor keys can again be used to access parameters off the right-hand side of the Logic Control display. If you prefer, use the Flip button to use faders for adjusting the parameters — good for drawbar organs, for example!
Note that Logic's automation system adds all the parameters you've twiddled during automation recording to the pop-up list of viewable parameters available from the track bar. As mentioned earlier, some third-party virtual instruments have limited parameter access via Logic's automation. Furthermore, some plug-ins will cause an ASIO overload if too many parameters are adjusted at the same time, though in the case of many effects plug-ins it probably wouldn't make sense to automate too much anyway, and some reverbs and delays can cause the audio to glitch noticeably. You can try changing the audio driver buffer setting if ASIO overloads are particularly problematic.
Thanks to Ian Cullen of UK Emagic Distributor Sound Technology for his assistance with this article.
Importing REX Files
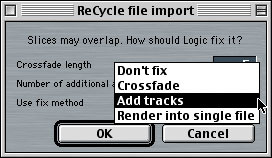
 It's easy to import REX or REX 2 files into Logic — just drag each one straight from its folder in the Finder into the sequencer's Arrange window, depositing it on the audio track you want it to appear in. The Recycle File Import window will then appear, which allows you to specify how the individual loop slices are dealt with. By default, it'll create an Arrange window folder object for the loop, in which a single track carries all the slices with 5ms audio crossfades between then (as in the top track shown here), and this usually gives good results.
However, if you need to speed up your loop a lot, this may not be the best option, because each slice will sound unnaturally truncated. You may also find that, even without much tempo adjustment, the crossfades interfere with transient information at the starts of some of the slices in some percussive loops. In these cases, you need to select Add Tracks in place of Crossfade in the Recycle File Import window, which will alternate the slices over two tracks within the folder object (as in the lower two tracks here), and assign each of these tracks a different Track Instrument. This allows the tail of each slice to overlap the next, and dispenses completely with crossfades.
If you're speeding up the loop a great deal, then you may need to allow Logic to add extra tracks to the folder object when importing, in order to avoid slices overlapping. You can also do this from the Recycle File Import window, by increasing the value in the Number Of Additional Audio Tracks field. Mike Senior