Adding character to a vocal with transformer emulations, multing instrument parts to vary the effects throughout the song, and tweaking the arrangement... There are no limits to a Mix Rescuer's job!
 A combination of corrective and creative processing was used to create the verse vocal sound. Waves' Renaissance EQ dealt with excessive proximity effect and a little harshness at around 7kHz, while their Neve‑inspired VEQ4 plug‑in added some beneficial transformer character, as well as brightening the sound overall. Stiff compression with Waves' Renaissance Vox kept the sound fixed fairly well in its position in the mix balance, although this did also emphasise sibilance, so Waves' De‑esser was pulled up to take care of that.
This month's Mix Rescue contender is from Sussex‑based songwriting and production team James Elder & Mark M Thompson. Their song 'The English Actor' was apparently composed and recorded in a single day, yet the guys had managed (by virtue of long experience of working fast together) to avoid most of the common arrangement and mixing pitfalls that seem to beset people featured in this column. Careful attention to the harmonies and arrangement meant that the track had good, natural long‑term dynamics, and the sounds had been well chosen to give both a full texture for the choruses and some sonic variety in other sections.
Mark had, nonetheless, encountered some mixdown problems. For a start, James' vocals weren't present enough in general, and another main gripe was that the chorus sections were falling a bit flat. When I listened to Mark's mix, I also felt that the drums should probably be delivering more punch. Given that these main challenges also face many home recordists, I'll focus in this article on how I tackled them.
A Tale Of Two Vocals
 Both kick and snare sounds were replaced for the remix of 'The English Actor', but even though this allowed more flexibility in terms of sound, some work was required before they worked in the mix: the kick achieved more low-end punch using Waves TransX Multi, and the snare was blended into the overall drum sound using Silverspike's freeware RM844 room simulator.
One of the first considerations was finding appropriate vocal sounds for the verse and chorus sections. The raw recordings comprised a single lead vocal track for the verses and the final line of each chorus, and then a more aggressive delivery for the main chorus line, which was also double‑tracked. To improve the impact of the choruses, I decided to emphasise the contrasts between these two vocal sounds.
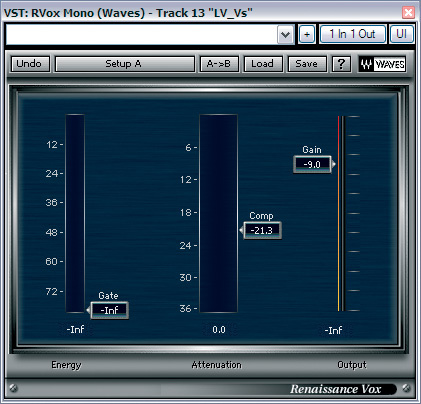
For both tracks, I first pulled out a fair bit of low end with EQ cuts, partly for corrective reasons (to compensate for proximity bass boost and wind‑blasts arising from the close positioning of the mic to James' mouth) and partly to prevent low‑frequency level peaks from interfering with the action of any compressors further down the line. I then chose my compressors for each vocal. For the verse part, this amounted to little more than an instance of Waves' simple Renaissance Vox plug‑in, which I found I could push to 18dB of gain reduction on peaks while still delivering a sound that was fairly natural — albeit within the confines of a pop style that requires exceptionally tightly controlled vocal levels.
Whereas the verse compression was primarily about evening out the levels, I selected the chorus vocals' compression settings to help enhance their aggression. This is the kind of situation where I instinctively reach for a Urei 1176LN where it's available, but here I fired up Stillwell Audio's The Rocket in lieu, as it provides a similar kind of character (as well as having a bit more flexibility in terms of controls). Driving this to about 10dB of gain‑reduction on peaks immediately gave the kind of tonal edge I was looking for, as well as controlling the signal levels pretty firmly. However, within the context of the whole mix I still needed to even out the chorus vocal levels even further. Trying to do this by increasing the gain‑reduction on The Rocket began to have unwanted audible side‑effects, no matter how I adjusted the compressor's time controls, so instead I bussed both chorus vocals to Antress Modern's Painkiller, which I find is particularly good at 'invisible' gain‑reduction.
Transformer Distortion, EQ & De‑essing
 was vital to achieving successful long‑term dynamics within this mix. Here you can see how many parts, including vocoder effects in the song's intro, and synth parts, had been multed by the time the mix was complete; the audio is coloured to show which regions originally belonged together.") The process of splitting individual audio tracks between a number of different channels (often known as multing) was vital to achieving successful long‑term dynamics within this mix. Here you can see how many parts, including vocoder effects in the song's intro, and synth parts, had been multed by the time the mix was complete; the audio is coloured to show which regions originally belonged together.
The process of splitting individual audio tracks between a number of different channels (often known as multing) was vital to achieving successful long‑term dynamics within this mix. Here you can see how many parts, including vocoder effects in the song's intro, and synth parts, had been multed by the time the mix was complete; the audio is coloured to show which regions originally belonged together.
Despite the tonal effects of The Rocket, I still felt that James' chorus vocals could be denser sounding. On their own they sounded fine, but in the context of the mix they seemed rather anaemic, even though they were perfectly audible in balance terms. My usual tactic for sorting out this problem is adding some subtle (or sometimes not so subtle!) distortion components into the sound, effectively adding extra harmonics to each note. I usually try simulated tube‑saturation as a first port of call but this didn't cut the mustard here (it just made the sound woolly) so I tried out a few other distortion plug‑ins and found that Bootsy's Tessla SE (a transformer emulation) fitted the bill much better, filling out the sound higher in the mid range.
If you find yourself adding subtle distortion like this at mixdown, don't lose any sleep over the exact settings you're using. The main thing is to try to find a setup that lets you add sufficient harmonics to give you the tonal/density change you're after, but without pushing into obviously audible distortion (unless that's stylistically appropriate). If you turn up the distortion level and the tone changes in an undesirable way, you can twiddle the controls pretty much at random to see if any of them are able to tweak the tone into line. If that doesn't work, then try some other distortion plug‑ins to see if you can get a bit closer. You can also use distortion as a send effect, which can give you more control of the frequency balance and level of any harmonics you add.
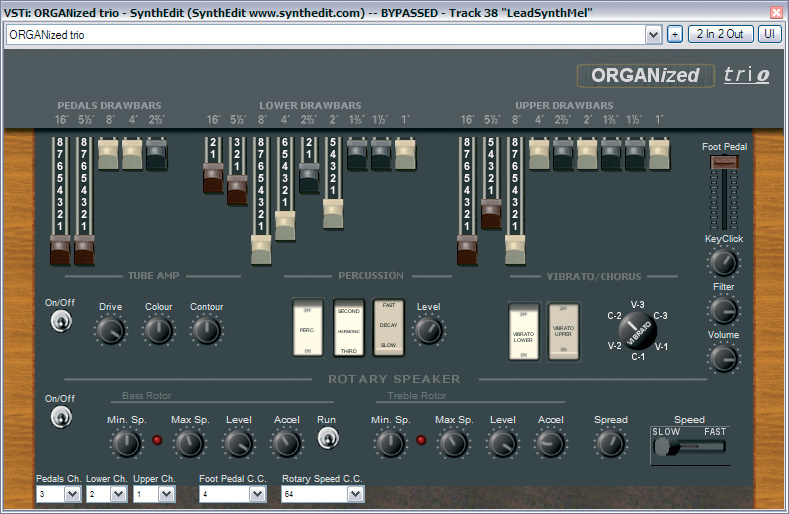
 The lead synth line that can be heard running over the final choruses was high‑pass filtered to keep it clear of the rest of the sounds, and then given more movement by passing it through a couple of different modulation effects: Twocircuits Audio Vibrato and the Leslie speaker emulation in Guido Scognamiglio's Organized Trio.Simulated transformers worked well on the verse vocal too, although here I decided to use the Waves VEQ4 (an equaliser based on classic Neve circuitry, which is famous in part for the sound of its transformers) so that I could get a bit more tonal control. Just driving the plug‑in at a decent level made the sound seem more dense, but in addition to that, I used the EQ controls to tilt the overall frequency response more towards the high frequencies, bringing the vocal more to the front of the mix. This involved two gentle mid‑range peaks (‑2dB at 390Hz and +2dB at 1.5kHz) and 5dB of high shelving at 15kHz.
With so much compression on the go, all of James' vocals needed some de‑essing to keep excessive sibilance at bay, but this was pretty straightforward with a Waves De‑esser. The trick here is to keep an eye on the little attenuation meter while you adjust the threshold and side‑chain frequency parameters. First, work fairly coarsely, purely to get the de‑essing triggering when you want it to, and then refine these settings to achieve the right amount of de‑essing without introducing lisping side‑effects.
Technical Versus Musical Processing
.") Compression and distortion were combined to differentiate the chorus vocal sound from the verse. Stillwell Audio's The Rocket did both at once, brightening the sound in the process, and to this was added extra transformer distortion from Bootsy's Tessla SE and extra gain control from Antress Modern's cleaner Painkiller plug‑in (not pictured).
Compression and distortion were combined to differentiate the chorus vocal sound from the verse. Stillwell Audio's The Rocket did both at once, brightening the sound in the process, and to this was added extra transformer distortion from Bootsy's Tessla SE and extra gain control from Antress Modern's cleaner Painkiller plug‑in (not pictured).
The processing for both of these vocal sounds involved a combination of technical troubleshooting and more subjective 'musical' processing, and it can often make more sense of the mixing process if you separate these tasks to some extent in your mind. I turned to The Rocket, Tessla SE and VEQ4 primarily for their subjective qualities, and although each of them also addressed some technical balance issues at the same time, that was really a secondary aim. Where The Rocket wouldn't level out the volume enough, for example, I turned to Painkiller to more transparently take up the slack. For pre‑compression troubleshooting, I turned to Waves' Renaissance EQ so that I could then concentrate on broader subjective tonal changes with VEQ4.
The point is that many mix processors deliver more than just a technical service — they also provide a variety of additional 'musical' side‑effects, such as slight tonal changes and distortions. Because you've got several forces at work at once, it's easy to overdo the technical changes while looking for subjective results, and vice versa. This is one of the reasons why you sometimes hear of engineers passing audio through a compressor without applying any gain reduction — it's so that they can get the tonality change and/or distortion of the circuitry, while perhaps using a technically better specified compressor (or even just detailed fader automation) to manage the dynamic range.
Stereo Widener & Ambience Effects
Although Mark had used an obvious reverb for James' vocal, I tend to steer clear of reverb where the vocal's going to be fighting to stay up‑front in a crowded mix. Instead, for the verse vocal I used my usual pitch‑shift/delay stereo‑widener patch and some short ambience (a 0.8-second impulse response running in Christian Knufinke's SIR2) simply to keep the voice adhering to the track without any obvious reverb tail — but I tweaked both of these to fit this specific situation. Firstly, I high‑pass filtered both quite heavily below about 1kHz, so that only the top end of each was being used. This effectively added some extra HF enhancement to the vocal sound, and also meant that I could fade each further up to increase stereo width without dragging James too far back away from the listener.
In both cases, though, this caused high‑frequency consonants to scatter across the stereo field as they hit the effects, so I used Digital Fishphones' Spitfish de‑esser plug‑in at the top of each effect chain to savagely duck these consonants (particularly 'S', 'F', and 'T' sounds) from the effects feed. You can really pile on the de‑essing in this setup without any lisping effects becoming obvious, because you're only processing the send to the effects, not the dry signal. Remember, however, that de‑essing is a threshold‑based effect, so you do need to be a bit careful if you later adjust effects‑send levels.
 I also spent some time tweaking the specific delay times and pre-delay times in these two effects — because I was using them at a higher level here than I often do — so that their processing began to phase‑cancel noticeably with the dry sound, altering its tone. This is a potential problem with any effect involving short delays, but fortunately it's not rocket science to deal with — just lightly massage the delay settings, muting and unmuting the effects return as you do it, and choose the delay times that seem to sound best. You might also find that you need to adjust your dry track's EQ a little to compensate. For instance, in this case I found that the HF enhancement from my exceptionally trebly effects allowed me to cut a bit of top end from the vocal channel itself.
Slapback & Ducking Delay
 Mark M Thomson.
To make the chorus‑section vocals more 'rabble‑rousing', I added a combination of very tight ambience (via a 0.2s Lexicon PCM60 room impulse running in SIR2) and a 60ms slapback delay from The Interruptor's freeware Tape Delay plug‑in. In both cases, the idea was to suggest more of a large room/venue sound without clogging up the mix with any reverb tail.
While I was experimenting with the chorus vocal effects, I tried sending to the simple stereo tempo‑sync'ed delay that I almost always have on hand for my mixes, and found that it worked quite well as an obvious special effect, joining James' phrases together nicely and further distinguishing the choruses from the verses. However, when I faded the delay effect high enough for it to work in this way, it was unacceptably blurring the intelligibility of the lyrics. Instead, I sent to a separate delay channel (in this case The Interruptor's freeware Bionic Delay) and then used Reaper's built‑in ReaComp compressor in the return channel to duck the effect level whenever the dry signal was present. This involved sending from the dry vocal channels to the detector side‑chain of the compressor while the effect signal was routed through the gain‑reduction path.
This kind of delay (often called a ducking delay) has a long history, and is probably most famously associated with TC Electronic's classic TC2290 multi‑effects rack unit. There are plug‑ins that implement ducking delays automatically (including freeware such as Smartelectronix MdspDuckDelay and GVST GDuckDly), but I decided to set up the effect manually so that I could start with a more characterful basic delay sound; by differentiating the delay from the dry signal sonically, you can usually keep the dry sound up-front more easily.
Adding Drum Samples

As you'd expect with a pop mix, much of the work was focused on the main vocal parts, but I also felt that the drum sound wasn't driving the song enough, and used several different tricks to improve matters. The multitrack drum recordings had come out of some kind of multitrack virtual drum instrument, and only the overhead mics had anything by way of spill from the other kit instruments, However, despite the flexibility of sound selection virtual instruments often provide, the kick close‑mic track here sounded a bit lightweight and 'flappy', and I wanted something much punchier.
After a few fruitless minutes fiddling with insert effects on the kick channel, I realised I'd be better off retriggering a sample to replace it. The danger of doing this with a proper live drum-kit recording is that some important spill contribution from the close mic may be lost when you substitute the mic track for the triggered sample — but there was no spill to worry about here, so I felt I could replace this track with impunity.
In the past, I've done the job of extracting MIDI trigger notes from close‑miked drum tracks with third‑party plug‑ins, but I rarely bother with them now that I've discovered that Reaper's built‑in ReaGate plug‑in can be configured to do this very simply. You just set up the gate to open reliably on kick‑drum hits and then tick the Send MIDI On Open/Close tick-box, whereupon it squirts out a specified MIDI note on cue. Because Reaper's channels handle both MIDI and audio, you can then insert Reaper's no‑frills sampler plug‑in (the splendidly named ReaSamplOmatic5000) directly after ReaGate in the same effects chain to play the replacement sample. Neat.
Once I'd set the gate's threshold so that it triggered correctly, I auditioned my shortlist of samples from Sample Lab's solid, all‑purpose one‑shot library, Drum Fundamentals, to find an acoustic kick‑drum sound that would fit the bill. I chose one that had a nice attack and mid‑range tone and added some low‑end oomph using Waves' TransX Multi transient‑shaping plug‑in. I originally tried adding LF with EQ, but it simply made the low end rumble away flabbily. By contrast, because TransX Multi only boosts the frequency range when it detects a transient, it was able to increase the low end while at the same time making it punchier.
The snare close‑mic suffered different problems, but again I couldn't get a result I was happy with using processing, especially because I wanted it to be fairly high in the mix, so I adopted a similar sample‑replacement solution. In this instance, though, the Drum Fundamentals sample I liked the most was too dry, and sounded rather 'stuck on' to the kit sound when it was high enough in the mix, so I used Silverspike's Room Machine 844 plug‑in to synthesize some room ambience for that snare, which has the effect of blending it back into the kit as a whole.
Triggered Dynamics Tricks
With the two samples in place, the rest of the drum balance didn't take a great deal of further work — mostly just high‑pass filtering and some fairly heavy compression for sustain on the undersnare, overheads, and room mic. Here, I specifically chose quite savage compressors (the Antress Modern VHME emulation of the Empirical Labs Distressor and SSL's Listen Mic Compressor) and drove them into heavy gain-reduction to add some thickening distortion side‑effects as well. The drums had a lot to compete with in this mix, after all, so needed all the power they could get!
The final piece in the puzzle was to use Reaper's side‑chaining facilities to adjust the balance of the mix in two different ways with each kick‑drum hit. The first of these involved ducking the main rhythmic synth pad, creating an exaggerated dynamic effect that was very much like compression 'pumping': the idea was to simulate the compression effect that the ear creates naturally at high volumes as it attempts to protect your hearing from damage, because this can provide a psychological cue that the music is loud, even when it isn't. (The same effect is used a great deal on chart‑mix versions of club tracks, for similar reasons — check out the New Radicals 'Music Sounds Better With You' or Steve Mac's recent single 'Paddy's Revenge', for a couple of really clear examples of this kind of pumping if you're not already familiar with it.) With a compressor, you usually need to combine a fast attack with a release of about 80‑200ms to achieve the pumping effect, and although I was creating pumping with a slightly different setup, I was using the same kinds of time constants.
The other kick‑triggered balance change involved a boost in the level of the chorus guitars with every hit, effectively forcing Mark's dynamics to more strongly support those of the drums. Just a couple of decibels of gain change allowed me to get more impact out of the guitar parts without having to fade them up too loud, something that freed up valuable mix real‑estate during the dense arrangement of the choruses.
In Search Of Pop Dynamics

The final aspect of his mix with which Mark felt really dissatisfied was the verse‑chorus transitions. This was partly to do with the mixing, but in the first chorus the harmony of the track was also partly to blame. What Mark had done was use a reversed guitar chord as a swell from the end of the verse into the chorus, but he'd used a chord with the same harmony as the chorus — which weakened the arrival of that harmony on the chorus downbeat. My solution was to pitch‑shift the chord to match the harmony in the last bar of the verse instead, and this simple change made a surprisingly big psychological difference.
The single most useful tool I'd suggest Mark uses when trying to make the section dynamics work in a track like this is 'multing', where you chop up each recorded track into sections and put the sections onto different tracks for separate processing. For example, I ended up with separate multed tracks for the verse and chorus sections of the bass, the lead vocal, the guitars, the main rhythmic pad (the one that's most clearly audible in the first verse), and some vocoded parts in the song's intro. In this way, I pushed up the bass level and boosted its LF EQ by a decibel to balance the added brightness of the chorus synths and guitars; I gave the solo vocal line at the end of each chorus more compression and a low‑mid EQ boost to help it compete with the fuller texture; and I adjusted the levels of some different tempo‑sync'ed effects I'd used to fill out the rhythmic pad.
Many of the tracks on this song crossed between sections, so actually I ended up multing nine different instruments across 21 tracks in Reaper. Although this might seem a lot, it's far from unusual in my experience where you're concerned with pop dynamics, and working in this way considerably reduces the amount of level and effects automation you'd otherwise have to do to achieve the same ends.
Multing also helped to pull off a few little mix stunts that drew attention to some of the arrangement details. For example, the single lead‑synth file that Mark sent me comprised a swell into the second chorus, the little scale‑run at the end of the middle section, and the high solo line over the final choruses. By slicing these three regions onto separate tracks, I could give the swell and the solo some nice modulation treatments with Two Circuits' Audio Vibrato and the simulated Leslie cabinet from Guido Scognamiglio's Organized Trio; I could apply a big feedback‑delay special effect to the scale; and I could cut out some excessive low end from the solo, thereby allowing me to fade it up to a more audible level without it trampling all over the rest of the mid range during the final choruses.
I wasn't able to completely avoid using automation, of course, particularly on James' vocal parts — there's usually no alternative to detailed level automation in pop mixes if you're going to hear all the lyrics well enough. However, I was able to limit my other automation mostly to fader rides on the guitar, kick drum, and drum room tracks. (Fading up the room mics or overheads to open up choruses a little is another time‑honoured mixing technique that's useful in pop, rock, and even acoustic styles.)
Final Adjustments

As I normally do once I've got the majority of a mix up and running, I sent a draft mix to Mark and James to get their feedback on the new sound. While I was at it, I took the opportunity to query the song's introduction, which seemed a little on the long side for a pop track, given the comparatively static arrangement. They got back to me with a few fairly straightforward mix tweaks, as well as suggesting I try editing the intro down a little, and in the end we all agreed that the opening section worked better at half its original length. It's often only at the mix that you can really form a final view on things like this, so don't be afraid to experiment with section lengths even at the latest stages of the production.
Pitch‑correction Problems
As usual, I spent some time working on tuning and timing issues before getting into the mixing proper, but in 'The English Actor' the tweaks were pretty much limited to the vocal parts, which were at times under pitch. Although this was nothing that Melodyne couldn't comfortably handle on my system, I can see how it would have posed problems for the kind of automatic pitch‑correction algorithm that Mark had been using.
The main problem with automatic corrector plug‑ins is that the detection algorithm will occasionally misinterpret the intended pitch of a note, and with James' performance that was particularly apparent in the chorus section, where he was undershooting the pitch of the first note of each phrase so that the algorithm detected the pitch as being below his intended target. In this situation, no matter how strict your correction settings, you'll still not get the misinterpreted notes in tune. In fact, it may have been because those few notes were remaining quite flat‑sounding in the original mix, even after pitch correction, that Mark was encouraged to push the correction parameters a little too far in general, so that the side‑effects began to become a bit too apparent.
Remix Reactions
Mark & James: "Mike's mix is slick, bright, and punchy, and it really sounds like a fully fledged pop song now! The Dark Lord Senior really brought the production's elements to the forefront of the mix, with the much drier vocal sound and the superbly hard‑hitting rhythms. Although our initial mix had a fair amount more bottom end compared to Mike's version (due to listening to way too many recent Toto recordings), his different handling of those frequencies has really brought energy and smack to the song. The idea to shorten the intro was also well‑founded, and immediately the listener is now 'in' the track. We have pestered SOS many times with our mixes and are incredibly grateful that Mike has found the time to put his magic touch on this one. Top job, sir!”
Rescued This Month
 James Elder, the vocalist on this month's Mix Rescue.
This month's song, 'The English Actor', comes from artist James Elder, writing in partnership with Mark M Thompson, who also took care of the recording duties. Live parts were recorded by James and Mark in a room above the Wheatsheaf pub in Worthing, using a Focusrite Octopre preamp and Audio‑Technica mics, feeding a Digidesign Digi 002R interface and Pro Tools LE software. Drums were programmed by Eben Zinzello, the electric guitar and bass parts went through IK Multimedia's Amplitube 2, and synth parts came courtesy of Pro Tools' Hybrid and Xpand synths. Their original mix was also done in Pro Tools. If you'd like to check out some of the guys' other material, head over to their MySpace site, where you can hear more songs and find information about their upcoming single releases and US/UK tour.
Hear The Mix On-line
We've posted some before and after audio files on the SOS web site at /sos/feb09/articles/mixrescueaudio.htm, so you can hear exactly what changes were made to the individual tracks and to the mix as a whole.