 It's now possible to configure which elements of the Edit window are displayed without opening this menu lots of times!
Multi-select menus are one of many subtle but invaluable improvements that Avid have made to the Pro Tools user interface.
It's not always the flashy headline announcements in new versions of Pro Tools that prove the most useful in a typical session. Some would say that's just as well as, in the case of Pro Tools releases for music users working in stereo, it seems like a while since there has been a big, exciting new feature to play with. However, in line with the subscription-focused release model adopted by Avid since 2017, Pro Tools releases have incrementally introduced the kind of time-saving interface tweaks that benefit working professionals for the work they are doing every day. Rather than concentrating on introducing new possibilities, they have been making what is already there work more logically.
Since 2017, Pro Tools releases have incrementally introduced the kind of time‑saving interface tweaks that benefit working professionals for the work they are doing every day.
Box Ticking Exercise
Pro Tools 2018.7 introduced one such UI tweak, which addressed a source of frustration when showing or hiding elements of the Mix and Edit windows. For example, prior to 2018.7 it was very easy to hide an element of the Mix window — if you wanted to hide the Inserts F-J selector block, Alt-clicking on the Inserts F-J label at the top of the insert selector would do so — but there was no equivalent way to bring it back again. With the selector hidden, there would be nothing to click on, so the only way to bring it back was to go to the Mix window Views section of the View menu, or more typically, to the show/hide view selector menu found at the bottom left of the Mix window.
The frustrating thing about this menu, and a handful of others, was that each time an item was ticked the menu would close, meaning that to change five items involved five separate trips into this menu. Thankfully Pro Tools 2018.7 resolved this multiple visit issue, introducing a system of tick boxes that allows all the necessary changes to be made in a single visit. The new system can be found in several places around the Pro Tools interface. The Rulers view and the Edit window track header View menus allow quick setup of the Edit window, and in both cases, Alt-clicking hides an element, but previously, there was no way to bring multiple elements back in a single operation. These are now multi-select menus along with the previously mentioned Mix window menu, where sections like Inserts, Sends, Comments, Faders, Instruments and the new EQ curve window can be shown or hidden.
 Workspace browser users will be very glad that they no longer have to open and close this menu again for every parameter they want to change!The usefulness of these new multi-select menus becomes apparent when there are many options. The Transport window only contains five options and the toolbar six, so it's not a deal-breaker in these cases, but the same cannot be said for two new tick-box menus. The first of these is the longest of all and can be found in the Workspace browser.
The Workspace browser offers database management tools, and organising and searching large libraries can involve complex searches across multiple metadata types. The browser column show/hide menu is a drop-down list containing no fewer than 51 options. Until the tick box system was introduced, this was a laborious menu to set up, but now things are much quicker. Alt-clicking on an unticked item ticks all items; conversely, Alt-clicking on a ticked item clears the entire list. People using Pro Tools for music might not be regular users of the Workspace browser, which is often perceived as being oriented more towards post-production, but the integration of Elastic Audio with loop preview makes the Workspace browser very useful for previewing drum loops in context within a session (the lack of Elastic Pitch makes it less useful for melodic or chordal parts).
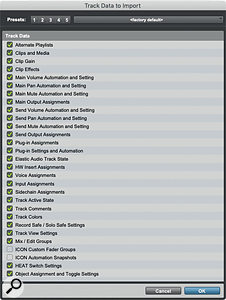
The other new multi-select menu, however, is found in one of those parts of Pro Tools that is essential for all users: the uninspiringly named Import Session Data window. Import Session Data allows pretty much anything to be imported from one session into another, from audio and MIDI files, clip groups, video files and track playlists, to I/O configurations and routing. It is an alternative way to save and reuse plug-in chains which pre‑dates the system of track presets that was introduced in Pro Tools 2018.1, and it allows the import of tracks from other sessions with or without clips, Playlists and plug-ins.
 The new multi-select menus are particularly welcome in the Import Session Data dialogue.Setting up what data to import is done in another long drop-down list, this time containing 29 options. Before the tick-box format was introduced, this list was time-consuming to set up. The most frustrating thing for regular users of this list was that the selections didn't persist, which meant users often found themselves having to set up their preferences over and over again.
The tick-box menus are quicker and more flexible, particularly once the Alt‑click method of clearing the list has been discovered, and your preferences can be stored in one of five user presets, or to a separate settings file. This system of five user presets is a feature of several areas of the Pro Tools interface. They can be found in the Edit window as zoom presets, for Pro Tools Ultimate users they appear again as clip effects presets, and in the Workspace browser they store column views and window size. (Disappointingly, they don't store the contents displayed in the browser — for that you'd need to create a catalogue.) To store a new preset in any of these five buttons, in whichever section of the UI they are, just Command‑click (Windows: Ctrl-click) on them until they flash blue.
Count To Five
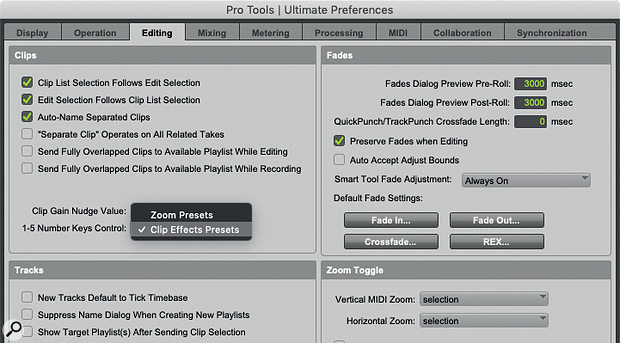
Two of these sets of five preset buttons have something of a special status in Pro Tools, in that they are recallable from the alphanumeric 1-5 keys. By default these are assigned to the zoom preset buttons, which, at their default settings offer progressively greater levels of horizontal zoom from 1 through to 5. Although this is a very practical arrangement, I've never been a zoom preset user: I prefer to use R and T with the Keyboard Command Focus active, or the mouse scroll wheel with Alt held down. I prefer to keep my 1-5 keys available for use with clip effects presets.
 If you use clip effects a lot, it may be worth configuring the 1-5 keys to apply clip effects presets rather than zoom presets.My typical uses for clip effects presets include things like applying a steep high‑pass filter at 100Hz to remove plosives on vocals. To set up a clip effects preset, just set up the clip effects settings in the Clip Effects window (you can use Alt + numeric 6 to open this window instead of mousing over to the disclosure arrow in the top right of the Edit window). Once your settings are correct, Command-click (Ctrl-click on a PC) until the button flashes three times, and your settings are stored. To configure the 1-5 keys to control clip effects instead of zoom presets, go to the Editing tab of the Pro Tools Preferences and select clip effects presets rather than zoom presets in the '1-5 number keys control' entry. Although clip effects are only available to Pro Tools Ultimate users, they will be applied on playback when a session is played back on a standard Pro Tools system.
It's The Little Things
These tick‑box menus are one of many examples over the last year or so of how Avid have quietly been looking at the function of Pro Tools as an everyday tool, identifying areas where it is inefficient or illogical and making changes to make a practical difference to users. These new menus and the plug-in and bus search functions (if these haven't found their way into your muscle memory then they really must — just click on a plug-in slot and start typing!) on their own are saving me time every day, and I value more time far more than I value a new whizz-bang feature which promises to mix my tracks for me at the touch of a button. Mind you, sometimes that sounds tempting too...
Behind The Curve
Leaving the new menus to one side for a moment, the EQ curve display in the Mix window has seemed limited by a lack of support from third-party plug-in developers. Some of the big hitters like FabFilter, Sonnox and McDSP are compliant, but far more manufacturers' plug-ins do not yet report their EQ curves.
One of the less obvious things this EQ curve window offers, which isn't available in individual plug-in windows, is that when more than one compatible EQ plug-in is used on a track, the sum of all compatible EQs is displayed in the EQ curves section. This is handy if, for instance, you like to use a seven-band EQ III for corrective EQ with an Avid Pultec for the bottom‑end trick.
