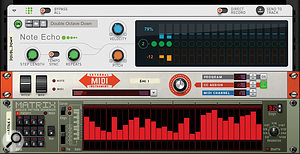
 Screen 1: The External MIDI Instrument device lets you output MIDI to any port on your machine.
Reason may be a self-contained studio, but it can still play nicely with others.
Reason is often perceived as a self‑contained software studio, but it's perfectly capable of working with hardware MIDI instruments. As with VST instruments and audio tracks, Reason treats external instruments slightly differently to most DAWs, making sure that your MIDI gear is integrated into the device Rack as well as the Sequencer. This month we'll look at how this works, and learn how to monitor and record your synths without latency issues.
The External Instrument Device
Most DAWs base their functionality around tracks, relying on multiple types of tracks to manage different situations. They have audio tracks for recording and playing audio, MIDI tracks for sequencing MIDI data, and instrument tracks that combine MIDI sequencing with an audio input route.
In Reason, each MIDI track in the Sequencer belongs to a module in the Rack. Internal instruments have their own MIDI track plus an audio Rack module for connection to the mixer and insert effects. This may seem complex but it means the instruments in your project can interact freely in the modular environment instead of being contained in separate tracks.
To work with external MIDI instruments, Reason uses a dedicated device called, sensibly enough, External MIDI Instrument (EMI). This is the last device in the list of built-in Reason devices in the Browser. An EMI device has its own MIDI track, and provides a conduit to route MIDI out of any MIDI ports on your computer. The device also has gate, note, and CV connections so that you can sequence or control external devices from Rack modules rather than (or in addition to) the Sequencer. Note that the EMI device is only used for MIDI output from Reason. MIDI inputs from external sources are managed like MIDI controllers, using the Control Surfaces tab in Preferences, or routed to Rack devices via the Advanced MIDI hardware interface. More on that another time.
Plug Out
Let's look at the most common and basic scenario: playing an external MIDI instrument via Reason, then later capturing it as audio. To start, drop an EMI device into the Rack, then use its central pop-up menu to select a MIDI output. In Screen 1 (above) I've chosen an RK005 MIDI interface which is connected to the synth I wish to play. Set the MIDI channel using the selector on the right of the EMI panel. With the EMI device targeted in the Rack or Sequencer, you should now be able to play your hardware device from your main MIDI controller and sequence it much like any internal device.
There are two other controls on the EMI's front panel: Program and CC Assign. Program lets you recall presets on your external device. This control can be automated, allowing you to trigger patch changes in the Sequencer timeline. The CC Assign setting affects the solitary knob on the EMI interface, which is used as a source for controller data to your instrument.
CC data from your controller keyboard will also be passed through and recorded into the Sequencer if necessary. The CC knob gives you an additional independent way to send and record CC data, and can also be controlled from CV, allowing you to connect a Rack modulation source to your instrument. If you capture some CC automation into the Sequencer using the EMI knob, you can then change its value and layer other parameters.
Audio
Unfortunately unlike, say, Ableton Live's External Instrument device, Reason's EMI module does not provide an audio input port for monitoring or recording your hardware instrument. Instead, you'll need to make audio connections yourself, either directly into the Rack or Mixer from the master hardware I/O module, or via an audio track.
The way you choose to connect audio depends on how you like to work. An audio track is the simplest and neatest option, especially if you want to record the audio from your external device. Use a direct connection into a Mix Channel if you're likely to leave the external gear running live throughout the project, or if you want to process the audio before recording.
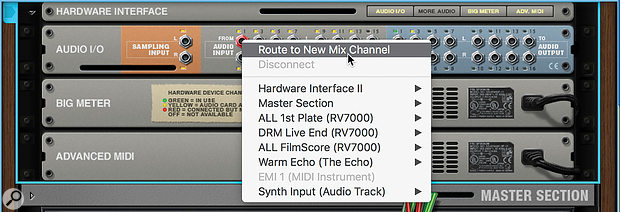
 Screen 2: If you prefer, instruments can route directly into the Rack or Mixer instead of an audio track.
The quickest way to route an input directly into the mixer is to flip the Rack, scroll up to the Audio I/O module at the top, then right-click on the input where your instrument is connected. Choose 'Route to New Mix Channel' (Screen 2) and a new mixer input module and strip will be created, patched from the hardware input. If it's a stereo input, add the right leg manually.
If you want to use an audio track, add one from the Create menu, right‑click menu or 'Add Track' button in the Sequencer. Then set the input using the 'IN' pop-up menu in the track's header panel in the Sequencer. As well as physical inputs, you can choose other mix channels that have their 'Use as Record Source' button engaged.
Monitoring
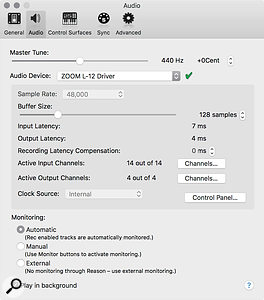
With a live Mix Channel, your instrument will be monitored through Reason at all times unless you mute the channel. With an audio track, monitoring will depend on the monitoring settings in the Audio tab of the Preferences (Screen 3). There are three options: Automatic, Manual and External. In Automatic mode, Reason will assume that you only want to monitor the input when recording, although you can override this by clicking the green input monitor button on the track.
 Screen 3: Reason's master monitoring mode determines how audio latency is managed during recording.Automatic mode is not so great for working with external sound modules as you'll most likely want to monitor the source while recording and editing MIDI. Manual mode may be more appropriate, allowing you to leave the audio track monitoring the live input until you've recorded it, then switch the track to playback monitoring thereafter.
In my setup I often use External mode, as I'm using a hybrid mixer/audio interface and tend to monitor my hardware sources with zero latency through this mixer instead of Reason. External mode disables the monitoring buttons on Audio Tracks, and leaves them permanently in playback mode. You then manage your monitoring manually on the external mixer: once you've recorded your part in you can mute the instrument channel in the external mixer. If you need to perform any punch-ins it's generally good to switch to Automatic monitoring so that you'll hear both the pre-recorded material and your new take as you drop in.
Latency & External Instruments
 Screen 4: A comparison of audio captured from a MIDI instrument with different monitoring modes and buffer sizes. External mode should record in time, without need for manual alignment.We've tackled the topic of audio latency and input monitoring before when we looked at recording guitars in Reason. But it's worth recapping, and in any case there are some important differences when capturing MIDI sequences as audio compared to playing an instrument live.
The basic picture is that audio signals coming in and out of Reason incur time delays caused by the input and output buffers (and potentially delay compensation in the Mixer). Audio playing back from Reason is delayed by the output buffer, and external audio sources monitored through Reason are delayed by both the input and output buffers. External audio sources that you monitor externally to Reason (as I do with my Zoom mixer) are not delayed at all.
 Screen 5: An External MIDI Instrument module with companion audio track for monitoring and recording your hardware sound source.These timing discrepancies present a tricky challenge when monitoring and recording external sources against existing tracks or the click in Reason. If you're using External monitoring mode (or Manual mode with input monitoring Off) and listening to your hardware instrument directly, things work out quite well. MIDI from Reason is output in time with audio playback and your hardware will sound in time. What's more, if you record your synth into Reason, the audio will be nudged to compensate for the buffers and should line up to the original MIDI events.
 Screen 6: Because the connections to an external instrument are in the Rack they can be sequenced and modulated by other devices and Players.Automatic monitoring mode is a different story. In this mode the audio you hear from your hardware is being delayed by the buffers so will sound late. How noticeable this is obviously depends on the size of your buffers. What's more, Reason does not compensate when recording, because it makes the assumption that you're playing live and compensating by ear. Of course when it's a MIDI track triggering back your synth this isn't the case, so you inevitably end up with audio recorded late in the timeline. Screen 4 shows some recordings made with different monitoring modes and buffer sizes.
Reason's manual offers some suggestions for time-aligning MIDI controlled sources, such as adjusting slice markers or using the Regroove mixer's Slide setting. We'll look at these next time alongside considerations of sync with MIDI Clock, Ableton Link, etc. Honestly, though, the simplest approach if you want the convenience of monitoring through Reason is to get your buffers as low as possible in the first place, then manually nudge recorded audio after it's been captured. To do this, zoom in on the start of your recording (like in Screen 4), switch off Snap, then trim the front of the audio clip right up to the first event. Then move the audio in time to visually align it with the original MIDI notes.
