 Revoice Pro can import tempo and time-signature information, including programmed changes, from your DAW. For example, notice the change here from 4/4 on bar one to 3/4 in bar 2.
We explore some more advanced techniques and less-obvious applications for Synchro Arts’ powerful audio-alignment processor.
Welcome to the third and final instalment of our Revoice Pro (RP) series. In the previous two articles, I took you through pretty much everything you need to know to manipulate the pitch, time and level of audio manually, how to apply the automatic doubling and alignment Processes, and some useful ways to organise and navigate your RP projects. So, hopefully, you’re already fairly proficient with RP, but there are more strings to RP’s bow than the simple aligning, doubling and pitch-correcting of vocals. In fact, it makes various less obvious possibilities, erm, possible, so this month I’ll consider a few examples. Before I do, however, there are a few more operational points to run through.
Starting Grid
I didn’t have space last month to discuss the timing grid, so let’s quickly address it here. Note that to get a grid to appear in the first place you’ll need to have an audio event in your RP project (the grid disappears when there’s no audio). You must also, via the drop-down menu at the bottom of the main GUI, change the view from the default (Timecode) to Bar & Beats. Your grid will then appear, and its characteristics are defined in the View/Settings menu. Here you can specify a fixed tempo and time signature, but while that’s useful enough for projects that have been either programmed at a fixed tempo or tracked to a fixed-tempo click, it won’t work for every project. Thankfully, Synchro Arts have incorporated a means of importing the tempo and time signature from a MIDI file that you export from your DAW project. So if you’ve composed a piece with time-signature changes or tempo ramps, or have, say, warped your DAW’s grid to match a live performance, all you need to do is export a MIDI file from your DAW project and import it to RP.
To import a tempo/time-signature grid is a two-step process. First, go to File/Import MIDI File... Then, in View/Settings, change the Bar & Beats Display setting to Import Tempo From MIDI File. The grid will automatically change to reflect your DAW project’s tempo and time-signature changes, with the audio remaining at the position determined by its timecode. It’s worth noting that you can switch back and forth between a fixed-tempo grid and the MIDI-derived one without losing either setting. With this grid in place, edits to the timing/length of notes become much easier.
Navigational Aids
When you’re working with complex RP projects, with lots of tracks and multiple APT and Doubler Processes, it can be a bit tricky to find your way quickly to the correct Processes. Obviously, methodical naming of tracks and Track Groups can help, as discussed in part one, but there are a couple more useful navigational aids.
 Adding a Marker track and inserting a Marker, which takes the form of a text box.
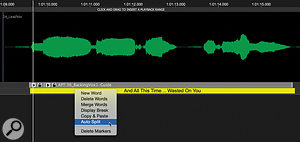
 It’s possible to paste whole sentences or lyric sheets and use the Autosplit function to separate the resulting Marker into individual words — multiple Marker tracks can be displayed for different purposes.

 It might not be called ‘automation’ but the facility to vary Process Settings over time will be familiar to any DAW user and allows you to create much more polished results.
 First, note that while the Processes themselves are given names automatically, they can be renamed. RP will retain a prefix to describe the type of Process (eg. ‘APT:’) and a suffix to tell you whether the Process is on the Guide or Dub, but you get to determine what goes in between. So, for example, if I renamed an APT Process ‘Renamed Process’, it would be labelled ‘APT: Renamed Process-Guide’ on the Guide track, ‘APT: Renamed Process-Dub’ on the Dub track, and the Output would be automatically renamed ‘APT: Renamed Process’. That’s not only useful within RP, though — this is the name that’s given to the audio clip that you copy/paste back into your DAW, so the chance to call it something meaningful is welcome!
There are (rare) occasions when you might want to perform a ‘two-way APT’ (my term, not Synchro Arts’), whereby you map the timing characteristics of one part onto a second part, and the pitch or level characteristics of the second onto the first. I find that the best way to keep order on such occasions is to convert the Output of the first Process to audio within RP and base the second Process on that. To do so, you can simply use the same drag-and-drop approach as you would if transferring the Output back to your DAW: select the Output, and Shift-Alt-click to bring up the WAV icon, then drag to a vacant track in RP. Now you can treat it as a freshly imported Guide track.
Marker My Words!
Continuing the theme of navigation, RP allows you to create what it calls Marker tracks, though I think of them as ‘text tracks’, as they function rather differently from my own DAW’s markers. Essentially, Marker tracks allow you to display words (such as a script or a song’s lyrics) alongside your audio. But this is more than a simple text facility, because when a marker or group of markers (you can select a group of them using the usual Shift-click facility) is selected, they become the default playback range.
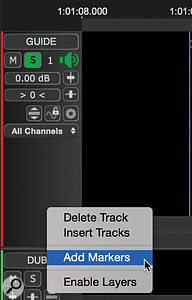
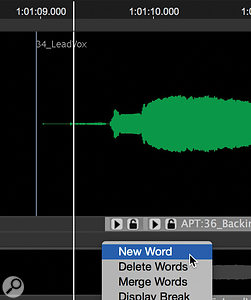
To create a Marker track go to the left of the track beneath which you wish the markers to appear. Right-click and select Add Markers. A grey area appears beneath the track in question, and if you right-click in that, you’re presented with a number of options, the first of which is New Word — you need to select this to get started.
You can type away to your heart’s content, but note that you can also paste text in, so you could, for instance, import song lyrics that way (it’s rather easier to type them out in a dedicated text editor than doing it directly in RP). If you do that, then you’ll probably also want to investigate the Auto Split facility, which splits the marker into multiple markers, one for each word. You can then drag and stretch/shrink the individual markers to align them to the words you can hear in the audio.
Note that you can have more than one Marker track beneath each RP track. That means, for instance, that you could have one track to contain the words, another one to label song sections and yet another to hold any notes you wish to make about some aspect of the track that you feel might require attention. Given that the selected Marker forms a playback range, I find them particularly useful for that last purpose.
There’s one ‘gotcha’ to be aware of, though, which is that various functions of the Marker track (eg. Merge and Split, which do precisely what you’d imagine) don’t seem to be remembered by RP’s undo history. Watch out for that, because while you might not often need undo for this function, it’s second nature (to me, at any rate) to hit Cmd-Z when I make a mistake, and doing that here will undo something else entirely — though at least you’ll see the red render wheel light to warn you that’s happening (in which case select Edit/Redo).
Obviously, markers are a great way of navigating your RP project, but there’s another potential application that you might not have considered: by sync’ing RP to your DAW you can, if you don’t have a more sophisticated alternative, use RP as a crude autocue when recording into your DAW.
Automation
Last month, I promised that this time around I’d take you through RP’s automation functions, which are invaluable, but also probably less than obvious to find for most DAW users.
Note that the facility applies largely to pitch-related settings — automating time Processes would soon lead to insanity! That said, it’s still possible to automate the time-alignment Tolerance. It’s a shame, but the level-transfer functions don’t appear to be similarly variable.
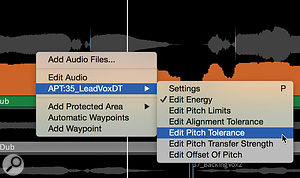
To access the automation, with a Process selected, right-click on the associated Dub (for an APT; for a Doubler use the original file, which is, in effect, both Guide and Dub) and in the pop-up menu move the cursor to the relevant Process. A submenu will appear, in which you’re given a number of options, such as ‘Edit Pitch Transfer Strength’ and ‘Edit Pitch Tolerance’ for APTs, and ‘Edit Depth of Randomisation’ and ‘Edit Formants’ for Doublers.
Selecting one of these menu items puts a familiar-looking DAW-style automation overlay on the part. This starts life as a straight line, reflecting the static settings defined in the Process Settings dialogue box. But click on the line and an automation point will be added. Then, just drag it to the desired time/value and you’re done. Over on the right, by the scroll bar, a discreet label informs you which parameter’s automation line is currently displayed, and on the line itself, the parameter value at any edit point is displayed.
What’s a little unfortunate is that it seems only one automation line is ever visible at once — you can’t view two automation parameters simultaneously on the same track. While you only really need to edit one parameter at a time, this setup does mean that you can lose track a little if you’re doing lots of automation. It would seem sensible to me to have a system whereby all automation can be revealed on screen at once, perhaps as different-coloured overlays, or perhaps in different lanes beneath the track/Process in question. That’s one for the future maybe, but meanwhile, the quickest way to reveal to which parameters you’ve already applied automation (other than the currently displayed one) is to open the Process’s Settings window — any settings that have been automated will be greyed out and inaccessible here.
I’ve only really used the automation facility for corrective purposes so far, and mostly for fine-tuning the results of an APT’s pitch-mapping, but for the Doubler, in particular, there is creative potential too. I’ve often wondered what might be achieved by automating formant shifts on two doubles but in the opposite direction, rather like cross-fading the formants, but I’ll leave such experiments to you for now!
Comping
RP also incorporates a basic comping facility, named ‘Layers’. You’re able to create up to four Layers per track, and place audio on any of them. To do so, as when creating Markers, right-click to the left of the track in question, but this time select Enable Layers. By default, all layers are visible. You’ll see the waveform reflecting the sum of the layered parts at the top and the main part in layer one beneath, with three empty layers below that. You should see an orange icon to show/hide all Layers (three horizontal lines, with the shortest at the bottom and the longest at the top). The drop-down initially labelled ‘All Layers’ can be used to limit the display to a single layer of your choosing. You can import parts to the other layers just as when adding them to a regular track, and the top-most clips take precedence — they mute any audio beneath them. Thus, it’s possible to drop the odd word in here and there to comp a part to act as a Guide or Dub (you’ll probably want to drag the main part to the bottom layer to make this easier).
 The Layers feature provides a basic comping facility — only the uppermost clip is played at any time.
Useful as it is to have such a facility built in, I must admit that I rarely find myself using it, as the comping facility in various DAWs has come on in leaps and bounds in recent years — I’d much rather prepare files there and import them into RP, and let RP focus on what it’s best at.
Let Me Be Your Guide
OK, let’s consider some of RP’s more creative possibilities. We’ve all been confronted at one time or another with a vocal talent with an amazing vocal timbre, but who can’t quite nail the pitching or accent certain phrases quite as you’d like. To make the best of what you managed to capture, rather than go in and tune the bejeezus out of it, you could instead sing a guide part yourself (or find a more competent singer to do it for you!) after the fact, and use that as a Guide for an APT process that will almost automatically correct the timing, pitch and emphasis all in one go.
But it’s not all about pitch. If you have, say, a sloppily timed rap part with lots of doubles and even the lead part isn’t quite on the money, you can sing/rap a fake lead, against which you can time-align everything. And you can even use a level-only APT as a kind of automatic level automation — process/automate your new guide part to taste to make it perfect before importing it to RP, and the results can be great. Obviously, the degree of success you achieve is always going to depend on how well the original was sung — silk purses are never made from sows’ ears — but if you get it right, this post-production guide-track approach can be surprisingly effective.
Not Just Vocals
The saying ‘the clue is in the name’ doesn’t really apply to Revoice Pro. While it certainly excels at the manipulation of dialogue and sung vocals, it’s also perfectly possible to use it to good effect on other sources. For instance, there’s no reason you couldn’t apply the guide-track techniques we’ve just considered to refine a guitar part. Perhaps you tracked a solo in a studio with a beautiful miked-up amp tone, but back in your home studio you identify some pitch or timing issues or playing dynamics that you’d like to tweak. There’s nothing to stop you playing a DI’d part to use as a Guide and applying its characteristics to your studio-tracked part. And, for that matter, there’s nothing to stop you doing that to someone else’s part if you can play well enough!
Hats Off To Revoice Pro
 Some experiments in hi-hat processing — mapping the accented feel of one part onto the other is possible, though may require processing of your guide part, such as gating, for the best results.You can apply the same technique to various other melodic sources, of course, but one of the most surprising things about RP is that, with a little effort, it can be used on drums and percussion. For instance, I was, fairly easily, able to apply the feel of one hi-hat audio part on to another, both in terms of timing and level variations, despite them having been played on different hi-hats and in different rooms. (Note that you’ll want to set the Protect Transients slider to maximum for this sort of work!)
And, though it took some work, I was even able to tap in a new guide part for the hi-hat using my fingers on the surface of my MacBook Pro, with the internal mic recording the result — that works better for timing than for level, but by gating the tapped-out guide and carefully tweaking the transfer strength of a level-only APT (I found it worked best to set this to zero and audition gradual increases of this setting until I arrived at the best result), I was able to manage both. Of course, I mention this as an illustration of what’s possible; you might get more joy from automated gate effects or level automation as the work involved here is not insignificant if you’re to achieve high-quality results.
DAWs Wide Open
Something that’s obvious when you stop to think about it — but often you don’t — is that the processes you apply in the confines of RP don’t have to be the end of the story. Just as you might create complex chains of processors and effects, so too can your RP Process form only a single stage of a more sophisticated process. In fact, the results of the Doubler process lend themselves wonderfully to being further manipulated when you’ve returned them to your DAW project.
 A Revoice Pro Doubler part can form the basis of a more complex widening patch in your DAW. Here I’ve used a stereo Doubler on a bass part, and in the DAW filtered the result and soloed its Sides signal before sending it to a reverb. The original bass part also plays along, untreated. The result is a nice, spacious effect that works in stereo and isn’t missed in mono.
Here’s an example: a bass-widening patch that I set up in Cubase, based around the results of a stereo Doubler I created in RP. At SOS, we’ve often been asked for advice on how a mono bass sound (such as, say, a bass guitar part) can be made to sound somehow wider, without losing the impact and solidity that a mono part panned to the centre typically delivers. Applying some sort of chorus effect generally gives a nice sense of width, but also tends to rob the bass of the aforementioned power and solidity. And I’ve not yet heard a straightforward double-tracked bass part that sounds right! So what I typically end up doing is creating a duplicate of the bass part and filtering it, before applying a chorus or other widening effect. That way, the original bass contributes the low frequencies, while the chorus adds width in the mid-range.
The RP Doubler is currently my favourite ‘chorusey’ effect by far, and a similar approach works well based around a stereo Doubler. You’ll find an example of the sort of effect you can achieve in the videos that accompany this series (http://sosm.ag/revoicemedia). I created this by generating a stereo double using the RP’s ‘Stereo Instrument Mild Vibrato’ preset, and filtering out the mid signal so the track is only contributing ‘width’, and then high-pass-filtering fairly steeply at around the 100Hz region. I find the best approach is to set the HPF very high so that you hear nothing, and then drag it down until the effect is contributing what you want. As a further step, you can send this track (but not the dry one) to a reverb. It’s an effect you can use on other sources, of course, but I find it particularly useful on bass guitar and synth parts. As this variation is a Sides-only effect, it’s not heard in mono, but I view it as fairy dust for the stereo mix; the main bass part works just fine in mono.
And I’m afraid that, ladies and gentlemen, is that. I hope you’ve enjoyed it, and that you now feel confident and able to make the most of this unique and powerful auto-alignment software.
ReVoice Pro 3.2 Masterclass (Part 1 of 3)
ReVoice Pro 3.2 Masterclass (Part 2 of 3)
ReVoice Pro 3.2 Masterclass (Part 3 of 3)
