This uniquely powerful pitch, energy and time alignment software could save you hours of edits.
Synchro Arts Revoice Pro (from hereon ‘RP’) is a unique stand-alone program that, with familiarity, can be used with your DAW with almost plug-in-like ease. You could think of RP as Vocalign on steroids! It allows you automatically to map not only the timing, but also the pitch and ‘energy’ characteristics of one vocal part onto others. You can also make manual adjustments to pitch, time and formant, and while other tools can do that there’s a crucial difference: any adjustments you make to the Guide (see Glossary box) can dynamically update the processing you’ve done already. An obvious application is the tightening of stacked vocal doubles or harmonies, but the same algorithms can be used to fake very convincing doubles and harmonies. When you dig a bit deeper, there’s potential for all sorts of creative manipulation of various instruments, not to mention the ability to make ADR sessions sound more natural.
The only real ‘downside’ is the learning curve: while there’s instant gratification to be had via the presets, this is sophisticated software. Not only is there new terminology for new users to get their heads around, but the array of options and possible workflows can seem almost bewildering at times. To help you achieve the best results quickly and consistently, this short series will guide you step by step along that curve, helping you progress from RP virgin to power user.
Overview
RP includes some plug-ins but at heart it’s a stand-alone application, so I’ll start with an overview of the various ways you can set up RP to work with your DAW. Which approach you choose will vary according to your DAW, your workflow preferences and what you’re trying to achieve. This month, I’ll also demonstrate how to apply and make simple tweaks to RP’s factory presets, and suggest some useful ways to organise your RP projects, to make auditioning and comparing results easier. Later in the series, we’ll cover detailed edits, manual pitch and time correction, and various more advanced features. I’ll also suggest a few less obvious applications for RP!
The text and pictures give you all you need, but I’ll also provide some videos to help you get a feel for things. You can find them here. I also recommend acquainting yourself with the Glossary box! Finally, the current version at the time of writing is RP 3.2, which I’ve used throughout: it includes several features not present when Sam Inglis reviewed RP 3.0. There’s a free 14-day demo (an iLok is required), which Synchro Arts say they’ll reauthorise once, giving you nearly a month’s trial before you buy.
Getting Started
 However you transfer audio between your DAW and Revoice Pro, you must ensure various project settings in Revoice Pro match those of your DAW.You must first ensure RP’s settings match those of your DAW. To start, load your DAW project, and in RP go to View/Settings. You must ensure the following settings match the equivalent ones in your DAW project:
- The sample rate. If you’re using the same audio interface for both applications this should be set automatically, but there are rare scenarios in which you might be using separate interfaces.
- The project start time. Different DAWs default to different start times. Without aligning these, your audio won’t sync.
- The timecode rate or frame rate.
- The project tempo in bpm.
If all your projects typically have the same sample rate, frame rate, and project start time, save your changes as the default via File/Save As Default Session. If using the plug-in-sync approach (which I’ll cover next month), change these settings before loading the plug-in, to avoid a timing offset on sync’ed playback.
You should also consider the audio file type. RP can accept WAV/BWF or AIFF files, at 16-32 bit, 44.1-192 kHz, but it will always output time-stamped broadcast WAVs. While AIFFs can be time-stamped, the format isn’t standard across applications. So unless you’ve inherited a project containing AIFFs, it makes sense to set your DAW to record broadcast WAVs (BWAV or BWF).
When it comes to moving audio between RP and your DAW, you can:
1. Apply the default alignment and fake double-track presets using RP’s AAX Audiosuite plug-ins for Pro Tools. (See the Audiosuite Satisfaction box.)
2. Drag and drop or copy and paste from one application to the other, or from RP to Finder or Windows Explorer.
3. Use the Revoice Pro Link plug-in to capture audio into RP from one or more tracks during DAW playback.
4. Sync RP to your DAW and monitor the stereo output in your DAW, via the Revoice Pro Monitor plug-in.
Copy & Paste/Drag & Drop
The copy-and-paste and drag-and-drop facilities make life easy for beginners. Full support for both is offered by Cubase (5 and above), Nuendo (5 and above) and Studio One 3, while Logic Pro supports only drag and drop. Reaper users can also drag and drop, though not, as far as I can tell, copy and paste. As with the Pro Tools plug-ins, the audio that’s copied/dragged to RP is based on the DAW clips/regions rather than the whole underlying audio file.
Whether you drag and drop or cut and paste, the audio can be automatically spotted on RP’s timeline — you get the option to place clips according to their timestamp, a user timestamp, the drag location or the playhead. To keep sync with your DAW select the first option; you may occasionally want to use the others but let’s keep it simple for now.
When you’re done processing (we’ll get to that later!), hold Shift+Alt or Shift+Option and click and hold the Output part in RP, and a little Wave symbol pops up. Release the modifier keys and drag the part to your DAW and drop it on a track. Some DAWs require a similar modifier to drag to another application. In Reaper, for example, you hit Cmd+Option (Mac) or Ctrl+Alt (Win).
As the audio won’t align automatically in your DAW, select the part and apply your DAW’s spot or equivalent command (see the Spot The Difference box) to move it to the correct time.
If Your DAW Won’t Drag
Not all DAWs support these approaches fully and some don’t at all. For instance, both the DAW and RP crashed several times when I attempted dragging an RP Output to Pro Tools 11’s arrange page (in Pro Tools 12 it worked fine). Thankfully, you can drag and drop between RP and Finder/Windows Explorer, so you can drag from RP to there, and then use your DAW’s import facility if necessary. And if you can’t drag from your DAW, there’s usually an easy way to locate the files and drag them to RP. Seeing as I mentioned having issues, here’s how you’d do that in Pro Tools:
1. Use the selector tool to define the section you wish to transfer.
2. Hit Cmd+E (Mac)/Ctrl+E (Windows) to turn the selection into a separate clip.
3. Consolidate the region (Shift+Alt+3) to create a new file.
4. Select the clip in your arrangement to highlight it in the Clip List, then right-click on it in the Clip List and select Reveal In Finder/Reveal In Windows Explorer.
Users of DAWs I’ve not mentioned can check Synchro Arts’ web site (www.synchroarts.co.uk/compatibility/editors/Revoice+Pro+3) for the latest details on compatibility.
Link Plug-in: Audio Capture
The other means of getting audio into RP is via the Revoice Pro Link plug-in (AAX/AU/VST3), which ‘learns’ the audio in much the same way as various noise-removal or pitch-correction plug-ins. You place the plug-in on the track(s) you wish to bring into RP, and on each instance ensure Capture is enabled. Select the RP track you wish to record onto and click the chain icon to enable linking. When your DAW plays, the audio will be recorded to the specified RP tracks and spotted automatically. When you’re done, bypass/remove the Link plug-in(s) to avoid recording next time you hit play.
Compared with dragging or copying, one benefit of the plug-in is that you can transfer multiple tracks to RP simultaneously. Another is that capturing only short sections doesn’t require you to make edits in your DAW. A third is that you can place the Link plug-in at any point in the signal chain, to incorporate any de-essing, high-pass filtering or other clean-up processes before transfer (RP can’t host plug-in processors) that might make RP’s job easier.
Going All GUI
Now you can get audio into RP, let’s ensure you can find your way around it — other than understanding RP’s terminology (see Glossary box) the first things you need to understand are the basic layout and how to navigate your RP project efficiently. Tracks run horizontally, and you can zoom on the timeline by using the slider at the bottom right-hand side, by hitting R (zoom out) and T (zoom in), or using Pro Tools’ zoom shortcuts: Cmd/Ctrl+[ and Cmd/Ctrl+]. Option/Alt+A condenses the timeline to view the whole project, though curiously this doesn’t work once you’ve applied an APT or Warp Process.
To scroll up and down, use the scrollbar on the right, which only appears when there are enough tracks to require it; the scroll-wheel/track-pad swipe performs another function which we’ll explore another time. Each track has solo, mute and enlarge/shrink buttons. The last toggles the track between the small (multi-track) and large (single-track) views. There are also pan and level controls, and a few others you can ignore for now.
At the top of the page is a DAW-style timeline — click on this to move the playhead. Immediately beneath is an area in which you can click and drag to select a playback range, which doubles as a means of selecting portions of audio. To remove the range, right-click it and select Delete.
There are no different track types in RP, as they’re all created equal, but their contents dictate what you can do with them: they can contain audio clips or an Output, and the audio tracks can be used as a Guide or a Dub or, for different Processes, both. To get RP to do anything, you must apply a Process to a Guide or Dub, and you can apply that Process to the whole track, or a selected range.
The Output of each Process is written to a separate track, leaving the originals intact. Lurking behind each Output is a temporary audio file, and as you tweak a Guide track, or a Process’s settings, the updated Output is rendered in the background. Rendering is denoted by the cog at the bottom illuminating red, and you can speed things up by clicking the cog, or hitting the space bar — the latter renders before playing back the result.
 or Windows Explorer (Windows).") Use the Shift+Alt modifier to drag audio out of Revoice Pro to DAWs that support it, or to Finder (OS X) or Windows Explorer (Windows).
Use the Shift+Alt modifier to drag audio out of Revoice Pro to DAWs that support it, or to Finder (OS X) or Windows Explorer (Windows).
Make Mine A Double!
That’s enough orientation for now: it’s high time we got on to some examples! We’ll start by creating a basic fake double. You’ll need a vocal part (it works well for electric guitar too, amongst other sources) on one track, and an empty track to accept the Process’s Output. There are three tracks in the default RP session, which gives you enough to be getting on with, but you can create a new track via Shift+Cmd+N/Shift+Ctrl+N, or Tracks / Add Tracks.
Make sure your clip is selected (the audio will illuminate green), then hit the B key or right-click where it says ‘Right Click Here To Add A Process’, and in the drop-down menu select Doubler. The input should default to Selected Audio but if not, choose that manually. From the Output drop-down, choose the track on which you wish the Output to appear. Then, from the Presets drop-down, select Factory Presets / Default, and hit New Process.
 To add a Process, you must first choose a preset, but don’t worry — you’ll be able to tweak it later.
You won’t see the result instantly; RP will be rendering in the background. So hit play to speed this up and audition the result: you should hear a fairly convincing impression of a double-tracked part straight off the bat. The tracks will both be panned centrally by default, but you could try hard-panning the Output to one side and the Guide to the other to add stereo interest. Alternatively, how about creating a stereo double, so you can leave the Guide in the middle for a more solid centre image? To do that You could repeat the process using the Stereo Vocal Loose Timing preset. But let’s tweak the process you already applied...
Below your Guide there should now be a green bar representing the Doubler Process. (When you’ve applied multiple Processes, click on the corresponding Output to change which Process is visible.) Click on its triangular arrow and a box of parameters will appear. For now we just want the drop-down where you specify the number of Output channels. Select ‘2’ and your Output will (once rendered) transform into a stereo version, with one double occupying the left channel, the other the right. Ensure the Guide and Output tracks are panned to the centre and enjoy!
While this often works beautifully, I’ll sometimes want the wide-panned doubles to be lower in level than the Guide, so try lowering the fader on the double and bringing it up until you can just hear it. It can sound subtle, but if you mute the double you’ll notice it’s gone! Finally, you can save your tweaks as a user preset and/or the default Doubler preset: go back to the parameter-adjustment dialogue, click on the purple Presets drop-down and both these options will be available.
 The settings for any preset can be changed in various ways. Here, I’m changing our original mono Doubler preset to give me a left-right panned stereo double.
APTitude
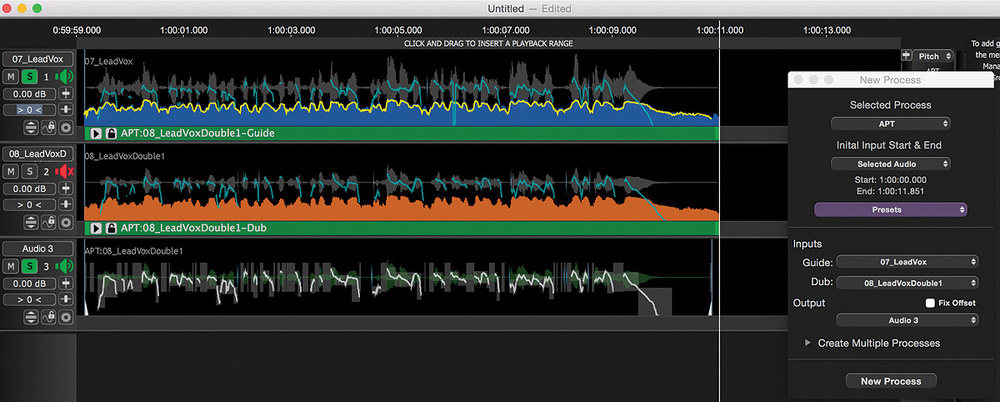
APT stands for ‘Audio Performance Transfer’, and this Process analyses the pitch, timing and energy of multiple tracks and applies those of the Guide to those you’ve assigned as Dubs. You can choose which characteristics to impose: you can, for instance, ignore the pitch altogether and impose only the timing or vice-versa. In fact, you have lots of control over the result, but again we’ll keep things simple for now.
Start with five empty tracks. Put the Guide part on the top one and place each double on its own track just beneath. The other two tracks are for your Outputs. Select your Guide part and hit B or right-click to add a new Process, this time selecting APT. You need to provide a little more information than for the Doubler but the approach is similar: there’s a range of presets based around pitch and time alignment, and it’s not particularly critical that you make the right choice now, as you can tweak things later, but I suggest you start with the Tight Timing preset.
Using the drop-downs in the bottom section, instruct RP which tracks to use as the Guide and Dubs, and on which to write the Outputs. If you were applying this Process to a single double, that’s where you’d stop: just hit New Process and you’d be done. But we wish to apply it to two doubles simultaneously, so there are a couple more steps.
First, tick the Fix Offset box, which informs RP how many tracks below each Dub you wish its Output to be written to. Then click on Create Multiple Processes, and set the Number Of Processes to ‘2’, one for each double. Leave Dub Track Increment at 1, as our second Dub is one track below the first. Hit New Process to apply your APT, mute your original doubles and hit play. Use the mute/solo buttons to compare the original and processed versions. If you like what you hear, copy/drag the Outputs to your DAW and spot it.
 Using the Create Multiple Processes section of the dialogue to align two vocal doubles to the main lead part simultaneously.
Get Organised!
I’m sure you noticed that soloing/muting tracks to compare different combinations can be fiddly, so let’s find out how to impose some order on your RP projects!
Each time you apply a Process, you create one or more Output channels. Your Dubs aren’t deleted, so when working with multiple doubles or stacked backing vocals, and especially when trying to work with multiple different double-tracked parts, you can end up with a cumbersome number of channels. This poses hurdles whether you’re soloing/muting as before, selecting Guides, Dubs and Outputs from menus, or dragging clips to and from your DAW.
The first thing to do is decide on sensible track names. In my DAW, I label tracks by instrument, so I’ll have tracks called Vox Lead, Kick In, Kick Out, Gtr Lead and so on. But you’re not (usually) going to be working with multiple instruments in RP — you’re more likely to have multiple versions of the same source, making that scheme somewhat confusing! Instead, I suggest using a dedicated RP project for each source, with names like Guide, Dub 1, Dub 2, Output 1, Output 2 and so on. This makes it very easy to spot the Guide, Dub and Output tracks in the Process drop-down menus, and it means every RP project will be laid out and labelled in the same way — and familiarity will save you time. Unfortunately, you can’t sync multiple RP projects via the Monitor plug-in (discussed next time) simultaneously. So, while I don’t like creating unwieldy RP projects with multiple different sources, each with their own Dubs, processes and Outputs, you’ll need to do that if you wish to sync playback.
Another consideration is the order in which your tracks are displayed. I find putting the Guide at the top, Dubs immediately beneath, and Outputs at the bottom, as in our examples, creates the most navigable setup. An alternative would be to put the Guide at the top, with Dub and Output pairs beneath, such that each Output is adjacent to its ‘parent’. Neat as that sounds, when dragging/copying things back to your DAW, I find it more fiddly, as it often requires scrolling. With that in mind, then, let’s consider the best way to solo/mute/show/hide multiple track selections.
RP provides dedicated shortcuts to solo Guides, Dubs and Outputs or a combination of them, as per the table.
APT | Doubler | Shortcut |
Solo Guide | Solo Input | G |
Solo Dub | n/a | D |
Solo Outputs | Solo Output | A |
Solo Guide & Outputs | Solo Input & Output | E |
Solo Guide & Dubs | n/a | F |
Solo Dub & Outputs | n/a | S |
And for simple Processes — those with only one Guide and Output, or one Guide, one Dub and one Output — these are really handy. But they work less well in projects with multiple Dubs/Outputs. For example, hitting D or A selects only one Dub, not all, and the behaviour for the other shortcuts is similar. Furthermore, these shortcuts only work after you’ve applied a Process, so you can’t solo your Guide or Dub(s) tracks to make drag-and-drop import easier.
A better approach, I find, is to use RP’s Track Groups facility: this allows you to mute, solo and hide/unhide any groups of tracks you create, via a single group of controls. Usefully, tracks may be members of more than one group.
As a simple demonstration, let’s create three Track Groups, one each for your Guide, Dubs and Outputs. As track Groups appear in the main GUI in the order you create them (a facility to reorder these would be most welcome!) we’ll create the Guide Group first. Even though you’ll often have only a single Guide, I find it useful to make it’s controls available in the Track Groups pane, so you can do all your muting/soloing in the same part of the GUI.
Select Tracks / Manage Track Groups... You’ll see a window divided into three, with tracks listed on the left and two empty panes opposite. Hit New Group, name it ‘Guides’ and choose a colour. Then create your Dubs and Outputs Groups in the same way. Select a group, then the tracks you wish to populate it, hit Add and you’re done — you can dismiss the Window.
In RP’s main window, the Groups are controlled in a pane on the right (if it’s hidden, click the triangular arrow to reveal it). Here, you can rename the Groups by double clicking on the name, and each Group has four buttons. A makes the Group active, indicated both by the A illuminating in the Group colour and a coloured line appearing on the left of each track in the Group; if a track’s a member of more than one group, coloured lines for the active Groups are stacked end on end. The V button is a toggle to hide/reveal the Group’s tracks. M and S are Group mute and solo toggles, respectively. The Group needn’t be active for these to function.
Grouping by Guides, Dubs and Outputs is a very simple example but Groups come into their own when you’re working with complex projects, such as when sync’ing and wishing to audition different track combinations or processes. To save yourself having to create lots of Groups frequently, why not create a project template, with tracks created and named to cover all your frequently used processes, and with various Groups already set up? I’ve created just such a template, with Guide, Dub, Outputs, Guide & Dub and Guide & Output groups pre-loaded. You might also consider including any common pan settings you like to apply for certain processes — you’ll just have to remember to import your audio to the correct Guide track in that case. You can find my template on the SOS web site (http://sosm.ag/dec16media); feel free to download and tweak it to taste. Then go to ‘File / Save As Default Session...’ and it will load every time you create a new project.
Next Time
That’s all I have space for in Part 1 — hopefully you can find your way around Revoice Pro 3.2 more easily now. Next time, we’ll dive in deeper, to explore the pros and cons of DAW-sync’ed playback, detailed Process editing, and manual pitch and time tweaks.
ReVoice Pro 3.2 Masterclass (Part 1 of 3)
ReVoice Pro 3.2 Masterclass (Part 2 of 3)
ReVoice Pro 3.2 Masterclass (Part 3 of 3)
Audiosuite Satisfaction!
 Pro Tools benefits from two Audiosuite plug-ins which can apply whatever settings you’ve saved as the default alignment and automatic-doubling presets.
If you use Pro Tools, the Revoice Pro APT and Revoice Pro Doubler AAX Audiosuite plug-ins allow instant alignment or doubling without leaving your DAW. Note, though, that these only apply the current default APT or Doubler preset — you can change the default but must enter RP to do so.
To try the time alignment, you’ll need a Pro Tools project with two vocal parts, one to act as the Guide (reference) part and the other a Dub, to which the process will be applied. Boot up RP and tweak the settings to match the Pro Tools project as outlined earlier. Then, in Pro Tools, select the Guide clip (you can select multiple clips, though the results are always written as a continuous audio file), and go to Audiosuite / Other and choose Revoice Pro APT. In the plug-in, select Capture (this imports the clip to a temporary RP project in the background). Still in Pro Tools, select your Dub clip, switch the plug-in’s ‘lever’ to Dub and click Capture again — this copies your Dub into RP. Finally, using the plug-in’s drop-down menu, select the Pro Tools track on which you wish the result to be written, and hit Spot. (The original part isn’t muted automatically, so do that before auditioning the result.)
Creating doubles is even simpler: select your Guide and choose Audiosuite / Other / Revoice Pro Doubler. Capture the Guide as before, select the destination track, hit Spot and you’re done.
Glossary
It’s impossible to learn to use RP without acquainting yourself with this handful of terms and abbreviations...
Guide: This is the main part whose characteristics RP either imposes on the other parts uses or as the starting point when faking a double-tracked part.
Dub: When performing an APT process, Dubs are the secondary parts which are processed to match the Guide.
Process: Every action that’s applied is known as a Process and every Process results in an Output. When you apply a Process, it remains in view, attached to a track; effectively, it’s an offline plug-in, whose settings can be tweaked to update the Output tracks dynamically.
Output: When a Dub is processed, or a fake double created, the result is written to a new track and called an Output. The Outputs change to reflect tweaks you make to the Guide/Dub tracks or Processes they’re associated with.
APT: Audio Performance Transfer, the Process type via which the characteristics of a Guide part are imposed on one or more Dubs.
Doubler: The Process type you apply to create a fake double-track.
Warp: A Process which allows you to manipulate the original audio part, with the result being treated as an Output.
Spot The Difference!
When bringing the results of RP’s processing back to your DAW via any means other than the Revoice Pro Monitor plug-in, you’re going to need to use your DAW’s ‘spot’ facility to automatically move the time-stamped audio into position. Different DAWs refer to this function differently, so to save you having to rely too heavily on Google, I’ve set out the equivalent command names for some popular DAWs below:
DAW | Command Name |
Avid Pro Tools | Spot |
Steinberg Cubase/Nuendo | Move To Origin |
PreSonus Studio One | Move To Origin |
Apple Logic Pro | Audio / Move to original recording position |
Cockos Reaper | Move items to source preferred position (BWF) |
Cakewalk Sonar | Revert to original time stamp |
Studio One & Vocalign
PreSonus Studio One users who are interested only in RP’s time-alignment facilities might want to consider Vocalign Pro 4 instead. It’s more affordable, uses the same time-alignment algorithm as RP 3.2 (Vocalign Project uses an older version) and, crucially, includes an ARA plug-in, giving you Melodyne-like deep integration in Studio One 3. I imagine we’ll see an ARA version of RP eventually, but I gather that’s slightly harder to implement, so it’s not likely to appear immediately!