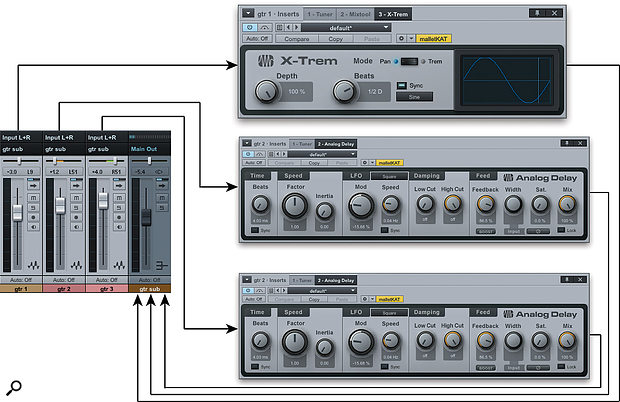
 Picture 1: The setup for a stereo flange based on panning two delays half-left and half-right, and then sweeping the original signal fully side to side.
Take a walk on the wide side with these Studio One stereo guitar techniques.
Sometimes the best complement for a tight rhythm section and a focused vocal is a guitar sound so big and fat you spread it on with a butter knife. Bands from the Police to U2 have relied on this texture, often demonstrating in the process that a thing worth doing is worth overdoing, and it's what we're going to look at this month.
The source guitar track should be in mono to start with. One important thing to keep in mind is that if you apply as much processing as I will in a few moments, the guitar part had better be kept pretty simple rhythmically and melodically, or else the whole thing will end up a gelatinous mess, which is only occasionally desirable. If you are writing as you play through the effects, you can tailor the part to work with them, but if you are applying these effects after the fact during mixing, don't lay it on so heavy that the part loses its purpose.
You'll find audio examples of these three effects, both solo guitar and with bass and drums, at /sos/apr13/articles/studio-one-tech.htm.
Flanger Management
We'll start with the most conservative effect of the bunch: a stereo flange, which, in this case, is not all that conservative.
- Right-click in the header of the guitar track and choose the 'Duplicate Track with Events' command.
- What we really want is a simple, one-tap delay with a little modulation, but there is no delay quite that simple bundled with Studio One, so add the Analog Delay plug-in to track 2 (our copy). Set a very short delay (I used 4ms) with a healthy amount of feedback, some extremely slow modulation (.04Hz in this example), and Mix at 100 percent delay (all wet). Pan the track about halfway to the right.
- Right-click in the header of track 2 (the delay track) and choose the 'Duplicate Track with Events' command. Now we have three guitar tracks. Pan track 3 halfway to the left. You can experiment with making the delay settings very slightly different from track 2, if you like, but it is not necessary for the effect and, in fact, could work against you, so you might wait a little to do that, and be careful when you do.
- Now we are going to mangle track 1, our original guitar track. First click the channel mode button to make the channel stereo. (Of course, that just makes it dual mono, with the same signal playing in both channels.) Next, insert the X-Trem plug-in on the track and set it to Pan mode, with Depth at 100 percent and a slow rate, as shown in picture 1. The rate can be tempo-sync'ed or not; as you please! Now this track is panning from hard right to hard left, past both of the delay tracks, which produces our flanging effect.
- Select all three tracks, right-click in any of the track headers, and choose the 'Add Bus for Selected Tracks' command to add a bus channel for submixing.
- The tricky part is finding the balance between track 1 and the two delay tracks that produces the best flanging effect. I got a stronger flange by using the Mixtool plug-in before X-Trem and inverting the polarity of one channel. When you get it right, you'll achieve a pronounced flanging effect, and you can use the submix fader as your overall guitar level.
 Picture 2: Almost a rotating speaker idea, but not really! The X-Trem plug-in pans two copies of the signal side to side in different ways, then the whole mess is chorused. When the X-Trem panning jumps back, you get a sudden image shift, but since the two versions are not panning at the same speed, it is asymmetrical, and the Chorus on the submix smoothes the whole thing. The result is less jarring than the description makes it sound.
Spatial Awareness
Ever since the Beatles persuaded Abbey Road's technical staff to modify the studio's Leslie rotating speaker so that they could put more than just organ through it (eventually giving guitars, vocals and John Lennon's brain the treatment), the rotating speaker sound has been popular for guitars.
The next effect that we'll look at is far from being a simulation of that, but it gives some of the same spatial chorus feel and, once again, the X-Trem plug-in plays a part. Picture 2 shows the setup you'll need.
- Insert X-Trem on the guitar track, and set it again to Pan mode, but this time select 16-steps mode for the modulation waveform, engage Sync, and set Beats to a value that's not too short (at least a quarter note), and Depth to a high value. Draw a diagonal line pattern across the steps (try dragging right to left). This will produce a pan across and then a little jump. By the time we're done, that jump will add some extra spatial interest.
- Right-click in the track header and choose 'Duplicate Track With Events' to make a second track.
- Open X-Trem on track 2 and draw a diagonal line going the opposite way from track 1; if the first one went high to low, track 2's should go low to high. Set Beats to a different value. Again, a long value is better than a short one.
- Select both tracks, right-click, and choose 'Add Bus For Selected Tracks' to make a submix bus channel.
- Insert the Chorus plug-in on the submix channel. Set it up more or less like a flange, with less than 10ms delay, medium/slow LFO Speed (1.32Hz, in this case), and a healthy amount of Depth. I suggest using only one voice, or you may start to lose definition. You might want to insert a compressor as well, just to make it smooth.
Delay Gratification
For the last example, I will dispense with any restraint whatsoever. This one is reminiscent of the echo-drenched sound of the Edge from U2. Don't look here for subtlety; this is all about texture, so melody and rhythm in the part are where you do actually want to show an ounce of restraint.
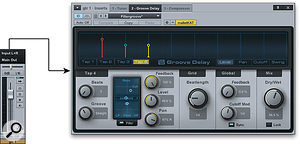
This effect is entirely from the wonderful Groove Delay plug-in, which offers four delay taps, each with its own level, pan, filtering and timing. There are lots of parameters in this plug-in, and you can go completely crazy with it, but a little goes a long way! Picture 3 shows how Groove Delay is configured, although it only shows parameters for one of the taps.
Insert the Groove Delay plug-in on the guitar track. Use three taps, setting Groove to Straight on all of them, and with no Feedback, either on the taps or globally. Set Beats on the first tap to 1 and pan it left, set Beats on the second to 2 and pan it centre, and set Beats on the third to 3 and pan it right. Apply heavy filtering to all of the taps, particularly to roll off lots of high frequencies. Make sure Sync is engaged.
Again, the key is balancing levels, so work the tap levels and the Dry/Wet Mix control to get the blend right. I tended to use less of the second tap than of the other two, and I preferred 50 percent or more wet sound in the mix. With the mix heavily wet, the original phrase will be transformed into something entirely new.
 Picture 3: The Groove Delay provides different delay times, panning and, importantly, filtering, to each of three taps.All three of these effects leave room for lots of experimentation and variation. You may find it helpful to apply compression in more places, if the effects make some notes jump out more than others, or to smooth out some of the spatial effects. Each of these treatments can create a very wide, immersive guitar sound, well suited to textural rhythm guitar or 'sweetener' tracks. I find they sound best when set against tight drum, bass and vocal sounds that do not have a lot of reverb or other effects on them.
Studio One is a great program for working with guitars, because of its excellent Ampire amp/cabinet simulator plug-in, and effects plug-ins such as Groove Delay and X-Trem. Heck, you could even use them in very straightforward ways, but where's the fun in that?
