 FX Chains let you apply complex processing chains using an unlimited number of stock and third‑party plug‑ins.
Get creative with Studio One’s FX Chains.
You’re probably very familiar with dropping effects onto mixer channels or creating effects buses. You have a range of plug‑ins to choose from — Studio One Professional comes with nearly 40 plug‑ins as standard, and you can add countless third‑party ones until you have them coming out of your ears. While a stack of your favourite plug‑ins might well do the job nicely, Studio One’s Extended FX Chains have the ability to transform your plug‑ins into something else entirely. You can design your own signal flow, combining and splitting plug‑ins in interesting ways to produce creative and sometimes surprising results.
Chain Reaction
With regular chains of effects you stack up plug‑ins in the insert section of the mixer channel. You can rearrange their order, turn them on and off, and access the GUI for each one with a single click. Or, if you have keen eyesight, you can edit them in place in the mini editor that appears in the insert space. Once you’ve put your chain together you may find that you’d like to use this same combination of effects on another track or in another project. You can drag copies of those effects over to other channels, or you can save the settings of each plug‑in as a preset and then make a note of the ones you’re using and re‑insert them in another project. It’s not very difficult, but it is a bit long‑winded.
If you look under the down arrow next to the Inserts you’ll see the FX Chains folder, which not only contains a whole bunch of preset chains using Studio One’s stock plug‑ins, but also the ability to store your own FX Chains, containing however many plug‑ins you want from any source. Preset and user‑generated FX Chains also exist in the Browser under the Effects tab.
The presets are worth exploring for an instant solution to many mixing scenarios, and these could at the very least be a good jumping‑off point for your processing.
Extended FX Chains
So, at what point do FX Chains become ‘Extended’? Well, once you start fiddling with their routing, and for that we need the Channel Editor. The Channel Editor is used in all sorts of scenarios, often without the user knowing that it’s working. It forms a wrapper around all the plug‑in GUIs and is there whenever you open an effect editor. If you were intending to edit the plug‑in parameters then what you see is the GUI for that plug‑in. Along the top there are tabs for all the other plug‑ins inserted onto that channel. If you didn’t realise this before, you can switch to another loaded plug‑in by clicking its tab — you don’t have to close one plug‑in to open another one.
For Extended FX Chains what we’re interested in are the buttons to the left of the tabs, which look like a tiny robot sitting next to Pacman. The Pacman button (I know, it’s supposed to be a little knob) opens the Macro page, which gives you a handy bank of knobs that you can assign to multiple parameters in the loaded plug‑ins. The button we’re interested in is the tiny robot button which opens the Routing window; this is where the magic happens.
The Routing button opens us up to different ways of approaching effects. Up until now all our plug‑ins have been placed in series; the signal flows in at the top of the stack, goes out of one effect and into the one below it, and so on until we reach the end of the chain. With the Routing page we no longer have to do that and instead can split the signal to create parallel effect chains, serial effect chains within parallel effect chains, and even nested parallel effects within parallel effect chains!
Extended FX Chains and Macro Controls enable you to design your own modular effects engine for processing your tracks of audio.
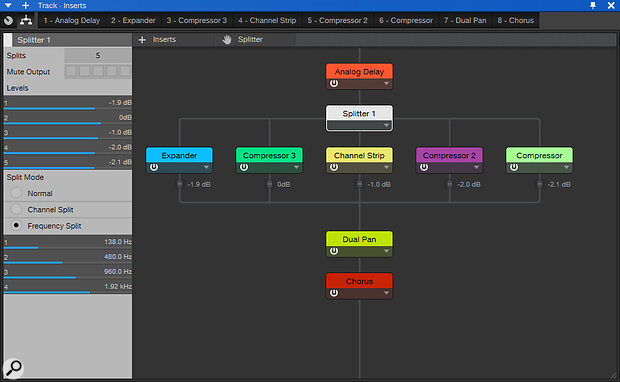
The key ingredient here is the Splitter. Drag it into your signal chain and it creates a split into different signal paths, onto which you can place individual effects or chains of effects. These will no longer be processed one after the other; instead they are processed individually via separate audio paths and recombined at the bottom. If you select the Splitter you’ll see some options on the left. First of all you can choose how many splits are going to occur, up to a maximum of five. You then have individual level control and muting over each new audio pathway. The level control is available in the panel on the left or on the signal path itself (which is a neat new feature).
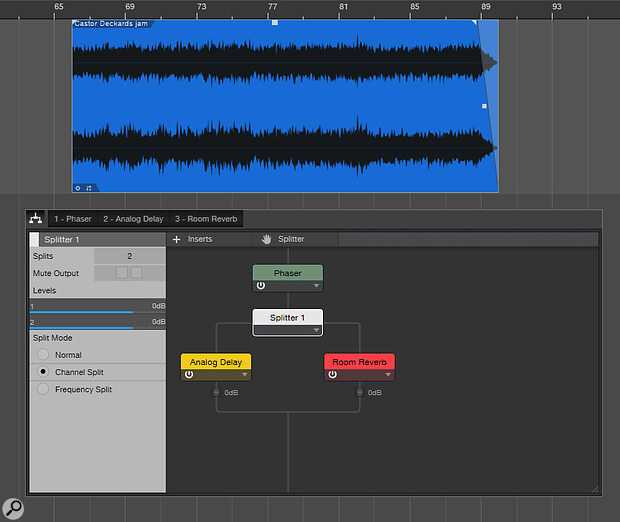
The split modes add in a whole new world of possibilities. In Normal mode the signal is simply split, and identical copies travel down the new paths. In Channel Split mode a stereo channel is split into two mono channels (this only works with two or four splits, with the four‑splits option simply duplicating the two pairs of mono channels).
 Here, the Splitter module is being used in its Frequency Split mode, with an Expander, Channel Strip and three Compressor plug‑ins each operating on a different frequency band.
Frequency Split is a whole new ball game. This allows you to split the audio into frequency bands, where you can set the crossover frequency for each split. This has huge implications for multiband processing, bass enhancement, adding effects to only the high frequencies or the mids, or creatively experimenting with what it means to add chorus to a restricted part of your frequency spectrum. Through this very simple device all sorts of things become possible.
For all Studio One plug‑ins the effect parameters will appear in the panel on the left for quick and easy access. For third‑party effects you’ll have to load up the GUI, but it will appear in the same window and you can quickly go back to the Routing page by hitting the tiny robot again.
Once you’ve created your hybrid monster Extended FX Chain you can save it like any other FX Chain. The Splitter does actually exist as its own plug‑in, so you can drag it into a stack of insert effects and start parallel processing — when you close the Channel Editor you’ll see it in the insert section.
Macro Macro Man
Macro Controls give you a simplified editor for your Extended FX Chain. You have eight knobs, eight buttons, and two X/Y pads that you can allocate to any combination of the parameters available on any of the loaded plug‑ins. You could arrange for the reverb depth on three different reverbs to be controlled by the one knob. You could map chorus tempo, phaser depth and an EQ sweep to the same knob, and control all three with a swing of your mouse.
 Macros let you control multiple parameters across different plug‑ins in an FX Chain using a single knob.
Click on the spanner icon to open the editor and on the right you’ll find a panel that lists the loaded plug‑ins and all the available parameters. Simply select the parameter and click ‘Add to target’. Each added parameter has a response curve that you can adjust to tailor the movement of the knob to exactly what you’re after, and they can all be different too — so a little turn can have a massive effect on one parameter and a small effect on another.
In essence, the Extended FX Chains and Macro Controls enable you to design your own modular effects engine for processing your tracks of audio.
Event Horizon
While we’re talking about effects, chains and routings, it’s worth mentioning Event FX, which is an often forgotten‑about feature. Event FX let you drop a plug‑in directly on an audio Event in the timeline and deal with it there rather than in the mixer. To do this, you must hold the Alt or Option key when dragging and dropping the effect, otherwise it will insert it onto the mixer channel rather than the Event itself.
 Event FX are handy for applying spot effects to a small chunk of audio, without using up an insert slot. You can even apply Extended FX Chains to specific audio Events.
Event FX can be easy to lose track of because they don’t exist in the mixer or any of the regular plug‑in places. Instead, the bottom‑left corner of the Event will display a little flag with ‘FX’ written in the tiniest font ever conceived. Click on that and you can pull up the editor GUI for the effect. You’ll also find it at the bottom of the Inspector under the channel strip. You can add entire FX Chains as Event FX, including your own complex Extended FX Chains.
This can be terribly useful for adding an effect to a specific part of a song without having to mess around with automating bypasses, or having it clogging up your insert stack. You can also apply the processing to the audio permanently using the Render button — although ‘permanent’ is the wrong word because at any time you can go back to the clip and restore the plug‑in back to being a real‑time rather than an applied process. That’s very useful.
