 From the Note, Drum or Pattern editor, clicking on the little pads icon will open up a streamlined Impact XT GUI, in which you can access most of Impact’s functions.
Impact XT is now right at home in Studio One's MIDI editor.
With Studio One v7, PreSonus decided to pull the interface of their Impact drum machine into the Piano Roll/Drum/Note editor window. No more having to deal with floating windows when making beats or fiddling with samples. I wonder if this concept will spread to other instruments, because it is indeed very tidy. With the 7.1 update, PreSonus have doubled down on the Impact integration and put a few more bits and pieces within reach without having to load the full GUI.
Just to recap, Impact XT is an MPC‑style pad‑based sample player designed for drum kits and percussive elements. It has eight banks of 16 pads that you can fill with samples, all within a single patch. These can be single one‑shot hits, loops or instrument sounds, and you have shaping controls over the pitch, filtering and amplitude of each pad. The sample display window gives you a certain amount of editing in terms of start and end points, normalisation and reversing. There’s lots you can do with layering, round robins, parameters and output routing, and there is plenty of depth to explore, but for this workshop, we’re going to keep things relatively simple and focus on the new integration.
Brace For Impact
The magic button to absorb Impact into the Note editor is the button to the far right of the toolbar that looks like two rows of four drum pads. It’s visible whether you are in the Piano Roll editor, Drum editor or Pattern editor. (The score view, it seems, is not interested.) Impact appears as if squashed over to the right of the editor, but you can resize it by dragging the dividing bar. In fact, the layout is very adaptable, and dynamically scales and rearranges itself to suit your view. If you make it really small, you’ll eventually lose the pads entirely and be left with just the sample display and parameters. A pair of buttons in the top right corner lets you swap between sample view and pad view. You have no real control over what the layout does, so you just have to resize the editor until you get what you need.
 With the integrated Impact GUI open, you can drag and drop samples directly onto the pads, or onto any of the notes in the Note editor.
The design of the front end is slightly different to the main GUI, but you will find almost all of the features and controls if you dig around. The main details panel, usually to the right of the sample display, is now in a rather untidily arranged space directly underneath. All the options are there for setting the sample type, quantise, tempo settings, choke and offsets; they’re just not as neatly presented. You can edit the sample in the same way, apply normalisation, reverse, set the start and end points (although there’s no Start/End value display) and add a crossfade to loops. The pitch, filter and amp controls are all present, although the envelope settings are hidden behind a button.
The only really noticeable omissions are the mute and solo buttons on each pad. I can’t find these anywhere other than in the original GUI. The output selection control is also missing from the pad, but you’ll find it shifted up into the details panel.
Workflow
Now that we have Impact XT nicely nestled into the editor, let’s go through some basics so we can see how well this works. If we start with the default empty Impact patch on a fresh new track, we can now build a kit by pulling samples from the Browser directly into the Note editor window.
Create a clip, open the editor and turn on the integrated Impact. There are two ways you can populate the Impact pads with samples: you can drag and drop each sample directly onto the pad that is now right there in the editor, or you can drop it onto the note in the editor that corresponds to the pad. As you do so, all the other notes disappear, making the kit building less cluttered. You can add further samples underneath the note, to build up the kit across the pads. If you have a bunch of samples that are already in the right order, you can select them all in the browser and drag them across together. Before you drop them, hold Shift and they will spread themselves across the pads automatically.
Just a note on undo/redo with Impact. If you drop a sample onto the wrong pad, your instinct might be to hit undo and try again. Unfortunately, that doesn’t work in this particular case. Undo applies to moving parameters, not actions like the dropping of samples. Your only option is to drop another sample over the top to replace it, or right‑click the pad and select Clear Pad.
Going Loopy
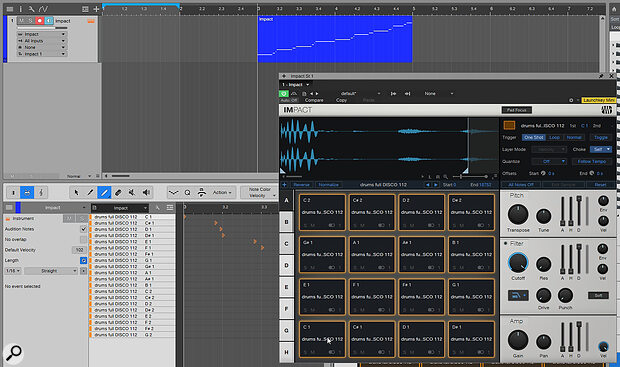
Working with loops was helpfully made easier in version 7, but this is also where we start to see the discrepancies between the integrated and the full Impact GUI. If you hold Shift while dragging a loop into Impact, it will automatically slice the loop across multiple pads. It’s a really easy way to pull a drum kit out of a loop, or do some sample recycling. With the new update it will also generate a MIDI part on the instrument track that will play all the slices back in the rhythm of the loop. However, that doesn’t appear to work with the integrated version, or when you drop the loop onto the Note editor. You have to use the full Impact GUI, and then it only works if the last thing you did was click on the arrangement before dragging the sample. I think there’s something odd going on, as whether the MIDI part appears or not seems to be a bit inconsistent, but the sure fire way seems to be to ensure the arrangement is in focus before doing it.
 Loop slicing in Impact XT will automatically chop up a loop and place the slices onto individual pads. In the full version, but not the integrated Impact, you’ll also get a new MIDI part, which will trigger the pads in order to recreate the original loop.
The auto‑slicing is normally very good, but if the results are not exactly what you were after, you can edit the start and end points of each slice. Click on the pad that holds the slice you want to edit. In the display, you can zoom in and out and move the start and end markers to precisely where you want them to be. They should automatically land on zero crossing points to minimise the possibility of clicks, and the new crossfade parameter can help to smooth out any jerkiness.
Pad Behaviour
The integrated Impact lacks some of its usual facilities when it comes to moving samples. It appears that once a sample is on the pad in the integrated GUI, you can’t drag it around like you can in the standard Impact. With the full GUI pads, you can hold Ctrl (Windows) or Cmd (Mac) to drag a copy of one pad to another, hold Ctrl+Shift (Cmd+Shift) to swap the samples and Ctrl+Alt (Cmd+Option) to copy just the parameters from one pad to another. You also can’t select multiple pads in the integrated version, which is easy to do in the main GUI by holding Shift.
We also hit the same problem when we want to pull samples across into SampleOne, as you can’t pull anything off the integrated version’s pads, regardless of how many keyboard combos you try. However, with the standard Impact open and pinned, you can pull samples or slices across into SampleOne and turn them into an instant instrument. By contrast, you can pull samples from SampleOne into the integrated Impact without any bother. It’s a really neat level of cross‑instrument integration that needs to make its way into the integrated version. I’m sure it will get there, but at the moment it’s a bit frustrating having to open up the full Impact for a few quite everyday tasks.
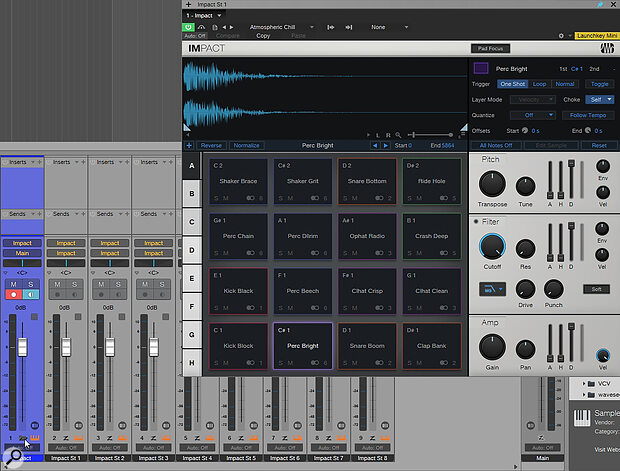
 As of version 7, loading a new instance of Impact automatically creates an Instrument Bus, giving you all the routing flexibility you’ll ever need but with the ability to hide the instrument’s sub‑channels when not needed.
Instrument Bus
PreSonus provide some powerful mixing tools for use with their own instruments. This has always been very evident in Impact XT; whenever you open it, you seem to see a couple of dozen extra channels appear in your mixer. Each pad can then be routed to an individual channel, giving you godlike powers of level control and audio processing. However, a lot of the time, those extra channels were just getting in the way, and you found yourself having to scroll past them to get to what you were actually interested in.
Studio One 7 introduces a new feature called the Instrument Bus, which is going to sort out the Console chaos.
Studio One 7 introduces a new feature called the Instrument Bus, which is going to sort out the Console chaos and give us a lot less scrolling. When you load a kit into Impact and then open the console, you’ll find just the one Impact channel strip. At the bottom of the fader, there’s a tiny folder icon with three vertical lines. Click the folder, and all the sub‑channels will appear. Click it again, and they all neatly slide back into the folder, so you don’t have to worry about them unless you want to.
Note Editor
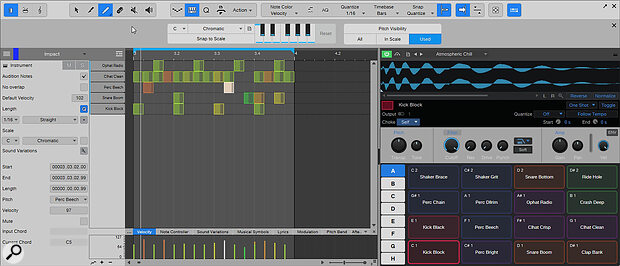
One last highlight from the new version of Studio One is designed for melodic parts but is actually very relevant to Impact XT and drum programming in general: with the new Scale options in the Note editor, you can select different scales and reduce the familiar piano keyboard down to show only the notes in a given scale. OK, that’s not relevant to percussion, but the next bit is... There’s also an option to show only the notes on the piano that are being ‘used’. So, if you were writing a drum part that just used kick, snare and hi‑hats, you could lose all the other notes and just focus on that pattern. Weirdly, this feature only appears in the Note editor for instrument parts, and doesn’t work in the Drum editor or Pattern editor views, which feels like a missed opportunity to me. Maybe its usefulness in pattern writing will make itself known, and PreSonus will update Studio One accordingly.
 You can greatly speed up your drum programming by showing only the notes that are in use.
We last looked at Impact XT back in 2019, and sadly not a lot has changed with the instrument itself, though the handful of adjustments are definitely worth looking into. However, the new integration into the MIDI editing windows is a really great move from a workflow point of view, helping to keep those floating windows under control and laying the foundations of a really powerful beat‑making system.
