 You can now choose custom colours for tracks and clips, and even make — and share — your own colour palettes.
We take a look at what’s new in Studio One v6.1.
PreSonus recently updated Studio One to version 6.1. It’s the first significant update to version 6 and brings with it a reasonable bunch of improvements for the Song page, Project page and Show page. There’s no startling new functionality, but there are a number of solid tweaks that are going to, in DAW developer language, enhance your workflow.
Colouring In
Let’s go straight for the most marvellous workflow enhancement of all, which is that you can now use your own palette of colours on tracks and clips. Previously, when you clicked on the colour bar on a track, clip or mixer channel, you were offered a choice of 100 or so colours curated by PreSonus. Now you can expand the colour‑choosing window to reveal a colour wheel. You can create and save your own palettes by selecting a range of colours defined by HSL (hue, saturation, lightness), RGB (red, green, blue), hex values, or just by clicking on it.
It’s precisely the sort of distraction we need right now, and PreSonus have even generated some preset options for you to consider. This feature gives you the ability to create a palette with just a handful of colours, making it much quicker to choose one. You can also share your custom palettes in the PreSonus Exchange hub, so other users can enjoy your damn fine taste.
Timecode Display
Studio One already had a timecode display, but this lived in its own independent window. Version 6.0 brought in a lot of really nice video editing features, but the timecode display and video preview still occupied different windows. Now you can have the timecode conveniently running in the bottom corner of the video display so you no longer lose track of it.
Another video tweak is that you can import video from within a Smart Template. When you choose a template from the Studio One Start page, you can drag audio tracks to the Drop Zone. You can now do the same with video files too, so that your project starts up with everything you need for your cinematic pop video.
Sphere Notifications
PreSonus have been taking steps to further integrate what happens in Sphere with your working DAW environment, and if you are a sociable music producer and have enjoyed collaboration using the workspaces in PreSonus Sphere, you will be thrilled to know that you can now receive notifications from your collaborators directly within Studio One. Previously you’d have to access those sorts of communications separately, either in a browser or in the MyPreSonus app. Now you can get yourself interrupted right in the middle of a session.
Anything that happens in your cloud‑based workspaces can send out notifications. And as soon as you’ve exported a project to the cloud, all your collaborators will know about it without having to check their email.
Anything that speeds up the way you can connect and collaborate has to be a good thing. There’s always the potential for issues when trying to do something in software that requires a default browser to pop up and facilitate things. This integration works brilliantly and bypasses the need for running an email client or other software on your music production system. You can also turn off notifications in your Sphere preferences.
Sync Points
Arguably the coolest development in the v6.1 update is a new timing feature called Event Sync Points. If you have unquantised audio within a container clip on a track and you want to duplicate it to another place in your song, it can be tricky to place it accurately. As the clip is not aligned to a grid, you’re going to have to line it up manually when you move it to another spot. It’s not that it is difficult to do, but it can be very time‑consuming. Not any more!
As you move the sync line it snaps to the peaks and transients of the audio, making it really easy to find the ideal point.
There’s a new timing reference you can add to your audio event. It’s called a Sync Point, and it’s accessible from the right‑click menu. Once enabled, a small yellow diamond appears in the bottom‑left corner of the clip. You can grab it with your mouse and set it to a specific position within the clip. This becomes the Sync Point around which the audio syncs and snaps to the project. As you move the sync line it snaps to the peaks and transients of the audio, making it really easy to find the ideal point. So now, wherever you move that audio clip to it will snap its Sync Point to the grid.
 Sync Points, shown by the small yellow diamond, help you line up your audio clips, even in projects that don’t use the grid.
This is also useful in a free‑flowing project that’s not using a grid. You could set Sync Points on various clips on different tracks and then enable the grid momentarily to line them all up. The audio is then sync’ed to transients rather than the clip's left/right containers. You need to enable Snap To Events under the Snap menu to make this happen. I think this is a huge time‑saver.
Lyrical Updates
The Lyrics engine was one of the best new features of version 6. In the Song page, separate lyrics are now available for the Scratch Pads, so you can work on alternative words in the Scratch Pads as well as different musical ideas. The lyric display switches depending on what you have in focus. Editing has also been made a lot easier with a ripple function: if you pull something out or decide to move things around, the rest of the lyrics shift to accommodate that without you having to re‑edit everything manually.
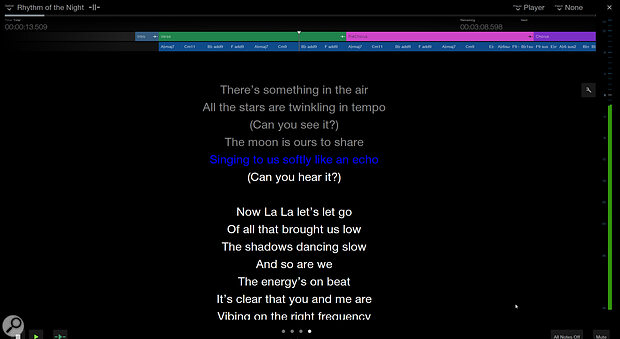
 You can now edit lyrics from the Show page.
You may have noticed how the lyrics get truncated in the Lyrics lane, especially when you zoom out and there’s no room to keep them in view. Now, you can hover your mouse over any section and it will display the full lyric. Lyrics can also be scraped out of MIDI files, so if you are importing a MIDI song file, your life just got a whole lot easier.
While it’s a tremendous songwriting tool, it’s also a brilliant thing to have in the Show page, so that you can display and follow the lyrics during a performance. The thing was that the Show page only used the global view pulled in from the Song page and not the more comprehensive Lyrics lanes. Well, guess what? Now it does. The integration is much better; you can edit directly and rather than popping up in another window, the Lyrics view is part of the view choices and has the chord arrangement running along the top.
Finally for lyrics, you can now display them in the Studio One Remote App for iOS, Windows or Android. The app has been updated to version 1.7 to support all of Studio One 6.1’s features.
Plug‑ins & Templates
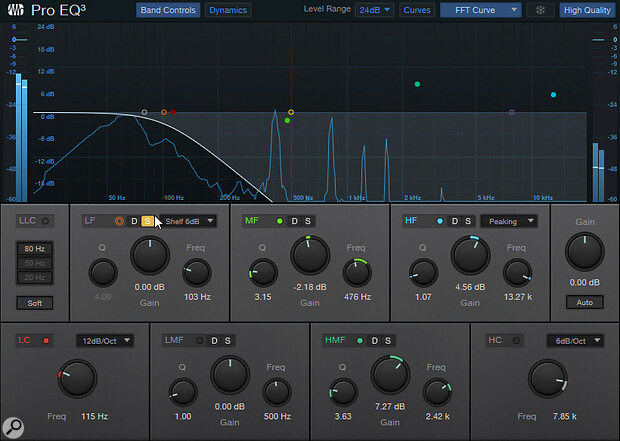
While I continue to bang on about Studio One's lack of new instruments, PreSonus do put some energy into the effects plug‑ins. The Pro EQ3 now has some very useful solo buttons on all the shelf filters, so you can isolate individual bands that you are working on to get down to some serious detail.
 The Pro EQ plug‑in now lets you solo your shelving bands, as well as the parametric ones.
There’s also been a tweak to the new Vocoder. PreSonus have added a pink noise option for a bit more flavour.
We enjoyed the arrival of Smart Templates in version 6. This included a single template for the Project page that opened the default project. Unlike the Song page there was no way to create alternatives or User Templates. Now the template function has been ported over to the Project page so you no longer have to be faced with the emptiness of the default.
To create a template, add in the plug‑ins you always use, select the metering you prefer and lay the windows out however you usually do. Then go the File menu, choose ‘Save as Template’ and the job is done. They appear as User Templates under the New button on the Start page. I imagine that’s saved a lot of clicking about or confusion when opening an older project to re‑save as a new one to use the same settings, which is what I always do.
The other new function is that Loudness now has an Album mode. This is within the Digital Release section, where you can adjust the target loudness of your exported files. This was done previously on a song‑by‑song basis whereas now, with the Album mode, it will consider the overall volume of all the tracks together. This will remove any unexpected volume changes between songs.
Finally, in a couple of months I’ll have written 50 Studio One workshops. While there doesn’t appear to be an end to the functions within Studio One we can talk about, I would be very interested in hearing suggestions on what you’d like to see covered. Please send your requests to feedback@soundonsound.com for consideration.
