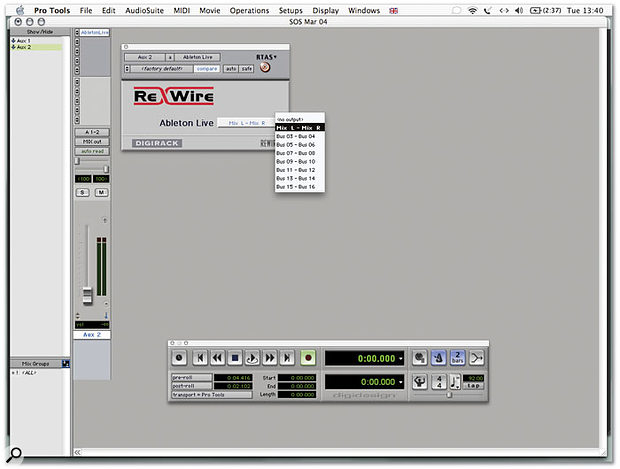
 I've inserted the Ableton Live Rewire plug-in in my aux track, and I now need to choose which Live channels should be brought back into Pro Tools on that track.
All Pro Tools systems now come with a bundle of extra software: Reason Adapted, Live Digidesign Edition, Amplitube LE, Sampletank SE and T-Racks EQ. Here we use Live 's powerful time-warping features to run tempo-shifted vocals alongside a remix.
If you've only tinkered a little with Ableton's Live software, you may think it's just a tool for throwing together and beat-matching loops on the fly, and as the name suggests, mainly suited for playing live or for DJing. However, there's a lot more to it than that — for example, it's also a fast and unique environment for recording and arranging. In the studio, running alongside Pro Tools, it adds scope for time-stretching audio in ways that are impossible in Pro Tools alone. This month's Pro Tools Notes is a 'walkthrough' to get Live up and running and manipulating a vocal track.
What we're going to do is run Live as a Rewire slave locked to Pro Tools, with Live playing back a vocal track. Live will 'warp' the vocal track to keep it running at the same tempo as Pro Tools. Not only will the audio follow dynamic tempo changes, but it will be variable over a much wider range than Pro Tools 's Time Stretch Audiosuite plug-in could handle, will work in real time, and have far superior audio quality. To keep things simple at first, we'll use a single complete audio file for the vocal track.
Quick Tips
- You're not limited just to running one Rewire application with Pro Tools. If you've got a really fast computer, try running this month's Live/Pro Tools combination and add Reason Adapted as well. If things are getting too much for your CPU, you can always bounce what you've got into Pro Tools.
- The Restore Performance command in the MIDI menu will revert selected MIDI regions back to their original state at any point, discarding any quantisation, transposition and so on. You can also use the Flatten Performance command to freeze the MIDI data in a region, creating a new starting point that subsequent Restores will return to. Restore only removes the effects of MIDI Operations, not any manual edits. If you wish to be completely safe, keep a copy of the original performance or use a new playlist.
- Note Chasing (Chase Events) in Pro Tools is turned on and off on a track-by-track basis from the playlist pop-up next to the name of each MIDI track. Note chasing means that if you start playback in the middle of a held-down note (ie. after a key was pressed but before it was released) you still hear the note.
First Run
If you've not already done it, you'll need to get Live installed and running in Rewire slave mode with Pro Tools. Installation is a simple drag-and-drop from the CD. The first time you run the software you'll be prompted to enter your serial number. You must then unlock it, which is achieved with a single button-click if your computer is on-line. If you're studio computer is not connected to the Internet you'll need to get a 'challenge response' code from the Ableton web site.
When you're ready, follow these steps to get started: first, make sure Live is not running and launch Pro Tools. Create a stereo aux input to receive the audio from Live (unless you're running a TDM system, in which case you must use an audio track), and in the track's first (top) insert point, call up the Ableton Live plug-in (as shown in the screen shot below) In the plug-in's display, choose 'Mix L Mix R' as your source channels from Live. Now set the track fader to unity gain using the Option-click shortcut and launch Live. Live will detect that there is an open Rewire connection from Pro Tools and automatically open up in Rewire slave mode. Note that the situation with Live is not the same as it is with Reason — it's not enough just to have Pro Tools running. There has to be a track with a Live Rewire plug-in inserted or Live will open with its audio engine disabled.
Doing The Time Warp
That's the technical setup out of the way — now you can get to work! First, set your tempo in Pro Tools. You can either use Manual mode and type something in, or switch on the Conductor and create a tempo map. Either way, you can make changes later and Live will still be able to follow. The main thing is to use a different tempo than that of your vocal clip, since that's the whole point of this exercise!
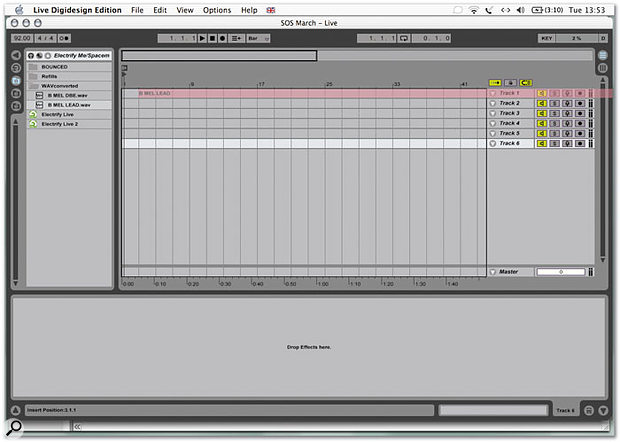
Now, switch to Live and change to the Arrange View by clicking the icon with three horizontal lines at the top right of the window. The main area of the screen shows your tracks in the traditional sequencer layout (note that the version bundled with Pro Tools is limited to six tracks). To the left is a file locator, which you should now use to locate your vocal track. When you've found it, drag it directly into the first track so that it starts at the beginning.
 Audio files are added to Live tracks by dragging from the browser at the left-hand side of the arrange page.
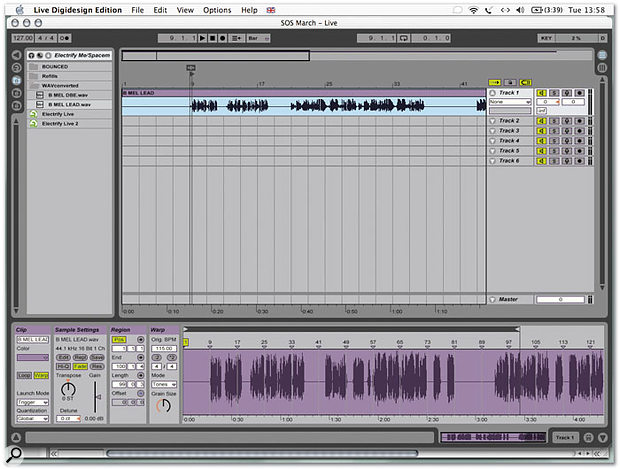
Click the small arrow icon next to the track name to see the expanded view. Now click the miniature waveform view at the bottom of the screen, and the bottom area of the screen will change to focus on the audio clip you've just dropped into the track. At this point, if you press Play, Pro Tools and Live will play back in sync, but the vocals will drift out of time. This is because the audio file is simply being triggered and playing back at its original tempo. You need to change some settings to get the audio to be warped into the correct tempo...
First, in the leftmost box of settings, click the Warp button so that it lights up green. Then, in the Warp section further to the right, enter the original tempo of the vocal track into the Orig BPM field. You'll see that in the main waveform view to the right, the bar indicators will move to take this new information into account. In the track display, the waveform itself will shrink or expand against the static bar ruler. That's nearly it! Your vocal track is now lined up correctly with the bars and beats of the new tempo. As you play back, Live will speed up and slow down to follow any tempo changes set in Pro Tools.
 Settings for the selected audio clip can be made to appear at the bottom of the Live window.
The last thing to do is to tweak the Warp settings to get the best sound quality. In the Mode pop-up you'll find four options: Beats, Tones, Textures and Re-Pitch. As you might guess, Re-Pitch actually pitch-shifts the audio to follow the new tempo. All the others time-stretch while maintaining the original pitch, with each mode optimised for the best sound quality for different types of audio content. Vocals generally sound best in Tones mode, although Textures might work too. While playing back, experiment with the Grain Size setting until you get the best-sounding results.
Now you can get on with writing your remix under the vocals, without worrying too much about the tempo. With the above steps complete, you can even start chopping up and rearranging the vocals in Live and things will continue to be automatically and dynamically warped for you. Once you've mastered all this, there are more tricks you can try, such as picking up and moving the bar/beat markers in the clip display to alter timings or add special stretch effects.
