 Photo: Antoni Shkraba Production
There’s more to crafting perfect pop vocals than slapping on a bit of compression and Auto‑Tune!
Of all the mainstream genres, pop arguably presents the highest bar to the mix engineer in terms of vocal production. The singer usually needs to sound bright, airy, and super‑up‑front, but without becoming harsh or abrasive. You want every detail of the artist’s phrasing and lyrics to come through clearly on the widest range of listening systems, but without making the backing sound weak by comparison. And you often need to adapt your mix settings in response to dramatic arrangement changes as well. In this article, I’d like to suggest a few tricks that I’ve found really useful for getting a polished end result.
1. Try Spectral Pre‑processing
There’s a family of specialist spectral‑processing plug‑ins that are usually associated with mastering and bus‑processing applications, and which use FFT‑based dynamics processing to enhance mix detail and smooth out mix tonality imbalances — I have in mind here things like Oeksound’s Bloom, Baby Audio’s Smooth Operator, and Soundtheory’s Gullfoss. I’ve found that these same algorithms can also deliver a useful improvement in tonal consistency when applied directly to lead vocal tracks. It’s usually difficult, though, to know exactly what’s going on behind the scenes with these plug‑ins, and exactly what each parameter’s doing, so I prefer to place them right at the beginning of the plug‑in chain, where they can’t mess with any of my other vocal processors. Spectral‑processing plug‑ins can be pretty heavy on both CPU load and in terms of latency too, so it’s not a bad idea to freeze such plug‑ins in your DAW once you’ve set them up.
 Although spectral‑processing plug‑ins such as Soundtheory’s Gullfoss are more commonly associated with mastering, they can also make solo vocal tracks more tonally consistent and therefore easier to balance.
2. Tune By Hand
There are plenty of plug‑ins that are designed to automatically correct vocal tuning, but if you’re after a high‑class result then I’d strongly advise against taking that shortcut — by the time you have the degree of correction you need, you’ll also have ironed out all the singer’s expressive pitching nuances, as well as probably degrading the sense of vocal ‘air’ and mangling the consonants with processing artefacts. Instead, you’ll usually get better results if you just use simple pitch offsets to target the tuning specifically of the syllables that really need help. That way, you won’t have any unwanted tuning artefacts for notes that were already in tune, you don’t lose all those heart‑tugging micro‑level pitch variations, and you can avoid processing noisy signals like breaths and consonants, which in my experience don’t tend to respond well to pitch‑shifting.
3. Control The Extremes
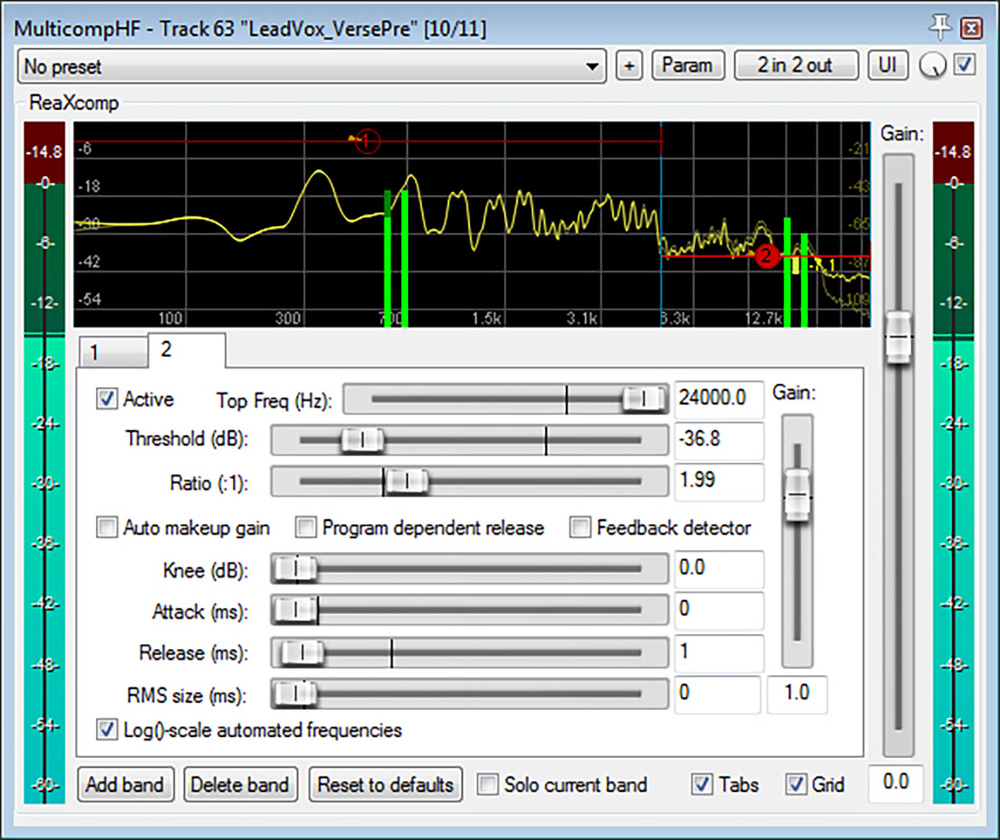
 Multiband dynamics control at the frequency extremes can help compensate for tonal variations caused by the singer’s movements while recording.
Almost all singers naturally move around somewhat while performing, and that causes a certain amount of unpredictable tonal variation, especially at the vocal spectrum’s frequency extremes. Below about 300Hz, for instance, any front‑back movement of the singer will cause the degree of proximity effect to vary if you’re using a mic with a directional polar pattern (as most singers do). Above 5kHz or so, the delicate air vibrations are extremely directional and very easily shadowed, so any turning of the singer’s head will cause significant differences in the amount of tonal airiness. In both these cases, using multiband compression to reduce the variability can help the vocal hold its place more consistently in the mix balance. In both cases, I prefer to keep the time constants relatively fast (attack and release times of around 10ms and 40ms at the low end, and around a millisecond each at the high end) so that the processing can react swiftly to the characteristics of each different vocal phoneme.
4. Brighten Just The Vowels
If you try to brighten a lead vocal with simple high‑end EQ boost, you’ll usually find that the sound gets abrasive before it’s airy enough. This is because, for most singers, the airiness of their vowels doesn’t match the brightness of the noisy elements of the vocal recording. Sibilants (‘s’ and ‘sh’ sounds) are commonly overbearing, for instance, because many people place their vocal mic at lip level where these sounds are naturally exaggerated, but any other noise‑based consonant (‘k’, ‘f’, ‘t’) can also be much brighter than a singer’s sustained vocal tone. Those little snicky noises you get from the physical mechanics of the lips and tongue (especially if the singer has a dry mouth) are another common culprit. A de‑esser can help with excessive sibilance, but with other consonants you’ll usually find transient‑reduction processing or region‑specific EQ more effective. For mouth noise, a de‑clicker plug‑in (which you’ll find in restoration packages like iZotope RX) can sometimes help, but personally I prefer editing those out manually to avoid any undesirable impact on the rest of the vocal tone — their little waveform spikes are usually pretty easy to see if you zoom in far enough.
 Mouth noises such as lip smacks are usually pretty easy to spot on the audio waveform if you zoom in far enough — there are a few in the highlighted section in this screenshot, for instance — and can easily be edited out manually.
5. Multiply Your Mults
Splitting up your lead vocal recording over multiple tracks (often called ‘multing’) is tremendously useful in pop production, where musical arrangements often change dramatically between song sections. It’s not uncommon, for instance, that you might want to dial back the amount of low end on a lead vocal as you move from a sparser verse into a fuller‑textured chorus, to avoid overall mix muddiness. And at the same time you might want to add in a longer reverb or some kind of modulation effect to help emphasise the arrival of that important song section, or compress a bit more heavily to give more of a sense of energy and aggression. Sure, you could do all that with layers and layers of automation data — but it’s a lot easier to just mult the verse and chorus vocal parts to separate tracks with independent settings. Multing can also really help with managing backing vocals, allowing you to group together similar licks and phrases for easier communal balancing and processing.
 Multing the lead vocal to different tracks can help adapt the sonics to suit different arrangment contexts, while effects‑level automation can grab the listener’s attention and support your arrangement.
6. Don’t Forget The Timing
People seem to spend an awful lot of time talking about tuning pop vocals, but I think it’s equally important to make sure the timing’s on point. The singer is so loud in a typical pop mix that any vocal timing vagaries can really undermine the song’s overall groove. Most DAWs have extremely flexible built‑in time‑stretching facilities that make these kinds of edits a breeze, but even if your software doesn’t (or the processing side‑effects sound horrible), it’s no excuse — I’ve done almost all my vocal timing tweaks with simple audio editing tools for years. Slice points in breaths or noisy consonants (things like ‘f’ and ‘s’) will usually be inaudible, and editing unobtrusively in the middle of held vowels is also pretty straightforward, as long as you remember to match the waveforms on either side of the edit and to smooth over the join with an equal‑gain crossfade (the straight X‑shaped one, not any of the curved ones).
7. Region‑specific EQ
Set‑and‑forget processing such as EQ, compression and de‑essing is undoubtedly useful for lead vocals, but it has its limits: the human voice is simply too varied and unpredictable a sound source for a one‑size‑fits‑all approach. The trick is to go as far as you can with ‘static’ processor settings without overdoing things, and then use manual processing to fix any remaining rough edges. In this regard, region‑specific EQ (which I believe is now available in all the software DAWs) is a godsend. High‑pass filtering around 100Hz can tame plosive ‘pops’, for instance. Low‑pass filtering can soften breath noises without unnaturally deleting them, and can take the aggressive edge off hard consonants. Narrow‑band notch filters can scotch those needling harmonics that some performers produce when singing certain vowels loudly in their higher register. And the beauty of this kind of processing is that, by nature, you only need to worry about processing side‑effects during that specific audio region, even if you need to go extreme with the settings to get the job done.
The more solidly your lead singer maintains their subjective level in a pop mix’s balance, the louder you can have the vocal fader without making the rest of the mix sound small.
8. Balance On A Single‑driver Midrange Speaker
The more solidly your lead singer maintains their subjective level in a pop mix’s balance, the louder you can have the vocal fader without making the rest of the mix sound small by comparison. Clearly dynamics processing has a part to play in this, but regardless of what compressors or limiters you use, you’ll still need to level‑automate the vocal in great detail if you want to compete with chart mixes. You’ll only be able to do this effectively if you can really hear what you’re doing, and this is where I recommend listening to your mix in mono, through a single‑driver midrange speaker such as an Avantone Mixcube or Tantrum Audio Angry Box.
By doing this, you can avoid the inherent phantom‑image instability of stereo listening, you won’t get phase cancellations between speaker drivers if you move your head, and you are also presented with a tonal balance that naturally focuses your ears on the midrange frequencies that are most important to mass‑market mix translation. As a result, a single‑driver midrange speaker is great for making fine vocal‑balance changes more clearly audible, so your level‑automation decisions can be more accurate and reliable.
9. Work That Clip Gain!
Pop vocal processing typically involves a lot of stages of dynamics processing, and those become more difficult to set up if your raw vocal’s levels are very variable. You can make life easier for yourself if you slice up your vocal recording into phrases and then use each region’s clip gain setting to do some preliminary broad‑brush levelling. Moreover, I’m increasingly finding clip‑gain changes useful on a more ‘micro’ scale as well, because they make it easy to boost small details in a vocal performance that can really aid lyric transmission — things like duller‑sounding closed‑mouth consonants (eg. ‘m’ and ‘n’), diphthong consonants (eg. ‘y’, and ‘w’), and underpowered plosives (eg. ‘b’ and ‘p’) or voiced consonants (eg. ‘d’ and ‘g’). Yes, it’s possible to address all those things with automation, but somehow I’ve found it easier to get natural‑sounding results with clip gain instead — and I can then focus more on the subjective musical balance when riding the vocal fader.
10. Automate Your Effects
Pop production is all about continually re‑engaging your audience’s attention, and in practical terms that means constantly surprising the listener to refresh their interest. In this respect, variations to the lead vocal are particularly powerful, because most people connect most strongly with the singer in any song, but at the same time you don’t want to vary the vocal melody itself so much that you compromise its memorability. Which is why it really pays to automate your vocal effects, especially if you do so abruptly. You see, in real life we normally move between different acoustic environments gradually — unless you’re The Flash, it takes a little time to walk from one room to the next! So sudden changes to vocal delay/reverb effects in a mix can be profoundly attention‑grabbing, even if most non‑techie listeners won’t be able to put their finger on exactly why. In addition, though, more subtle dynamic adjustments to your vocal effects can powerfully support the build‑up of your musical arrangement. So don’t just ride your vocal’s level — ride its effects levels too.
Audio Examples Online!
 Moni Blue, the artist featured in the audio examples.Photo: Lotta SeitherIf you’d like to hear some of these techniques in practice, then head over to https://sosm.ag/mixing-pop-vocals, where you’ll find a selection of audio examples breaking down the vocal mixing process for my recent mix of the indie pop song ‘April Blues’ by new artist Moni Blue.