 Audified’s U73b variable‑mu compressor plug‑in.
Your SOSFA subscription gives you access to some super plug‑ins by Audified. Let’s see what they can do...
It’s great that there’s so much to explore in SOS For Artists — but when you first sign up, this can also make it easy to overlook some things. So we’d like to shine the spotlight on some hidden gems, and this month our focus will be on the six Audified plug‑ins included in your subscription: U73b Compressor, U78 Saturator, 1A Equalizer, RZ062a Equalizer, RZ062b Equalizer and MixChecker Ultra. Together, they form a useful toolkit that can add something to your DAW’s built‑in tools, and you can call on them at pretty much any stage of a mix.
In this article, we’ll provide a quick overview of each plug‑in, along with some notes on how you might go about getting the most out of them — and we’ve also created a few audio examples, which we’ve based on samples you can find in the SOSFA library. Before we get started, though, note that lots of these plug‑ins feature level calibration controls, which can help you ensure that you’re hitting the sweet spot in the modelled processing. There’s no ‘right’ setting — it’s similar to analogue gain staging, but when you’re searching for character through modelled saturation, you should feel free to experiment for the best sound.
U73b: Vintage Compression
The U73b Compressor (now on version 3) is a great‑sounding emulation of a vintage variable‑mu compressor‑limiter made by Telefunken. Variable‑mu types are famous for sounding classy — smooth and musical — but the Telefunken device has a reputation for being a bit more colourful, with a slightly forward character in the midrange, and this plug‑in does a good job of replicating that. So it’s a useful alternative flavour to the options you’ll typically already have in your DAW.
This plug‑in offers both compressor and limiter modes, selectable release times, side‑chain high‑pass filter options (the original had a 100Hz filter built in, but you can disable that) and the ability to link or unlink the left and right channels when used on stereo material. Additional benefits include being able to inversely link the input and output controls, plus a virtual moving‑coil meter, with the option to view the amount of gain reduction, or the input or output levels.
As with the U78 (more of which below) there’s an oversampling option, which can give you higher‑quality results, especially when adding lots of character, but as this comes at the cost of using more of your computer’s CPU power you could, if needed, disable this feature until your final render.
For our audio examples, we used U73b in both its limiter and compressor modes, on a drum loop and a bass line. For the drums, we switched to the limiter mode and aimed for a combination of loudness and vintage character, just to get the beat driving the track a little more. The release is quite fast, which is typically what you want for drums (so that the compressor recovers before the next hit), and the amount of compression fairly high, with a slight boost given to the output level to compensate for that. Here, we used a loop, but you could equally well apply these sorts of settings to the drum bus when processing live drums.
For the bass, we switched to the compressor mode and set the attack to 2.5, again keeping the compressor settings quite high. In this instance we activated the high‑pass filter to prevent the really energetic low‑end frequencies from triggering overcompression — this really helped to retain a sense of clarity in the bass line; it’s pretty easy to switch it in/out and judge this setting by ear.
Finally, note that you can try this compressor wherever you’re looking to add a bit of vintage character, including dropping the plug‑in onto your mix bus. The mid‑forward character will likely work wonderfully for some material and less well for others, but it’s well worth a try; we’d suggest aiming for only a very subtle amount of gain reduction, with a fairly slow release.
U78: Saturation
The U78 draws on the sonic character of U73b to give you a dedicated saturator, with tools to help you focus the resulting energy where it’s needed. There are high‑ and low‑pass filters, a Tone control that operates rather like a tilt EQ, and a wet/dry mix control that means you can be as heavy‑handed or subtle as you like with the resulting colour. An Auto Output facility ensures the overall level remains broadly consistent.
 U78: vintage‑flavoured saturation.
To demonstrate the sort of thing you can do with this plug‑in, we applied it to synth and fretless bass parts, but you can try it on any source that you think will benefit from greater harmonic richness, warmth, grit or presence, be that individual tracks, groups or even, with a suitably subtle mix setting, the main mix bus.
On the first demo, we’ve used U78 to apply some valve brightness to a synth, to give the part just a little more bite and edge. To do this, we rolled off some of the lower frequencies, cut some high‑frequency harshness, and then restored some of the brightness using the Tone control. For the bass track, some of the lower frequencies were again rolled off to clean up the sound, and then we used the Tone control to compensate by darkening the overall tonality.
1A’s M‑S option means you have more scope than on many emulations for sculpting stereo signals, such as synths...
Pultec‑ish
As you can tell immediately from the GUI, the 1A equaliser emulates the classic Pultec EQP‑1A, a valve‑amplified passive EQ famous for the unusual curves created when boosting and cutting around the same frequency. That’s possible here, and it can be especially useful for shaping the low end — often effective when you need to rework kick drums and bass instruments. Two other standout features are the Calibration knob — again, this allows you to dial in analogue‑ish saturation to taste — and a Mid‑Sides mode. Pultec‑style EQs can be useful on any number of instrument tracks, and vocals, but 1A’s M‑S option means you have more scope than on many emulations for sculpting stereo signals, such as synths, drum and mix busses or even in mastering. An output level control lets you compensate for any overall level change resulting from your EQ moves.
 The 1A equaliser is based on a Pultec design, but adds some useful touches.
For our demos, we applied 1A to both guitar and choral vocal tracks. For the guitar, the lower frequencies were pulled down, while the higher frequencies were boosted to give a sense of air, resulting in a much cleaner, clearer sound. On the vocals, we set 1A to its Mid‑Sides mode, to ensure depth and solidity at the centre and on mono playback, while emphasising the width in higher frequencies for a more dramatic stereo presentation.
RZ062 Suite
The RZ062 suite, comprising RZ062a and RZ062b, offers you emulations of two different vintage EQs, this time rare Siemens valve EQ modules that were originally used in the Klangfilm system in European film studios in the 1950s. Although these were designed and built to the highest standards of the day, they have since become known for imparting an engaging warmth and density and have naturally found favour in music production circles.
The ‘a’ version features a tilt‑style slope with a centre frequency of 650Hz, and a central knob moving the slope up or down, while also imparting an enticing valve character — you might call it ‘warmth’! This makes it an ideal tool for gently enhancing vocals, strings, pianos or the overall mix. There are separate control sets for the left and right channels and, again, there’s a Mid‑Sides option, which makes it particularly versatile.
 The RZ062 suite, comprising ‘a’ and ‘b’ versions of a plug‑in that emulates a valve EQ developed for film production in the 1950s.
We used this version of the plug‑in on string and piano samples downloaded from the SOSFA library. For the string sample, we opted for the Mid‑Sides setting, and unlinked the two channels before giving the lower and upper frequencies slight boosts. The input levels were raised to give a little more saturation, and the output levels dropped to compensate — and note that you have the option of driving the two channels into different amounts of saturation, by setting their input/output levels differently.
For the piano, our aim was to add some warmth and presence to the part. This was once again achieved by switching to Mid‑Sides mode and de‑linking the two channels, before boosting the upper and lower frequencies on each channel to taste, until we felt we had a nice tonal balance and stereo image.
RZ062b has a similar heritage, but in place of the simple tilt point the middle EQ control offers four selectable frequencies for adding presence, with six boost settings for each. These controls make it a great option for use on guitars, snares and other instruments with a lot of information in the mids, as well as any tracks that you feel might benefit from a boost in presence or attitude.
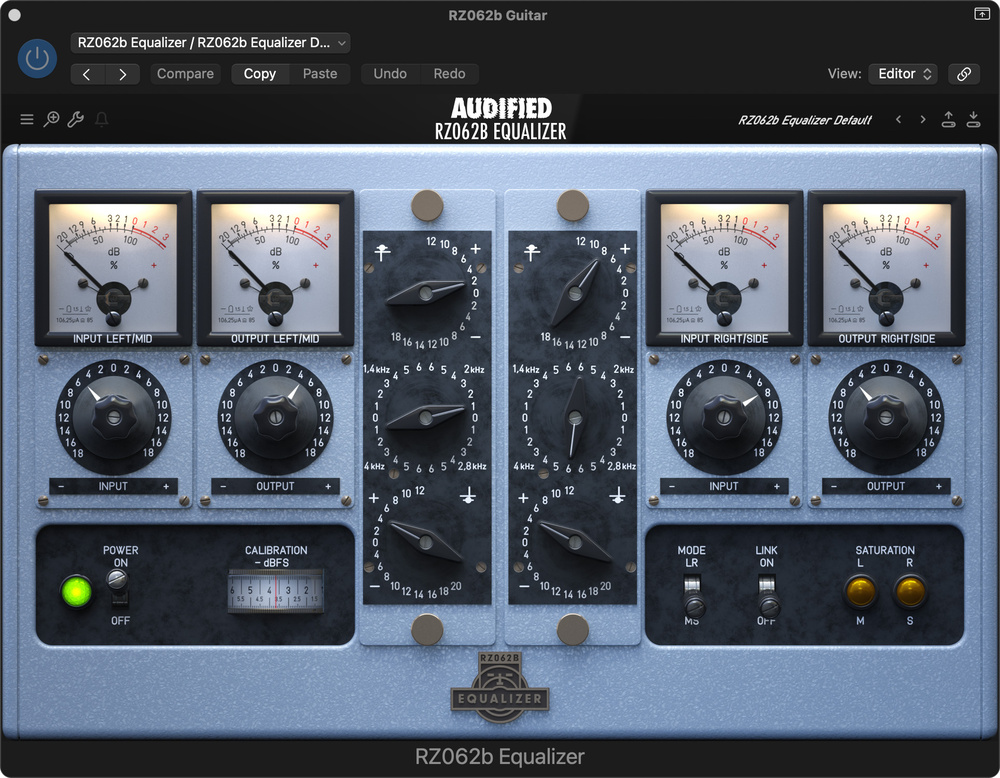
For our audio examples, we applied the plug‑in to a drum loop and guitar. In the first, the plug‑in was left on linked mode and the snare enhanced by boosting the high frequencies and adding extra presence in the 2kHz area. Again, the input level was boosted for a little extra colour, and this was counterbalanced by pulling down the output level. For the guitar, we increased the presence and unlinked the left and right channels so we could boost different frequencies on each side (2kHz on one side, 4kHz on the other), to widen the stereo image, making the resulting sound more dramatic.
MixChecker Ultra
Finally, we come to MixChecker Ultra. This one isn’t intended as a processor, but it can be used as one, as well as being a handy mix referencing tool. The idea is that it mimics how your track will sound on a range of real‑world playback devices in different listening environments. With over 90 device simulations (phones, laptops, car systems, small bluetooth speakers, club PA, etc), plus impulse‑response support, you can test how your mix will translate outside your studio. The built‑in meters help you to compare loudness, phase, dynamics and more.
 Mix Checker is a really handy tool for checking how your mix will translate on other playback systems. There are lots of options, and there’s some handy metering thrown in for good measure.
You can insert MixChecker Ultra either as the final plug‑in on your master bus (in which case remember to turn it off before you bounce your mix!) or, if your DAW allows it, a dedicated monitoring or control‑room output. Then it’s easy to toggle through different device simulations to check for critical mix issues. It’s perhaps not a complete replacement for checking your final mix in a different room or in your car, but the metering is useful, and it can be a very effective way to discover if the bass end or dialogue come across OK on smaller speakers.
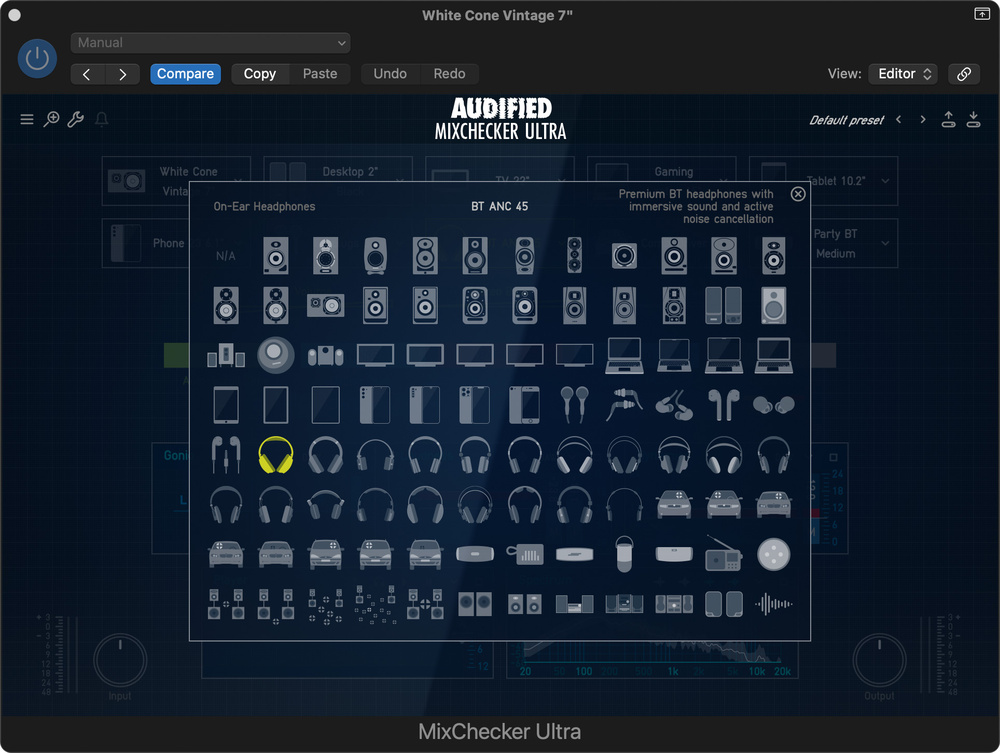
Of course, you could choose to print the processed sound as an effect — for example, for an authentic voice‑on‑phone sound in video post production or as a spot effect in a track. In our audio demo, you can hear the track dry, followed by the desktop monitors, 22‑inch TV, White Cone Vintage 7‑inch (based on Yamaha NS‑10s) and Classic Pods emulations.