For this month's Pro Tools feature, we line up three of the most popular audio restoration packages available. Which gives the most natural results, which is easiest to use, and how do you get the best from them?
High-quality audio restoration has become available to the project studio at sensible prices not from one but several different manufacturers, enabling the user to 'resurrect' otherwise unusable recordings. Typical defects, including noise, hum, clicks, crackle — and combinations of any or all of these — can now be reduced or eliminated using a variety of affordable tools.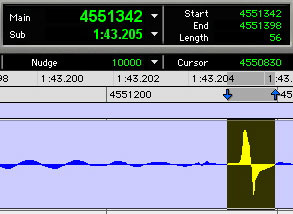
In this month's Pro Tools feature I am going to take a look at three mid-range products — Waves' Restoration Bundle, Sony Oxford Restoration Tools, and BIAS Sound Soap Pro — and then run some comparative tests using the same source material, trying to achieve the best results possible with each. Subscribers and those who bought the magazine at UK newsagents will find the some of the source files and the treated versions on this month's covermount DVD-ROM.
Audio restoration can be both an art and a science. By and large, removal of clicks and tones such as hum is more of a science, in that you can clearly hear and measure how much of the problem signal has been removed, and the 'disturbance' can be easily distinguished from the signal in either the frequency or time domain. On the other hand, noise and crackle are more difficult to remove without starting to damage the original sound; side-effects, often called 'artifacts' appear as noise and crackle are removed, since these tend to contaminate all samples and all frequencies. An artistic judgement is required to determine how much noise can be removed before the artifacts become unacceptable.
Know Your Noises
The unwanted noises found on vinyl and tape recordings are usually divided into several types, and dealing with them requires separate tools:
- Large clicks or pops
These are defined as an impulse comparatively long in duration — usually more than 2ms — and very high in amplitude compared to the surrounding programme audio. In the example shown the click is around 50 samples in length at 44.1kHz and has a very high peak. Typical large clicks would be scratches on a vinyl recording or digital errors caused by clocking problems. Note that physical damage to the media such as vinyl scratching usually corrupts the audio for more samples than digital errors, and so is more difficult to repair.
- Small clicks or crackles
These are much smaller than large clicks or pops. In this example the click is only a 'minor blip' on the audio waveform, and is only a few samples long. Unlike large clicks or pops, these do not obliterate the underlying audio. Small clicks or crackles usually come from surface noise on a vinyl recording or low-level digital clicks.
- Hum and buzz
When a recording gets 'infected' with hum or buzz, it usually isn't a single frequency such as 50Hz or 60Hz induced from the mains supply, but will often have harmonics at 100Hz, 150Hz and so on. A a good hum-removal tool must, therefore, be able to remove the harmonics as well, preferably automatically. Indeed, buzz generated from thyristor lighting dimmers will have very complex harmonics that continue well up the frequency spectrum. The other type of buzz that can be encountered is 24Hz film camera noise, and this, too, will include a lot of harmonics.
- Broadband noise
The term broadband noise refers to tape noise, hiss and so on, which usually 'infects' a recording if it was recorded at too low a level. Most tools for dealing with this have a 'learn' feature, where they can detect the noise profile and use that to remove the noise from the audio signal. Broadband noise reduction is the hardest to implement, because the unwanted signal is usually much lower in amplitude than the desired sound and so incorrect use or overuse of this tool can result in unpleasant audio artifacts like 'birdies' or 'tinkly' sounds.
In general, you should undertake click removal first as clicks can disturb the other processes, then crackle removal if necessary. Next comes hum filtering, and finally, broadband noise reduction. Most restoration packages have a suite of tools, each of which deals with a specific problem.
Restoration Tips
- When playing original source material, do the best you can to ensure a high-quality transfer. Do anything you can with the source material to help, such as cleaning the tape heads, baking tapes where appropriate, and gently washing vinyl records with distilled water.
- Use these restoration tools as sparingly as possible. Resist the temptation to push the tool as far as it can go; instead, choose a setting that just provides the desired result. Treating your audio using several passes with a gentle setting can be more effective and produce fewer side-effects than one pass with a more severe setting.
- The effectiveness of audio restoration is helped significantly by the masking effect. This is a 'feature' of human hearing, where when two or more sounds occur simultaneously, we tend to notice the loudest sound and ignore the quieter sounds. This principle is also used in audio data compression techniques such as MP3 and the ATRAC format used on Minidiscs. The benefit for restoration work is that we don't necessarily need to achieve a 6dB reduction in the unwanted signal to make it 'sound' like a 6dB reduction.
- When working on restoration projects, remember that your ears can become accustomed to a new sound and also become tired. Constantly refer back to the source audio: is it really better, or is the treated audio worse? Sometimes the treated audio can sound more objectionable than the original sound with its defects. Come back to the process with fresh ears, to check whether the treated version really is better or not.
- All restoration packages use both 'look ahead' and 'look behind' to help in processing. You should use 'handles' to allow the plug-in to 'settle in' before you get to any audio you will need in the finished product, and likewise, leave extra audio on the end of a section you want to process. You will hear the 'settling sounds' in some of the processed examples. Also, if you use these plug-ins 'live' then you will need to use the delay compensation feature, if you have it, or slip the track to compensate if you don't.
- Instead of treating an entire track with the same settings, consider treating small sections that have bad clicks with a severe setting and the rest of the track with a lighter setting. This can also apply to other restoration processes too.
The Restoration Tools On Test
Waves' Restoration Bundle has been round the longest of the three packages on test, and is available either as a native bundle supporting all the major formats, or as a TDM bundle supporting HD cards and HTDM host-based processing. Both bundles include Audiosuite off-line versions.
 Waves X-Click.
The Restoration Bundle is made up of four separate plug-in modules. Waves X-Click handles the large clicks or pops and has two controls to adjust for optimum click removal: Threshold sets the amplitude of the targeted clicks, with higher values removing more clicks and a zero setting leaving all clicks untouched. A good starting point is between 30 and 50. Shape corresponds to the width or duration of the clicks to be removed. Lower values remove smaller clicks like digital errors, while scratched vinyl record clicks need a higher Shape value. I find a setting of 70 is a good starting point for vinyl record restoration.
For additional help in finding the optimum settings you can use the Difference feature, which enables you to hear the difference between the original and the processed signal — in other words, what is being removed by X-Click. If you start to hear too much of the programme audio in the Difference mode, try lowering the Threshold and/or Shape to minimise the removal of audio transients.
 Waves X-Crackle.
Waves X-Crackle handles low-level clicks and crackles that are interspersed in the audio, and again, has two main controls to adjust. Threshold sets the amplitude for targeted crackles; a setting of between 50 and 70 is a good starting point, and you can go as far as 80 or more on noisy signals without introducing too many artifacts. Reduction sets the attenuation applied to the detected crackles, and like X-Click, X-Crackle has a Difference feature.
 Waves X-Hum.
Waves X-Hum handles hum problems as well as low-frequency rumble and DC offset, and consists of two sections. The high-pass filter section removes rumble and DC offset, with a Slope switch and a frequency control to determine the cutoff frequency. To eliminate only DC offset, set the frequency control at around 10Hz. The harmonic notch filter section handles the filtering of the hum and its associated harmonics, with a Frequency control setting the fundamental frequency of the first filter; the filters for the harmonics automatically track this one. There are also global Q and gain controls, which set the width and depth of the notch filters. An Inverse option switches the filters to boost rather than cut — it can sometimes be useful to boost a problem area to help tune into it and then flip back to the normal cut mode.
Waves X-Noise handles broadband noise such as tape hiss and air conditioning. There are the usual Threshold and Reduction parameters, as well as some additional controls including a Learn feature that enables you to 'teach' X-Noise the noise you wish to remove. You do this by selecting a section of audio which contains just noise and no programme material. Clicking on the Learn button causes it to flash. You then play the selected section of noise and click the Learn button again, whereupon X-Noise will create a Noise Profile, which you can save. If you cannot find a 'noise only' section, there are some standard profiles in the factory presets to choose from.
 Waves X-Noise.
Now use the Threshold and Reduction controls to achieve the desired amount of noise reduction. Start with a Threshold of 10dB and then use the Reduction control to set the degree of noise reduction. Increasing the Reduction setting increases the amount of noise reduction and increases the chance of artifacts appearing. If these appear before you get the desired degree of noise reduction, try increasing the Threshold to 30dB and readjusting the Reduction control to suit. You can also adjust the Attack, Release, Resolution and High Shelf controls to improve the way X-Noise responds to the audio and noise.
As in X-Click and X-Crackle there is a Difference option in X-Noise, which enables you to listen to what X-Noise is removing and adjust it so noise is removed without removing programme audio as well.
BIAS Sound Soap Pro
Sound Soap Pro (reviewed in SOS February 2005), can work with a wide range of host applications that support VST, RTAS, Audio Units or Direct X plug-in formats. Rather than being a series of separate plug-ins, it has a single main window with a series of tabs to access the different sections. The main window includes a number of global options such as loading and saving presets, four temporary settings which can be stored for instant comparisons, and a noise-only option like the Difference feature in the Waves bundle for listening to what is being removed. Across the bottom are the tabs relating to the four sections of the plug-in.
 Click and Crackle section in Sound Soap Pro.The Hum and Rumble section is very similar in operation to Waves X-Noise, in that there is a Frequency control to set the point of operation of the first filter, plus Q and Depth controls. The rumble filter control has a fixed slope of 12dB per octave and a variable Frequency control. The Harmonics control determines how many harmonics of the hum frequency will be filtered, with 1 being just the fundamental and 9 being notches for every harmonic up to the ninth. The Tilt control allows you to filter the harmonics progressively less severely than the fundamental, to compensate for the fact that the harmonics of hum and buzz tend to be lower in amplitude than the fundamental.
The Click and Crackle section is like Waves' X-Click and X-Crackle combined, and offers only two controls. The Click Threshold control has a range from 1dB to 25dB: the higher the threshold (taking the slider to the left), the more severe the process. The Crackle Threshold control works similarly and has a range of 12dB to 25dB. Unlike X-Click and X-Crackle, there are no separate Reduction controls, but there is a Click Meter which flashes red when a click is being repaired. Broadband noise functions.
The Broadband noise reduction section has 12 control bands, each with Threshold and Reduction controls, and an audio level meter. The actual frequency range of each band is not fixed but is dependent on the learned noise profile. Broadband has two learning modes. The first is Snapshot, where a snapshot is taken of the noise profile when the Camera icon is clicked. The second is a timed learn mode; whilst playing a section of 'noise only' audio it averages out a noise profile from the point the stopwatch icon is clicked to when it is clicked again to stop the learning process.
The horizontal Threshold-Reduction slider changes the way the controls are displayed. At its leftmost position you see only the Threshold controls, whilst only the Reduction controls are visible when it is over to the right-hand side, and both are on show in the middle. The Threshold and Reduction controls work as expected, and the controls for the separate bands can be linked together. The is achieved with the master lock and unlock buttons, together with a button at the bottom of each section showing whether that section is locked into the group or not.
The Attack and Release controls operate as you would expect, with their respective Tilt controls allowing for different attack and release times across the different bands. With the Release Tilt set at 1.00, the release times will be the same across all the bands, but with the Release Tilt control set to 2.00, the release time for the lowest band will be as set by the Release control and the release time for the highest band will be half that.
The final section is a Noise Gate, which is not featured in either of the other suites under test here. It is a conventional arrangement, with a Threshold control ranging from 0dB to -60dB and a Reduction control setting the amount of attenuation of the signal below the threshold, with a range of 1.00 to 5.00. There is also an Attack control with a range of 10ms to 500ms and a Release control with a range of 50ms to 1000ms, as well as a visual display to show how the gate is functioning.
Sony Oxford Restoration Tools
This set of tools is made up of three separate plug-ins, and is available as an RTAS plug-in with Audiosuite support.
Declick is similar to the Waves X-Click and X-Crackle plug-ins, but is presented as one plug-in with two sections. The first section deals with what are normally referred to as 'clicks', though Sony call them Pops. It has a Threshold control, which you start off at the minimum setting and increase until the clicks go away. If you start to get distortion, the Threshold setting is too high. The next control is Soft, which determines the length of the repair of a pop; the higher the setting of the Soft control, the longer the pop that can be repaired.
The final control in the Pops section is Sensitivity. This determines whether a piece of audio is detected as a pop in the first place. If you are unable to remove pops for their full duration just by using the Threshold and Soft controls, try increasing the Sensitivity and then readjusting Threshold and Soft to minimise the risk of distortion. Alternatively, if the Pops section produces distortion even at minimum Threshold and Soft settings, try reducing the Sensitivity and readjusting Threshold and Soft again.
The second section, which Sony call Clicks, is designed to deal with what is normally called crackle — Sony's terminology is somewhat confusing and I prefer the conventional expressions, which describe the problems more accurately. This section has two controls, Sensitivity and Repair, and to use it, you start with the Sensitivity at the bottom and slowly increase it until the crackles are gone. The Repair control helps to put some of the harmonics back into the sound. Set at maximum it should provide audio clean of crackles, but may sound somewhat dull. Slowly turn the Repair control anti-clockwise and the high frequencies should reappear, but if you turn it too far, you may get artifacts.
Debuzz is Sony's hum removal plug-in, and is very different from Waves X-Hum and Sound Soap Pro 's Hum and Rumble tab. It doesn't have a high-pass filter or Harmonics controls, but does have the ability to track the fundamental. This means that if the frequency of the hum drifts for any reason — for instance, if the tape recorder's speed varied — Debuzz will track it and adjust the filters to follow the drifts. The Frequency control sets the fundamental frequency for the filter section, while the Adapt button enables the tracking feature and Freeze disables it. Use the Strong option if the fundamental is much louder than the surrounding audio and the Weak option if the buzz is lower in level and so closer to the programme audio.
You might also find that if you are unable to remove all the buzz in either Strong or Weak modes, two passes will be more successful. Do the first in Strong mode to remove the main fundamental and the second in Weak mode to remove all the low-level buzz. Whichever mode you choose, set the Frequency control as close to the fundamental as you can get it with Adapt mode on. You will see Debuzz 'tune in' and 'lock on' to it. Then adjust the Gate control; starting from the maximum position, bring it down until just before the buzz becomes audible. Note if you change between Weak and Strong modes you will need to readjust the Gate control.
The Bandwidth control determines the maximum frequency up to which the buzz filtering will be applied, while the Sharp control is the Q control and Depth sets the depth of the filters. It can usually be set to 144dB, but if you find this is removing too much programme audio, you can reduce the Depth to suit.
Denoise is Sony's broadband noise-reduction plug-in, and has three modes of operation. Automatic Mode is the best option when the noise profile changes with time or where no clean noise is available to learn from. To use this mode, turn on both Auto and Adapt; the noise profile is then continuously updated by tracking the noise in the audio. The Level control functions as a threshold control and adjusts the height of the noise contour in the graphical section, while the Smooth control determines how closely the noise contour follows the noise profile. The lower the setting, the closer the contour will be to the profile. In Automatic mode, the Smooth control should be set close to the maximum.
The Correlation control only works in Automatic mode, and provides a means for fine-tuning the automatic noise profile. Low values of Correlation will produce fewer artifacts, especially on low-level sounds like decaying notes or intakes of breath, but with an increased risk of noise pumping, where you hear the noise coming and going with the loud and quiet audio. If you experience noise pumping try increasing the Correlation setting.
Fingerprint Capture Mode is Sony's 'learn' mode and is achieved by pressing the Auto and Adapt buttons, then playing a section of 'noise only' audio. Pressing the Freeze button then takes a snapshot or 'fingerprint' of the noise profile. Start with the Smooth control at maximum, and only decrease it if there are distinct notes or tones in the noise, as lower values of Smooth will allow the noise profile to follow the bumps created by the notes or tones.
The final mode is Manual and can be used for simple noise reduction, usually when the noise is 'whiteish' and static, like tape hiss. Smooth and Correlation do not apply in Manual mode. The Colour control adjusts the contour in the low-frequency range of the noise profile from white noise (fully counterclockwise) to pink noise (halfway) through to red noise (fully clockwise).
The Attenuation control is the primary means of adjusting the amount of noise reduction; the greater amount of noise reduction, the greater the risk of artifacts, the most common of which are tinkly random tones.
 Oxford's DeNoise.
The Tests
Let's now take a look at how these three suites actually work in practice. To do this, I treated the same audio examples with each suite, aiming to get the best results possible with each for comparison. If you bought your copy of SOS in the UK, or you are a subscriber, you will find these original audio examples on this month's covermount DVD-ROM, as well as the treated versions from each suite. For each example, I have included the original untreated file and then three treated versions, with the relevant postscript to the file name to indicate which package it was treated with. I have also saved the plug-in settings that were used in each case.
All treated files were done in one pass using one plug-in, with settings taken to the point where artifacts are just becoming audible. I have scored them out of 10 in two categories. A high 'ease of use' score means that it was quick and easy to get to a good result, and quality of processing indicates how good that result was.
No Earth
The first clip is called 'no earth'. It was part a recording that came to me that had been recorded at someone's funeral; unfortunately there hadn't been time to check that the recording setup was OK, and so we have a recording where the hum is nearly as loud as the programme audio, as it turned out that a lead with a faulty screen connection had been used!
All three packages were able to filter out the hum very successfully, though Waves X-Hum and Sound Soap Pro did leave some high-frequency buzz. This could be treated with a broadband noise-reduction plug-in — which is what I did for the client at the time — but the Sony suite does stand out over the other two as giving the cleanest result. I also appreciated its ability to fine-tune to the exact frequency of the hum automatically; with the other two, I had to set the fundamental frequency myself, and in both cases the harmonics filters didn't go high enough to remove all the high-frequency buzz.
| No Earth | Ease of use | Quality of processing |
| Sony Oxford Restoration | 9 | 8 |
| Waves Restoration Bundle | 7 | 7 |
| BIAS Soap Pro Sound | 6 | 7 |
Tape Motor Noise
This was a different challenge for the hum-filtering packages. This was part of a set of recordings brought to me by a client that she made when she was eight or nine on a Grundig open-reel tape recorder, recorded on quarter-inch tape at 3.75ips. I actually replayed them using her original machine! All three packages where able to remove the hum and reduce the motor noise, and as you will be able to hear, they all gave very similar results. Again, as with the 'no earth' test, a subsequent pass with a broadband noise reduction plug-in would be able reduce the motor noise even further.
| Tape Motor Noise | Ease of use | Quality of processing |
| Sony Oxford Restoration | 9 | 9 |
| Waves Restoration Bundle | 7 | 7 |
| BIAS Sound Soap Pro | 6 | 6.5 |
Vinyl Record
This is a typical example of a scratched vinyl record, with the test being how well each package is able to remove the clicks and fill in the holes in the sound. This was the only test where two plug-ins were used together, as in the Waves Restoration Bundle, click and crackle removal are two separate plug-ins, which is not the case in Sony Oxford Tools or Sound Soap Pro. Interestingly, the Crackle section of the Sony plug-in was able to remove nearly all the 'clicks' on its own, but I chose a setting where both sections were working equally. I marked the Waves bundle down on its 'ease of use' because it is two separate plug-ins, so you are swapping between two windows all the time. As you will hear, all did remarkably well and were able to remove nearly all the clicks; the Sony Oxford Tools stands out as producing the best results, with a close call between the other two.
| Vinyl Record | Ease of use | Quality of processing |
| Sony Oxford Restoration | 8 | 9 |
| Waves Restoration Bundle | 7 | 7 |
| BIAS Sound Soap Pro | 6 | 8 |
Hiss
This is an example of a track that had been poorly recorded to Minidisc using the wrong lead. There are a number of single-point stereo mics about that have unbalanced outputs on a three-pin XLR cable. The lead for these mics looks the same as one you might use for a mono mic with a balanced output — both have a 3.5mm plug on one end and a three-pin female XLR on the other — but the two leads are wired differently. If you use a stereo lead with a mono mic it will work, but with two problems. One is that the two tracks will be out of phase, and the other is that the recording will be much noisier. The phase problem can be resolved by only using one channel, but you are still left with a noisy recording, which is what this example reproduces.
Broadband noise reduction is always the trickiest of all the restoration processes as it is always a trade-off between good noise reduction and artifacts. Patience and constant use of the Bypass button are called for, and perseverance will be rewarded.
Using the 'learn' option to create a noise profile will always give the best results. The results were very similar for each of the plug-in and could have been improved by using a more gentle setting and multiple passes. I marked the Sony Tools down on ease of use, as the controls are not as intuitive as I would have liked, whereas the Waves controls are very clear.
| Hiss | Ease of use | Quality of processing |
| Sony Oxford Restoration | 7 | 8 |
| Waves Restoration Bundle | 8 | 8 |
| BIAS Sound Soap Pro | 7 | 8 |
The Final Analysis
- BIAS Sound Soap Pro
This has some very nice features. I thought at first that the 'all in one' design would be annoying, but I came to really appreciate it, as most restoration jobs do involve using a combination of processes. In general I tend to use an RTAS or TDM plug-in on a track to set up the parameters, copy the settings to the corresponding Audiosuite plug-in for processing, and then take out the RTAS or TDM plug-in, so not tying up valuable DSP resources and also making the job more 'portable'. This is made easier with Sound Soap Pro as all the processes can be run together as one, whereas with the others you have to run the Audiosuite plug-ins one at a time.
On the down side, I didn't find the graphical display in Sound Soap Pro any help in adjusting the plug-in — it felt like it was consuming DSP power for no obvious benefit — and in my opinion, the Gate section actually devalued the package, as in the field of restoration using a gate is like using a mallet to crack a nut! However, I liked the ability to 'unlock' and adjust the Threshold and Reduction controls separately for each band in the broadband noise-reduction section.
- Waves Restoration Bundle
I own the Waves bundle and have always been impressed with their products. I did find it the most intuitive to use, even taking into consideration the fact that I have used it several times before.
However, compared to the other two packages, both of which are relative newcomers in this field, the Waves Restoration Bundle is getting a little long in the tooth. I hope Waves are working on a 'v2' Restoration Bundle with improved algorithms as Sony have shown how good restoration processing has become.
- Sony Oxford Restoration Tools
This is an excellent bundle and is very competitively priced. Although in general I found it easy to use, I did find the naming of some of the controls unintuitive and I had to refer to the manual quite a lot to check what they did. Having said that, the reason the Sony bundle got high 'ease of use' scores was that I often found the default settings were a very good starting point, while the 'auto tune' feature on the Debuzz plug-in was truly awesome. In addition, they have come up with an automatic mode for the broadband noise reduction plug-in, recognising that it isn't always possible to isolate a section of 'clean noise' to learn, although I did find it was able to produce better results when it had a noise profile to go at.
I missed having a 'noise only' option on the Sony Restoration Tools, as I found it a real help with the other packages to check what the process was taking away. However, spending too much time listening to the 'noise only' output did also lead me down some blind alleys, and with experience, I got the best results by listening mainly to the complete output, with occasional checks to the 'noise only' to make sure the process wasn't taking too much out.
information
Waves Restoration Bundle £1756.63 (TDM) or £881.25 (native). Prices include VAT.
Sonic Distribution +44 (0)1525 840400.
+44 (0)1582 843901.
information
BIAS Sound Soap Pro £529 including VAT.
SCV London +44 (0)20 8418 0778.
+44 (0)20 8418 0624.
information
Sony Oxford Restoration Tools £625 including VAT.
HHB +44 (0)20 8962 5000.
+44 (0)20 8962 5050.