Does Pro Tools sometimes take an unwarranted dislike to one of your hard drives? Here's how to deal with it, and how to let non‑admin users join the Pro Tools party.
This month we're going to look at a couple of maintenance‑related issues that have been on my list to cover for a while. The first, I suspect, will have affected us all at some point, and the other will be of interest to folk who provide Pro Tools systems in a shared environment.
The first problem has recently cropped up more regularly than usual for several of my clients, and it has to do with getting the message in the screenshot below. "But it was fine last time I tried it...” One of Pro Tools' more familiar error messages. I suspect most of you will have seen it at some point.
Most of my clients work on the 'sneaker net' principle: for want of a proper network, they simply walk the drive from one system to another, hence the nickname 'sneaker net'! The problem seems to come up randomly as they start to work on a Session. "It was OK yesterday, but now I get this message when I try and open my Session” would be a typical query. Sometimes it can be fine on one system but this message comes up on another system. So what's going on, and what can be done?
Transfer, Playback & Record
Pro Tools categorises drives into three groups:
- Transfer (T): Pro Tools will label a drive a Transfer Drive if it isn't suitable to play back Sessions. Examples include shared network drives, CD‑ROMS, and drives that are formatted in a non‑native format. Transfer drives cannot be used to either play or record Pro Tools Sessions directly. Any Sessions on them will first need to be copied onto a drive formatted correctly for Pro Tools — which is not necessarily the same as being formatted correctly for the computer's operating system. On the Mac platform Pro Tools only supports 'Mac OS Extended (Journaled)' drives; if you are running Pro Tools on Windows, NTFS is the supported format.
- Playback (P): On a Playback drive, Pro Tools will play back any Session on that drive but won't permit new files to be added to it, so it won't let you record, import, create new fades and so on. This is good if you have a Session that you don't want messed about with, because most changes will need you to write some new files to the drive, but it's a complete catch‑all. Also, Pro Tools has a habit of changing Disk Allocation off its own bat so it can write files somewhere, and you may end up with vital files on another drive somewhere.
- Record (R): This is the normal mode, whereby Pro Tools will permit all normal functions, both playback and record.
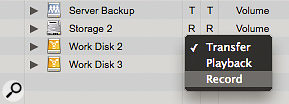
It's my experience that these settings sometimes inexplicably change on drives that can support Pro Tools Sessions, so it is useful to know how to reset them. Open the Workspace window, which you find in the Window menu of Pro Tools. It will look something like the screens above. Pro Tools' Workspace window is where drives can be reset to Record (R) if need be.
We're interested in the letters in the 'A' (audio) and 'V' (video) columns. The letters are where you set the status of the drive in Pro Tools. You will notice from this screenshot that 'Work Disk 2' is set to 'T', which is what caused the error message in the first screen. Assuming that the drive is correctly formatted, to reset it back to normal, click on the 'T' and a little menu will appear. Change it to 'R' if you want to be able to record onto this drive; alternatively, if you want to prevent recording onto the drive, you could set it to 'P' so you can only play back a Session from this drive.
Now that Work Disk 2 is set to 'R', the Session will open and all will be fine.
But It Keeps Happening!
If a drive repeatedly goes back to 'T' or 'P', perhaps only on one system, when it's fine on another, here's what to do. First, delete the Digidesign Databases folder on the drive in question. Then delete the Volumes folder on the startup drive of the system that won't play ball. On a Mac, this will be on your startup drive in Library / Application Support / Digidesign / Databases / Unicode. On a Windows machine it's on your C: drive, in Program Files / Digidesign / Pro Tools / Databases / Unicode.
Be careful, however, that you don't delete any Catalogs folders that you will also find in the Unicode folder, as this is where any catalogues you might have created in the Digibase Browser are stored.
Once you have put the Volumes folder in the trash and emptied it, restart the computer. When you re‑launch Pro Tools, it will create a new Volumes folder and all should be well.
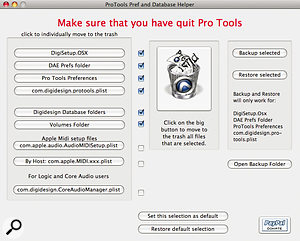
If you are a Mac user, you could, of course, use the excellent free Pro Tools Prefs & Database Helper application from Jean‑Charles Deshaies to do this for you; just select the Volumes button from the options. (I covered this little helper utility back in August 2009.) Jean‑Charles Deshaies' Pro Tools Prefs & Database Helper application can make disk management easier on Mac systems.
Pro Tools In Shared Settings
Although single‑user and professional multiple‑user facilities are happy giving all users admin‑level access to their computers, there are times when this is not very desirable. In educational establishments such as schools, colleges and community‑based facilities it is best to limit the access users can have on the computer systems made available to them. Digidesign have now enabled Pro Tools to run on standard accounts rather than admin accounts on both Windows and Mac machines.
So if you have problems with users tinkering with your carefully set‑up machine when you rent out your studio, or you have large educational labs full of computers, this option might save the day. This is because the standard account on both Mac and Windows will restrict what users can do in terms of software installation, Preference Settings and access to other drives and computers. However, it would be only fair to say that this isn't something I would encourage a novice to undertake, and although it helps to restrict what users can do, it also restricts what Pro Tools can do.
You should install Pro Tools in the normal way using an admin account, and get it working on that account before creating standard user accounts for other users. Remember, though, that Pro Tools enables each user to have his or her own user preferences, which will be kept in the Preferences folder in their own Home folder.
Users of Pro Tools standard accounts on Mac OS X or Windows will normally be limited to saving Sessions and audio files to folders within their Home directory, such as the Documents folder for Mac users or My Documents folder for Windows users. As I am sure you are aware, though, Digidesign do not recommend saving Sessions on the drive that contains the operating system (Macintosh HD for Mac or the C: drive on Windows machines). In this 'lab' context, saving files and recording on an internal drive will work for small‑ to medium‑sized Sessions, but for larger Sessions requiring many tracks and higher sample rates, external Firewire drives should, of course, be used. To achieve this, you will need to make sure that users logged in using a standard account and requiring external drive access have read/write permissions set to use these drives. This is most easily done from an admin account, where you can set a drive's read/write permissions to 'Everyone'. On Mac OS X systems, it is possible to override permissions altogether on drives other than the one that has the OS on it. Highlight the drive icon, select Get Info, and then, in the Info window, make sure that 'Ignore Ownership on this Volume' is checked. Setting a drive to Ignore Ownership can make life easier for non‑admin users.
Standard Accounts On Macs
When setting up standard accounts for Pro Tools users on a Mac, Digidesign suggest that system administrators set the limits for the non‑admin accounts to 'No Limits'. If the account is restricted, users will encounter further restrictions when they try to create a new Session, record audio or MIDI, use AudioSuite plug‑ins, export MIDI, save Sessions, bounce to disk, create fades, change playback engines or disk allocation, and so on.
Standard Accounts On Windows
There are some special notes that need to be followed for Windows machines. During the Pro Tools installation, the installer automatically creates a user group called 'Pro Tools Users'. By default, all Pro Tools users are part of the Pro Tools Users group, which enables full use of the Pro Tools system. Pro Tools also includes optimisations to reduce record allocation times when Windows users are logged in with administrator accounts. These optimisations can also be enabled for non‑administrator accounts by following the steps below.
1. Choose Start / Control Panel.
2. Launch Administrator Tools.
3. Double‑click Local Security Policy.
4. Under Security Settings/Local Policies, double‑click User Rights Assignments.
5. Double‑click 'Perform volume maintenance tasks'.
6. Add users or groups that use Pro Tools to the list.
7. Click OK.
Non‑administrators can then access the Disk Management section of the Computer Management Tool, where you can format, partition, and assign driver letters to drives.
As you can see, all this isn't for the faint‑hearted, but if you're fed up with people messing around with your carefully configured systems, it's well worth considering.
