When building Macros gets tough, the tough get going with Cubase’s Project Logical Editor.
In last month’s Cubase workshop, John Walden explained how Macros can be used to automate repetitive tasks — and I was reminded me of a surprisingly challenging recent Macro‑making experience of my own. So this month, I’ll dive a little deeper into Macros, exploring some limitations and workarounds. Hopefully, by taking you through how I overcame the challenges posed by one particular Macro, I’ll be able to help you design and troubleshoot some sophisticated Macros of your own.
Missing The Bus
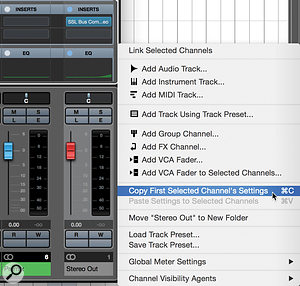 When the Macro has been run, it’s easy to copy and paste the channel settings from the Stereo Out to your new Premix bus. The task I wanted to automate should have been simple: inserting a new ‘premix’ bus — a fancy name for a stereo Group track that sits between Cubase’s master Stereo Output track and the rest of your mix — into an existing project. The idea of a premix bus is that you can put all of your master‑bus processing on this bus, while leaving Cubase’s main Stereo Out track free of processing. This setup allows you to either send or directly route selected sources ‘around’ any bus processing you’ve set up.
For example, I often like to mix into some gentle mix‑bus compression — just 1‑2 dB of gain reduction to ‘glue’ the mix together. But often, what feels like the right setting for the mix as a whole can be a bit too much for the vocals or cymbals. There are various strategies to overcome this, but one is the premix bus. By placing the compressor on the premix bus, I can set the level of the vocals running into the compression using the vocal channel fader as normal, but can later choose to nudge the vocals up a little without impacting on the action of the bus compressor, by sending a little of the vocal directly to the clean master bus. Similarly, if I feel that the drum overheads are a little undesirably coloured by an analogue tape emulation on the bus, but I want to keep that effect on the rest of the mix, I can back off the overheads’ channel fader and use a send to route more overheads to the clean Stereo Out.
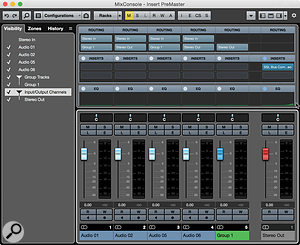 Here’s the test project before running the Macro...Another scenario is where you’re using reference tracks and either don’t wish to use the Control Room or don’t have it (it’s only available with the full Pro version of Cubase): simply route the references to the Stereo Out and use the reference tracks’ channel mute and solo controls to audition your references.
Ideally, you’d create your premix bus before you start work on your project, but there will be occasions when you wish to add one to existing projects. If the project is a busy one with lots of Group tracks, this can be rather fiddly. It requires careful manual selection of tracks and a lot of mouse clicks and key presses — it’s easy to overlook something, and distracts you from the actual job of mixing.
Manual Or Automatic?
A few built‑in commands can help speed things up. For example, in the MixConsole, you can select a track and use the ‘Show Channels that are Connected to the First Selected Channel’ command to reveal all tracks that are routed directly to the selected one. And you can re‑route all the currently selected channels by clicking on one of the channels’ routing, then Shift+Option (Alt+Shift on Windows) clicking the desired destination.
Sadly, Cubase is a little inconsistent in terms of which commands are available to you and how those commands behave, with the choice and result depending on whether you’re viewing the MixConsole or the Project page. The command I’ve just described, for instance, is only available when in the MixConsole. Yet selecting ‘all’ tracks in the MixConsole selects both the visible tracks and any you’ve hidden, whereas in the Project page the same command selects only the visible tracks, not the hidden ones. Accessing the Project Logical Editor, which can be used to make track selections, requires you to be in the Project page.
When it comes to automating things with Macros, the same rules apply; you must be in a certain window to execute certain commands. You’ll also find that lots of obvious commands are toggle types, which invert the current state of something (eg. open a window if it is closed, and vice versa) but can’t actually specify the state (eg. there’s no built‑in command to ‘Open the MixConsole’). Thus, automating the creation of a premix bus, complete with routing, requires some prep work and a little lateral thinking...
Prep School
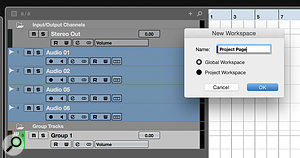 As Cubase only has toggle commands to show/hide the MixConsole, it’s necessary to create a Workspace to provide the Macro with a known starting point.The MixConsole command that hides all tracks that aren’t routed to the Stereo Out requires the Stereo Out to be selected. Automating that selection requires the creation of a Project Logical Editor (PLE) preset, which means you must have the MixConsole closed! The default F3 command to toggle the MixConsole open/closed won’t work in our Macro, as it has no way of knowing whether that window is currently open or closed. So we must create a known starting point using Cubase’s Workspaces: close all open windows except the Project page, go to ‘Workspaces / Add Workspace’ and create a global (so it applies to all projects) Workspace preset called ‘Project Page’. Macros address Workspaces by number, not name, so make a note of the Workspace number and use that in place of Workspace 1 in your Macro.
Next, create that PLE preset — in fact, you’ll need to create a few. The first will select the Stereo Out. Go to ‘Edit / Project Logical Editor’ and set the PLE with the following parameters: Filter Target = ‘Name’; Condition = ‘Equal’; Parameter 1 = ‘Stereo Out’. Leave everything else at the default settings (the Action pane blank, the Function as ‘Select’ and the Macro as ‘Not Set’). Save this as a preset called ‘Select Stereo Out’.
Create a second preset called ‘Select All Except Stereo Out’: use the same settings, but change the Condition parameter to ‘Contains Not’. With both presets saved, go to the ‘File / Key Commands’ and open the Project Logical Editor folder. You should see your new PLE presets listed here, which means they’re now available to add to Macros and/or assign to keyboard shortcuts.
You must also ensure that the Stereo Out track is actually selectable in the Project Page — the Input/Output Channels folder must be expanded. Again, the default commands for specific folders toggle the open/close state of the currently selected folder. And while there’s a command to expand or collapse all folders in your project, that could hide things you don’t want hidden! But you can create the command you need with another PLE preset.
This time in the PLE window’s upper pane, you need to add two conditions. The first row should read: Filter Target = ‘Container Type Is’; Condition = ‘Equal’; Parameter 1 = ‘Folder’. Click on the plus sign to add another row, in which the parameters need to be set as follows: Filter Target = ‘Name’; Condition = ‘Contains’; Parameter 1 = ‘Input/Output’. That selects the folder and the lower pane’s settings, so instruct Cubase to expand it: Action Target = ‘Track Operation’; Operation = ‘Folder’; Parameter 1 = ‘Open’. Finally, set the Function parameter at the bottom of the window to ‘Transform’. (You can check the selection works without performing the action by leaving this set to ‘Select’). Save this as a PLE preset called ‘Open Project IO Folder’.
 Another preparatory step is to sync the Project and MixConsole visibility and track selections.Our final piece of prep ensures that the visibility of tracks in the MixConsole and the Project Page is synchronised. I couldn’t find a way around doing this manually, but you should only need to do it manually once as it will become the default setting. Go to ‘Cubase / Preferences’ and in the ‘Editing / Project & MixConsole’ section, ensure ‘Sync Visibility of Project & MixConsole: On/Off’ is ticked. You can assign this a shortcut if you wish (I used Shift+Alt+S), and can check and change the status by clicking on the ‘=’ icon in the visibility tab to the left of the MixConsole or Project page. If doing this really bugs you (because you want, for other reasons, to be able to un‑sync the two windows), note that Cubase actually has three separate MixConsoles, and each can be set independently to sync with the Project page or not. So you could easily adapt this Macro to use MixConsole 2 or 3 without affecting the sync setting of your main MixConsole — the commands to toggle open/closed these auxiliary MixConsoles are available in the ‘Key Commands’ window.
Building The Macro
Having created your Workspace and channel‑selection commands, you can start work on the Macro itself. Add the commands in the sequence I’ve used, since you can’t drag to reorder commands in a Macro — by default a new command is added below the currently selected one. Get this wrong and you have to delete the command and try again.
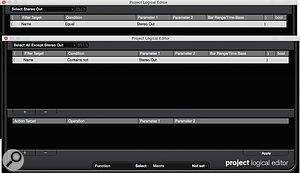 These two Project Logical Editor presets enable the Macro to select the Stereo Out track, and all tracks except the Stereo Out.Go to ‘File/Key Commands’ and click on the Show Macros button at the bottom. Click the New Macro button and call the new Macro ‘Insert Premix Group’. I find it quickest to find commands by typing in the search field at the top — type the text you want and hit enter to find the first result. Use the magnifying glass to find additional results (don’t hit enter twice or you’ll close the Key Commands window). In this search box type ‘Workspace’ and hit enter. From the list select Workspace 1 (the one we created with only the Project Page open). Then, in the Macro sub‑pane click the Add Command button.
Now to select the Stereo Out: type ‘Project IO’ to find your ‘Open Project IO Folder’ PLE preset and add this to your Macro. In the same way, find and add your Select Stereo Out preset.
The next step will need the MixConsole open. Since the Macro’s first command defined the state of the MixConsole as closed, we can add the MixConsole toggle command — it’s in the ‘Devices (Studio)’ folder and is called ‘MixConsole’. Then add the wordy command ‘Channel & Track Visibility — Agents: Show Channels that are Connected to the First Selected Channel’.
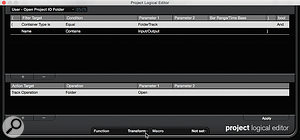 Another Project Logical Editor preset locates the default Input/Output Folder and sets its view to expanded.As discussed earlier, while the MixConsole now displays only those channels we want selected, you can’t actually select them here — you must first return to the Project page. So add either the Workspace 1 or MixConsole toggle command (it doesn’t matter which). Then add your ‘Select All Except Stereo Out’ PLE command, followed by another MixConsole toggle command to return us once again to the MixConsole. Finally, add the ‘Mixer — Add Track to Selected: Group Channel’ to the Macro.
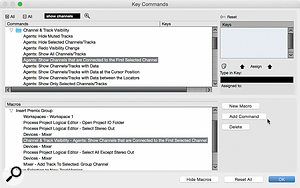 In the upper pane, you can see the command that allows us to select all tracks currently routed to the main Stereo Out. The lower pane lists the different steps that form the finished Macro.And that’s almost it. You can run your Macro either via the ‘Edit/Macros’ menu, or by assigning a keyboard shortcut to your Macro in the Key Commands window. It will create a new Group track routed to your Stereo Out bus, re‑route any tracks currently routed to the Stereo Out to the new Group, and prompt you to name the Group. Call it ‘Premix’ or something similarly descriptive (to make it easy to select via PLE presets, should you ever wish to do so).
The Hidden
I said ‘almost’, because there are two remaining issues. First, you need to make visible in the MixConsole those tracks that were hidden by the Macro. Second, we need to move any processing on the Stereo Out to the new Premix track.
There’s a command (accessible only in the MixConsole view, and called ‘Agents: Undo Visibility Changes’) that should do what we want: it reverses the last visibility changes you made. But this didn’t work reliably for me when used in the Macro. You could use ‘Channel & Track Visibility — Agents: Show All Channels/Tracks’. This will unhide all tracks that were previously hidden, and if you don’t tend to hide many tracks in your projects this is probably the best way to go. Personally, I preferred to do this step manually, using the Visibility pane on the left of the MixConsole, where it’s the work of seconds. But if it really bugs you and you want to aim for Macro perfection, you could design this whole Macro to operate on MixConsole 2 or MixConsole 3 behind the scenes, leaving your main MixConsole’s visibility settings intact. As before, to do that you simply replace the MixConsole commands in your Macro with MixConsole 2 (or 3).
Processing Chain
I’m afraid I met with stauncher opposition when trying to automate the transfer of the processing chain from the Stereo Out track to the new Premix bus. The commands exist to make automation possible, but on my system (at the time of writing, I’m using Cubase Pro 9.5.30 on MacOS), these seemed somewhat buggy, resulting in Cubase crashing. So I ended up doing this step manually. Still, as I know other Cubase users who didn’t experience any problems with this, it’s worth me setting out the steps necessary to automate this side of things.
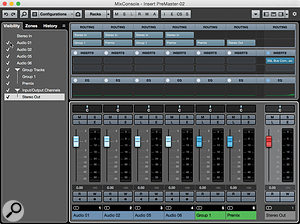 ...and here it is after. All I had to do was hit one key and enter a track name, and the re‑routing of tracks was taken care of automatically.There are a number of ways to save and recall settings: saving and loading track presets, for example, and saving and loading effects chains. But to my mind, the simplest approach is to select the Stereo Out and simply use the Cmd+C (Ctrl+C on Windows), go to the destination track and use Cmd+V (Ctrl+V). If you want to automate that, then you’d create another PLE preset to select your Premix bus, as we did before for the Stereo Out. Then you’d be able to get your Macro to select the Stereo Out, then ‘Copy First Selected Channel’s Settings’, then select the Premix bus and ‘Paste First Selected Channel’s Settings’. (I suggest doing this task as a separate Macro.)
Perhaps this Premix‑bus Macro will be useful to you and perhaps not. But I hope at least it has given you some idea of how you might solve any more complex task‑automation problems; there’s usually a way, even if it isn’t all that obvious at first!
Debugging
When creating Macros like this from scratch, you’ll probably find that you need to spend a chunk of time double‑checking your logic, and it’s thus a good plan to do your Macro building in a ‘dummy’ test project, as I did here. That way, you can be sure you won’t wreck any important work!
As you can see from the screens I’ve included here, my test project consisted of four Audio tracks, two of which I routed to a Group track (which was routed to the Stereo Out) and two directly to the Stereo Out. I also ensured I had the Routing section open in the MixConsole — that way I could see at a glance whether the Macro had delivered the intended results.
If you find that your Macro hasn’t worked as planned, I’m afraid a simple ‘undo’ command won’t necessarily unpick everything the Macro did — in particular it won’t reverse all the routing changes, since deleting a track such as the Premix bus described in the main article will change the routing of all the tracks that were routed to it so that they feed ‘no output’. You’ll thus need to re‑route these to the main stereo output every time.
