 Don't fear the Logical Editor! Even a simple preset can help generate some interesting musical ideas.
Stuck in a musical rut? Cubase Pro might just be able to provide the inspiration you need.
A number of third-party tools aim to offer the spark of musical inspiration around which you can build a project. Nobody expects them to cough up the sort of fully formed melody that could grace the next chart-topping hit, but by combining elements of key/scale 'rules', a dose of randomisation and a little user input — to influence the general direction of the riff-making process — they can be a great source of new melodic ideas. Happily, Cubase Pro 10 users need look no further than their own DAW for a toolset that allows you to experiment with this sort of random-but-guided riff generation. To follow the examples, you'll need a MIDI clip as a starting point. Anything will do; a simple two-bar sequence of 16th notes, all set to C3 and a velocity of 80, will suffice. Use this MIDI to trigger a staccato-style synth patch.
Iterative Inspiration
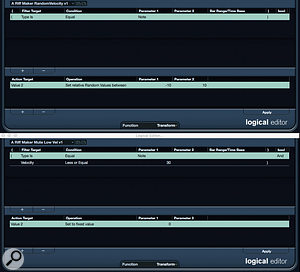
 You can manipulate note velocity in various ways using the Logical Editor, whether that's subtle randomisation (above) or note muting (below).Many third-party plug-ins work by applying iterative changes to note pitches and velocities, often snapping notes to a specific key/scale combination. The hope, in repeating this sort of 'guided randomisation', is that something musically interesting will grab your attention. Cubase Pro 10's Logical Editor makes this approach possible — it can be used to select, in a clip, any MIDI data that meet the criteria you define, and then make adjustments. For example, you could use it to select only notes with a velocity under 30 and change their velocity to zero.
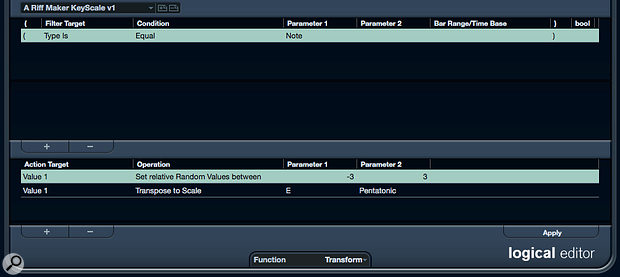
To do this, we first have to create the necessary Logical Editor presets, so let's start by tweaking the note pitches. In the first screen, the Logical Editor's upper panel is set so when you run the preset it will select all MIDI notes, and the lower panel defines the changes that will be applied. Two actions are defined. The first randomises the current Value 1 (pitch) by up to three semitones in either direction. The second (optional) line changes the resulting pitches to the nearest note on the specified key/scale. I used E Pentatonic since that was the key/scale of this project, but there are plenty more options in the drop-down menu of the parameter 2 column.
 Logical Editor presets can also be used to reset your original MIDI clip, so you can start over.Each time this preset is applied to the selected MIDI clip all note pitches are randomised by a small increment and then nudged to work in the specified key/scale. Importantly, note that a Logical Editor preset can be applied while the MIDI clip is being played; you can hear the changes as you apply them.
The next screen shows two Logical Editor presets to adjust note velocity data. The first again selects the clip's MIDI notes. A single action then applies a small random change (+10 or -10, but you could experiment with other values) to Value 2 (velocity data). Applied iteratively, the note's velocity pattern will slowly evolve.
In the second preset, the upper panel selects only MIDI notes whose velocity is currently 30 or lower. The action then changes their velocity to zero, effectively muting them. This can be fun to apply occasionally, as it removes low velocity notes from playback and can thus help add some rhythmic interest to our (initially) 16th-note-pattern starting point.
It's not hard to imagine creating other similar Logical Editor presets — for example, you might set a zero velocity for specific note pitches if you wanted to exclude some notes from one of the preset scales.
The Key To Success?
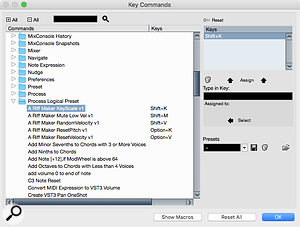
 By executing the Logical Editor presets via Key Commands, you can generate new ideas more efficiently.Applying randomisation processes in the hope of something good can feel a little crude and won't always bear the tastiest fruit, and in that case you might want to start afresh. The next screen shows the lower (action) panel for two further Logical Editor presets. In both cases, the upper panel is configured to select all MIDI notes. The two actions then reset all notes pitches to C3 (or whatever note you prefer) and reset the note velocity data to 80 respectively. You could combine both actions into a single preset, but I prefer the flexibility of being able to reset this data independently. If I have a melody I like, I can reset just the velocity data, and vice-versa. And don't forget the undo Key Command (by default, Ctrl/Cmd Z), which can be used to undo your iterative changes if you just want to go back a step or two in the randomisation process.
Executing these presets via the Logical Editor window itself is a bit clumsy, as you have to switch between the presets manually via the window's preset panel. A more efficient workflow can be established via the Process Logical Preset section of the Key Commands window, where you can define convenient key commands for your DIY presets. Having selected your target MIDI clip, you can then fire off repeated presets without opening the Logical Editor. If you also have the clip open in the Lower Zone Key Editor, you can combine your 'guided randomisation' with some occasional manual MIDI editing.
For a further creative step, why not try combining your Logical Editor presets with a bit of Chord Track magic?
More Options
The basic process described here really is very simple, and the idea is that you can use manual editing to refine the results — once this tactic has sparked a fresh musical idea, it's done its job. But if you want different options, you could try giving your initial MIDI clip a more obvious direction and/or rhythmic feel, whether it's different note intervals or leaving some steps blank. There are plenty of options, but one neat example is to copy your kick/snare MIDI data to a bass synth track, reset the pitch values, and see if you can't randomly generate a cool bass pattern to play alongside your drums.
 The Chord Track can add a further creative twist to your random melody generation workflow.
For a further creative step, why not try combining your Logical Editor presets with a bit of Chord Track magic? For the final screen, I used my Logical Editor presets to generate an initial two-bar MIDI sequence. Then I made three copies to create an eight-bar sequence, which I set to follow both the chords and scales defined in the Chord Track. So the sequences in bars 5/6 and 7/8 have been subjected to further pitch tweaking by the Chord Track engine, resulting in some nice further variation.
Finally, in the Key Command window, you could easily create a Macro that bundles some of the Logical Editor randomisation presets into a single command... but I've already encouraged you to face your Logical Editor fears, so I'll leave that for another time!
