Improving your Pro Tools system needn’t always cost money. We look at some essential add–ons that can be downloaded for nothing.
As we start a new year, money can be short after the excesses of the Christmas festivities and January sale purchases. In this month’s Pro Tools feature, then, we’ll take a look at some donationware software and free plug–ins that could be a welcome relief to strained wallets!
Management Is Easy
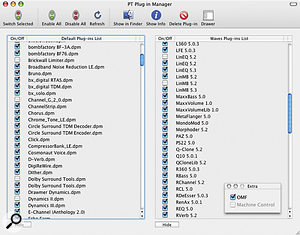
 Plug–in Manager makes it easy to avoid those annoying ‘Try, Buy or Quit?’ dialogues every time you start up Pro Tools!The Mac OS X utility Plug–in Manager from Maison Sonique is ‘donationware’, written by sound designer and composer René Overhorst. For the past 10 years he has worked in several big studios in the Netherlands, mainly as a sound designer and composer. He found that often they didn’t buy licences for every plug–in in every one of their rooms, so when he fired up Pro Tools he would often end up needing to dismiss a series of licence warnings before the program would start. Eventually, the lack of a plug–in manager for Pro Tools frustrated him so much that he decided to write one himself because, as he said, “every programmer does this when missing some software”. Plug–in Manager began as a collection of Applescripts, which were developed further with Applescript Studio in his spare time between studio projects.
Plug–in Manager lets you disable and enable plug–ins and check for duplicate versions. It displays two columns, the right–hand one for Waves plug–ins and the left–hand one for the rest. If a plug–in is ticked, it will be kept in the active plug–in folder, while unticked plug–ins will be moved to a location determined in the Preferences window. For normal plug–ins, this defaults to the Digidesign–created Unused Plug–ins folder, but there is no equivalent in Waves–land, so you can create a Waves Unused plug–in folder, as you can for the ‘Extra Resources’ like the OMF option from DigiTranslator and MachineControl.
You can create and manage sets of plug–ins from a ‘side drawer’ of the main window, so you could set up a number of different configurations on your Pro Tools system to suit the licences that engineers carry on their personal iLoks. You can delete plug–ins from the main window or, more accurately, move the selected plug–in to the trash so you still have the final choice to delete it yourself! You can even install plug–ins by dragging them in the main window. There is a Show Info option so you can check which version of a plug–in is the latest, and I was impressed to find that Command+I (the normal Apple Get Info shortcut) works in this application as well.
This is a stunning piece of software that is incredibly useful, especially in situations like the one René found himself in. I have a similar situation on my laptop–based system. I have DV Toolkit as well as a number of other plug–ins installed on it, but I rarely need them, so I prefer to leave all my iLoks safely at home. However, this means most times I boot Pro Tools on my laptop I have to dismiss around 10 licence windows — but not with this utility. It is so worth the $5 donation René asks for. Go get it, pay the man and let’s get that iLok feature! The latest version can even enable and disable the OMF and Machine Control options, and René’s ultimate aim is to get it to determine what licences are loaded on connected iLoks and then enable only those plug–ins.
Every Mac Pro Tools system should have René’s Plug–in Manager, and also Jean–Charles Deshaies’ clever application for deleting Digidesign Databases and Preferences that I mentioned in SOS June 2007. These two applications will go a long way towards keeping your system running sweetly. It would be even better if Digidesign would license them from René and Jean–Charles for the standard Pro Tools installation. www.maisonsonique.com
Free Plug–ins
There are thousands of free plug–ins available in VST format, especially on Windows, and most of these can be used with Pro Tools via a ‘wrapper’ such as FXpansion’s highly recommended VST To RTAS Adapter. However, there are also a few free plug–ins available in native Pro Tools formats, and three in particular strike me as very useful.
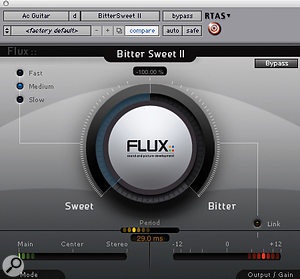
 Flux Bitter Sweet II, available for Mac and PC, is a dynamics processor that enables you to emphasise or de–emphasise the transient content of a signal, rather in the mould of SPL’s Transient Designer. Like all Flux plug–ins it features 64–bit floating–point processing, for up to eight channels.
There is one main control, which defaults to a neutral centre position. Turning it to the side labelled ‘Sweet’ decreases the amplitude of detected transients, while on the Bitter side the transients’ amplitude is magnified. When used on a stereo channel Bitter Sweet II also features a control to determine which elements of the signal are to be processed. In the main position, the process affects the entire stereo signal. In the Centre position, only the Middle signal of the internal M/S matrix is processed. When Stereo is selected, only the Sides signal from the M/S matrix is processed.
I have to admit I was sceptical about what this plug–in claimed to be able to do, but I tried it on a solo vocal and found that reasonable amounts of Bitter brought some life back into the vocal, although you have to be careful not to overdo it, because the starts of words and phrases can jump out. Next I tried it on a piano track, where the Sweet side didn’t have a huge effect, but the Bitter side seemed to emphasise the attack of the notes, making that piano sound very clunky.
I followed this with a bass guitar, where medium amounts of Bitter increased the attack of the bass, giving it some more ‘cut’ on the track. Conversely, the Sweet side produced a smoother-sounding bass. Finally, I turned to an acoustic guitar track on an album I am finishing up at the moment. The classical guitar was miked with an M/S pair, but I had to mic quite closely, as there was a string section playing in the room as well. When it came to the mix, we wanted to achieve an impression of more distance. My normal route is to use Waves’ Trueverb as an insert and add that sense of space with the Distance control, but on this occasion it wasn’t working as well as I would like. Adding Bitter Sweet II to the track and turning it fully over to the Sweet side allowed me to back off the Trueverb quite a lot and improved the sense of space and distance.
Side Splitting
 We reviewed Brainworx’s BX_Digital mastering EQ plug–in in the July 2007 issue. Now, as part of their evangelism for Mid/Side stereo, they have released the BX_Solo plug-in, which is a simple free M/S decoder that includes their unique Solo buttons, enabling you to monitor any of the components of a stereo signal individually. They are Left, Right, Mono sum, and Difference, and all are presented in phase and fed to both channels (so often when you solo the Sides component of an M/S signal you hear it out of phase, which makes it more difficult to evaluate what is going on). The plug–in also features a stepped Stereo Width control, which is basically a gain control for the ‘S’ component.
This excellent plug–in lets you experiment with M/S processing, as well as acting as an M/S decoder when you’re doing M/S miking. Because you can put in conventional stereo and get out M/S, or put in M/S and get out conventional stereo, you can set up an M/S processing chain by starting and ending with one of these plug–ins and then use multi–mono versions of your favourite processing plug–ins in between to process the mono (M) and (S) difference paths separately. This is, of course, how the BX_Digital plug–in is designed. More and more mastering folk are using M/S techniques, and now you can, thanks to Dirk Ulrich and Brainworx. BX_Solo is available for Mac and PC.
Into The Groove
 Izotope bill their free cross–platform plug–in Vinyl as ‘the ultimate lo–fi weapon’, and say it was designed ‘to create authentic vinyl simulation, as if the audio was a record being played on a record player’. They have provided controls for the amount of turntable motor rumble and other mechanical noise, internally generated electrical noise, such as 50Hz hum, the amount of dust and the number and depth of scratches on the record. Wear controls how worn–out the record is, from brand–new to played many times, and Warp sets the degree and shape of warping for the record. The Audiosuite version also allows you to set the age of the record player, ranging from current linear–tracking turntables to ’30s phonographs.
I’m not sure what possessed Izotope to develop this free plug–in, but for post–production work it is proving remarkably useful. I have used it to treat a recording of a bell to make it sound as though it was recorded on an old cylinder recorder, as well as treating audio to give the impression it came off a film projector. It does its job very well, and at the price, it’s a bargain!
Extra Keyboard Shortcuts
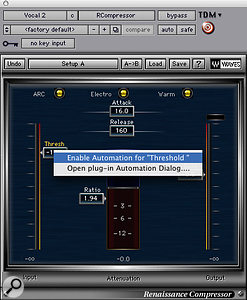
 Keyboard shortcuts can be used to enable all plug–in parameters for automation (above), or just individual ones (below).I recently came across some keyboard shortcuts I hadn’t previously been aware of, and thought they warranted a wider airing:
- Changing grid & nudge values
This can be particularly useful when programming or editing MIDI notes. To quickly change grid values, make sure you have the preference ‘Draw Grid Lines in Edit Window’ switched on in the Basics section of the Display tab of the Pro Tools Preferences window. You can then adjust grid values by holding down Ctrl+Option (Windows: Start+Alt) and using the plus or minus keys on the numeric pad. Similarly, to quickly change nudge values you can hold Command+Option (Windows: Ctrl+Alt) and use the plus and minus keys on the numeric pad.
- Enabling automation on plug–ins
In Pro Tools it is possible to automate every single parameter in every single plug–in, but actually enabling them all used to take quite a while, as you had to go through the Auto table for each plug–in and click on each parameter in turn. Fortunately, it is now possible to enable all parameters, or individual ones, without even opening the Auto window.
To enable a single parameter, Control+Option+Command–click (Windows: Control+Start+Alt–click) on a parameter in the plug–in window. To enable all parameters, Control+Option+Command–click (Windows: Control+Start+Alt–click) on the plug–in’s Auto button. This shortcut gives no warnings or menus — you will simply see the parameters change to show they are auto enabled. These two shortcuts are already getting the nickname of ‘the three–fingered salute’!
