Quickly and easily slice, rearrange and process breakbeats using some of the new facilities in Logic 9.
At the heart of hip‑hop and other dance‑music genres are sampled loops, such as breakbeats and instrumental loops, which are often sliced, re‑programmed and processed to create new material. This can be time‑consuming — but, luckily for Logic users, Apple have added new features to Logic Pro 9 that can be used to speed it up. In this workshop, I'll be looking at how you can utilise some of the new functions in Logic Pro 9 to work with breakbeats.
Grab A Breakbeat
First of all, dust off some vinyl and grab yourself a classic breakbeat to practise with, or get something suitable from a sample CD or on‑line sample collection. For illustration in this article, I'll use one bar of the drum solo from the Graham Central Station track 'The Jam'. Once you've recorded or imported your breakbeat, drag it onto an audio track in Logic Pro 9's Arrange page.
Now we'll set the project tempo to match the material we've imported. First, edit the breakbeat so it's exactly one bar long. Now click in the top half of the bar ruler to activate Cycle playback, then click and drag the Cycle range so that it is exactly one bar long in the timeline. Go Options / Tempo / Adjust Tempo Using Region Length and Locators (or use Apple‑T). This causes Logic to look at the length of your audio region, use the Cycle region as the target length and calculate loop tempo from that. A dialogue box will pop up. Tick 'Globally' to set the project tempo to that of your sample.
Chop At Transients
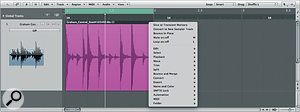
We're now ready to chop up the breakbeat, and we can use Logic's new transient‑editing functions to do it. Double‑click on the audio region to open the sample editor and click the Transient Editing Mode button on. Logic now automatically detects the transients in your audio file and puts Transient markers in those locations. The detection process is very good, but often requires tweaking to remove unnecessary markers.
In the Sample editor, edit the Transient markers so that there's only one for each drum hit, using the +/‑ buttons or by manually removing them. (For more on editing Transient markers, see the Logic drum quantisation article in December's SOS.)
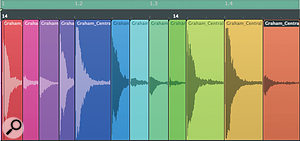
 After editing your Transient markers in the Sample Editor, Ctrl‑click on a region and choose Slice At Transient Markers to chop it into individual hits.Now that your Transient markers are bang‑on, go back to the Arrange page and Control‑click on your breakbeat region. From the pop‑up menu, choose 'Slice at Transient Markers'. Logic now automatically chops your breakbeat into single hits. The screen above right shows my sliced breakbeat, whose audio regions have been given different colours so that you'll be able to see how they've been rearranged in later stages.
 I've given my newly chopped regions different colours, so that you can see how they're rearranged later on.
Re‑sequence The Loop
We can now use Logic's excellent audio‑editing facilities to rearrange the breakbeat. In the Arrange page, set the Snap menu to Smart and the Drag menu to Shuffle L. Drag modes in Logic determine the behaviour of regions when you move them, and choosing Shuffle L means that when you drag one region across another, they will swap places, preserving the length of each region and the overall length of your breakbeat. This gives you the freedom to quickly re-order the drum pattern in any way you choose, while Logic adjusts other regions to fit around you. This is hugely powerful, and just as useful for pitched instrumental loops.
Set the Cycle range so the left and right locators frame the breakbeat, and hit play. Now move regions around until you find an interesting new pattern (see screen above).
Fades & Turntable Effects
 Rearranging a loop with the 'Shuffle L' drag mode allows you to quickly reorder your regions without any of the regions being changed in length or overlapping. The screen shows my new rearranged drum loop.
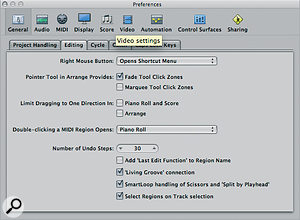
 New to Logic 9 are preferences that allow your pointer to become other tools according to position. The Fade Tool Click Zones option is particularly useful.
 You can change your fades to become DJ stop/start pitch effects. First add a fade‑in to a region, then go to the Region Parameter box, click on fade‑in, and choose Speed Up from the pop‑up.
Logic 9 has some useful new preferences to allow the pointer tool to emulate other tools, depending on where you move it over a region. Go to Preferences / General / Editing and tick the Fade Tool Click Zones box.
Now move the pointer over the upper‑right edge of a region and notice how it emulates the Crossfade tool (make sure you go right to the top corner!) and allows you to draw in a fade‑out by click‑dragging from the upper‑right corner to the left. You can input a fade‑in using the same method, but from the opposite corner. To curve a fade, hold down Control and Shift while you click and drag the fade. Creating fades in this way allows you to quickly alter the attack and decay characteristics of each drum hit. Experiment by using a curved fade‑out to sharpen a drum hit by removing some of the room sound from it, or using a fade‑in to soften the transient of a drum hit, to create ghost notes.
With Logic Pro 9, you have the option to turn volume fades into pitch envelopes, to emulate the classic DJ 'deck stop', and 'deck start' effects. Create a fade‑in on a region of your breakbeat. Open the Region Parameter box in the Inspector. Click on 'Fade In', and choose Speed Up from the pop-up menu.
Now listen to the audio region. The fade‑in has become a pitch envelope sounding similar to holding a record at a standstill and then letting go of it so that it rises back to the original pitch. You can repeat a similar effect for fade‑outs. Pick a different region and apply a fade to the end of the region. Go to the Region Parameter box, and this time click on Fade and choose Slow Down from the pop-up. Your fade now becomes another pitch envelope, with an effect similar to abruptly stopping a record. Experimenting with altering the curve of the fades you have entered can help make them sound more like the DJ effects they're emulating (the screen at top right shows both volume and pitch fades My drum loop complete with fades and DJ stop/start effects.).
While we're on the topic of region parameters, Logic 9 now includes a gain offset parameter for individual regions, found in the Region Parameter box. For our breakbeat example, this would give easy control over the volume of each drum hit. Do play around with this, as dramatically increasing the volume of quieter drum hits and ghost notes can have really interesting effects on the feel of an entire loop.
Bounce In Place To Add Effects
Now let's apply effects to different regions using Logic 9's excellent new Bounce In Place function. Bounce In Place lets you render all active plug‑ins and automation data into a new audio file, and we're going to use it to selectively process individual drum hits with their own effects. First, let's apply some brutal EQ to a region containing just a hi‑hat.
- On the audio channel you've been using, call up the Channel EQ insert effect and dial in some heavy‑handed settings (just so that you can easily hear that the processing has been applied).
- To apply that processing to just one region, Control‑click the region you want to process (a hi‑hat, in this case) and choose Bounce In Place from the pop‑up menu (or the Arrange page Region menu).
- In the Bounce In Place dialogue, check Destination / New Track and Source Mute, and ensure that Bypass Effect Plug‑ins is not checked (see screen below
 The Bounce Regions in Place dialogue box. Tick 'Include Audio Tail in File' when working with time‑based effects such as delay and reverb.).
Logic will bounce the chosen region, with its added EQ, onto a new track, while muting the old region. If you go back to the old track, bypass the EQ plug‑in and hit play, you should hear the same sequence, but now only the hi‑hat region has the EQ.
You can use Bounce Regions In Place to add all types of processing to different drum hits, but if you use reverb or delay, make sure you tick the 'Include Audio Tail In File' option in the dialogue box.
Applying Processing
As all the drum hits in our loop are discrete regions, we can easily apply off‑line processing to the individual hits. As an example, let's reverse a drum hit: simply double‑click on a region to bring up the Sample Editor, then go Function / Reverse. It can also be rewarding to call up the Time and Pitch machine, found in the Functions menu, and experiment with altering different drum pitches. Try pitching a snare‑drum hit up by 1200 cents, for example.
