We've had a good look at some of the tools available for mastering in Pro Tools. So what are the best ways to use these tools?
Following our two-part round-up of mastering limiter plug-ins, I thought it would be useful to look at some techniques for using Pro Tools to master finished tracks. There have been many articles on mastering techniques in general and so I don't intend to cover general principles. Instead, I will look at how to take some of those techniques and apply them in a Pro Tools world.
In the analogue days, mastering would involve setting various processors for each song, then recording the processed version, logging settings, resetting the equipment and moving on. In the non-linear, non-destructive world of digital audio workstations we can benefit from more flexibility; non-destructive processing and very accurate logging, using presets and structured file and Session saving, enables us to accurately revisit tracks to easily make adjustments following the 'cold light of day' approval sessions.
Bedtime Reading
In this article I have deliberately only touched on the actual techniques of mastering, as this workshop is about how to apply those techniques in Pro Tools. For more general guidance and information, take a look at the many on-line resources that are available, including the following:
- Bob Katz's Digital Domain site (take a look at the Articles section):
www.digido.com/portal/pmodule_id=11/pmdmode=fullscreen/pageadder_page_id=31/
- Bob has also written an excellent booklet which is available on the TC Electronic web site:
www.tcelectronic.com/default.asp?id=1457
- Sounding Off: Music Mastering, Sound On Sound October 2005:
www.soundonsound.com/sos/oct05/articles/soundingoff.htm
- Mastering: How The Pros Do It, Sound On Sound October 2005:
www.soundonsound.com/sos/oct05/articles/gettingmastered.htm
- Audio mastering in your computer, Sound On Sound August 2004:
www.soundonsound.com/sos/aug04/articles/computermastering.htm
Starting Point
Because mastering an album project is as much about the order and flow and overall sound of the tracks as it is about the sound of each track, it is best to begin with a new Pro Tools Session containing your mixes as a series of stereo files, one for each track of the album. So create a new Session and call it your 'mastering session' or similar, then create six stereo tracks; depending on how you choose to work, further on down the line you may need more or fewer tracks, but this will do to start with.
Now import your track mix files into your mastering Session. In Pro Tools 7 you can use the new 'Import Audio into Region List' command from the File menu, while the Import Audio command in Pro Tools 6 is in the Audio menu at the top of the Region List. Alternatively, in Pro Tools 7 you can also drag the files from a Finder or Explorer window direct into the Region List, or even straight onto the tracks.

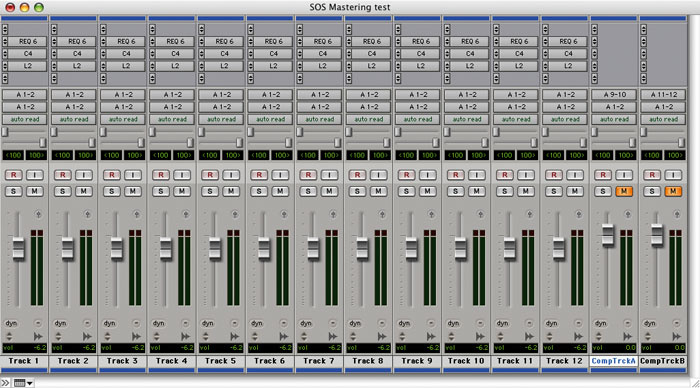
 or using entirely host-based processing (left) on an Apple G4.") This typical mastering Session, with 12 tracks each hosting three real-time plug-ins, will happily run on an HD2 rig (far left) or using entirely host-based processing (left) on an Apple G4.Next, import some reference material into your Session. When you are mastering it is very important to have a range of reference material to compare tracks with, whether that consists of tracks from the same artist's previous albums or tracks from CDs that you would like this album to sound like. Usually these will already be on CDs, so the easiest way to get these into Pro Tools is to drag them in from the Workspace window.
This typical mastering Session, with 12 tracks each hosting three real-time plug-ins, will happily run on an HD2 rig (far left) or using entirely host-based processing (left) on an Apple G4.Next, import some reference material into your Session. When you are mastering it is very important to have a range of reference material to compare tracks with, whether that consists of tracks from the same artist's previous albums or tracks from CDs that you would like this album to sound like. Usually these will already be on CDs, so the easiest way to get these into Pro Tools is to drag them in from the Workspace window.
Listening and rest are crucial when mastering, as is frequent use of the Bypass button. The ear can get accustomed to a sound quite quickly, so make sure you take breaks from working on tracks, keep going back to your chosen reference material and get other opinions whenever possible.
Get Plugged In
Insert some plug-ins on three of the tracks to start with, and leave the other tracks without plug-ins — use one of the plug-in-free tracks for the reference material. The exact make-up of the plug-ins you will need for mastering is dependent on the material you are mastering and what work needs to be done it. A good starting point is a decent EQ plug-in such as Waves Renaissance EQ or the Sony Oxford EQ. Follow that with a multi-band compressor such as Waves C4 or Wave Arts Multi Dynamics, and finish up with a good brickwall limiter such as one of Waves' L2 or L3 Ultramaximisers, or the Sony Oxford Limiter.
The EQ part of the mastering chain is a good starting point, for both enhancing the overall sound as well as fixing any problems that might be evident. Unless you have to fix a very specific problem, subtlety is the name of the game, so use low Q and cuts or boosts of no more than 3dB. If the track has been mixed on small monitors, you may need to look at the 150 to 250 Hz area as this could require a gentle dip to remove the muddiness in the sound that can occur when tracks are mixed on small monitors. A boost at around 5kHz can help with vocal clarity, while a high-frequency shelving boost at around 15kHz is often described as 'adding some air' to the sound.
Multi-band compression can be used for a wide range of fixing tasks such as de-essing and bass control, as well as dynamic EQ to further enhance the sound of the track and gain a few dBs of loudness. As I discovered in my limiter shootouts, multi-band compressors won't deliver enormous loudness increases but can produce dramatic improvements in the overall sound of a track.
Brickwall limiters are the plug-ins that contribute most to increasing the loudness of a track, and you should be able to get another 5 to 6 dBs of loudness out of most material without side-effects, especially when the limiter is preceded by EQ and multi-band dynamics plug-ins.
Real-time Or Audiosuite?
When mastering in Pro Tools, one of the issues you will need to decide on is whether you can do all your processing in real time or not. For me, the best solution is to have a stereo track for each song on the album. This way, each song has its own plug-ins with individual settings, and you are keeping your options open all the way to the end. Whether you can do this will depend on the type and number of plug-ins you use, so I tried an experiment to see what sort of load this would put on a system. First, I created a Session with 12 stereo tracks and inserted a six-band Renaissance EQ, a C4 and an L2 on every track as TDM plug-ins on my HD2 Accel system. This left three chips completely free, along with bits of others. Then I tried RTAS versions of the same plug-ins, and the system CPU load hovered around two-thirds on my dual 1.42GHz G4 machine. So whether you're a TDM or LE user, it's possible to do this on a medium-spec system with processing power to spare. This technique works for both TDM and LE systems and you aren't dependent on having to use snapshot automation, which isn't available on LE systems unless you buy the DV Toolkit 2 upgrade.
 If your system lacks the DSP or CPU resources to run many tracks' worth of plug-ins in real time, you can use a setup like this to audition processing before saving plug-in settings and applying them permanently using the Audiosuite versions of the same plug-ins.If you don't have the necessary processing oomph to do it this way, all is not lost. You can work round it by using real-time plug-ins to find the right settings for each track, then saving presets, loading them into Audiosuite versions of the same plug-ins and 'rendering' processed versions of each track.
In the example shown below, I'm using two pairs of tracks: Track A and Track B will be used for finding the right settings, while the two Composite Tracks are used to play back rendered audio. We begin by working on the first song (the 'track 1' Region) with real-time plug-ins on Track A to create the desired sound, remembering to regularly check the changes against the original and reference tracks.
When we are happy with the sound of the first track, we save the plug-in settings for each plug-in — I recommend you use the track name and plug-in name in the settings name so it is clear which settings go with which track — and save the settings to the Session folder rather than the Root Settings Folder, as if your Root Settings folder is anything like mine, it contains loads of settings and finding the right one is like finding a needle in a haystack! Saving them in the Session folder means they are easier to locate and choose from, and clicking on the '+' button in the plug-in window brings up the first setting saved in the Session folder, which is very helpful. Now we work on the sound of 'track 2' on Track B in the same way, and save another set of settings.
 For this sort of task, it's easiest to store plug-in settings in the Session folder.Going back to 'track 1', we use the matching Audiosuite plug-in and settings to process it. Start with the first plug-in, in this case REQ6, and continue with the other plug-ins in the order they are in your inserts — in this case, C4 and finally L3. Once we have a rendered version of 'track 1', we move it down — holding down the Ctrl key (Mac) or Start key (Windows) to constrain the movement of the Region to vertical only — to Composite Track A, and change its name to 'track 1 v1'. Finally, we drag out a replacement copy of the original 'track 1' file using the Ctrl/Start key and place it back on Track A, in sync with the processed version, so that if later on we need to reprocess it we have an unprocessed version in the right place ready.
Next we can drag 'track 3' from the Region List onto Track A and adjust the plug-ins till we are happy, remembering regularly to check our progress against the rendered version of 'track 1' and the real-time processed version of 'track 2' still on Track B. Once we are happy with 'track 3', we can render an Audiosuite version of 'track 2', move it down to Composite Track A, and move onto 'track 4'. As we work down the album, we'll always have the last two tracks available to adjust using real-time plug-ins, with the rest of the tracks as rendered Audiosuite versions.

, place the processed files on a track with no real-time plug-ins inserted, and restore the unprocessed version to the original track in case it needs to be revisited.") Once you've processed your songs using the Audiosuite plug-ins (left), place the processed files on a track with no real-time plug-ins inserted, and restore the unprocessed version to the original track in case it needs to be revisited.Should we need to revisit one of the rendered tracks, we can reconstruct it with the real-time plug-ins and the saved plug-in settings, make the changes, save new versions of the plug-in settings, render a new version and call it 'track x v2', so again we know where we are at all times. Providing we are methodical with our naming and saving, this method provides a reasonable degree of flexibility without using up too much processing load, but if you want more flexibility, you can try to keep a single instance of the brickwall limiter operating in real time, perhaps as an insert on a Master fader. The only limiter control you're likely to want to vary is the Threshold, and this is relatively easy to automate even without snapshot automation.
Once you've processed your songs using the Audiosuite plug-ins (left), place the processed files on a track with no real-time plug-ins inserted, and restore the unprocessed version to the original track in case it needs to be revisited.Should we need to revisit one of the rendered tracks, we can reconstruct it with the real-time plug-ins and the saved plug-in settings, make the changes, save new versions of the plug-in settings, render a new version and call it 'track x v2', so again we know where we are at all times. Providing we are methodical with our naming and saving, this method provides a reasonable degree of flexibility without using up too much processing load, but if you want more flexibility, you can try to keep a single instance of the brickwall limiter operating in real time, perhaps as an insert on a Master fader. The only limiter control you're likely to want to vary is the Threshold, and this is relatively easy to automate even without snapshot automation.
The Snapshot Alternative
 When using snapshot automation for mastering, it's important to make sure that snapshot changes fall in the gaps between songs.The other alternative is to keep the plug-ins running in real time on a single track, and use snapshot automation to store and recall the plug-in settings that are appropriate to each song. Remember, though, that this is only possible on HD systems or LE systems with the DV Toolkit 2 upgrade. For a detailed explanation of snapshot automation, take a look at Simon Price's Pro Tools workshop article from the June 2003 issue of Sound On Sound, at www.soundonsound.com/sos/ jun03/articles/pronotes0603.asp. Simon outlined some excellent tips for using Snapshot automation that are still valid for Pro Tools 7 over three years later! If you do use this approach, make sure that the transitions between the different snapshots happen in the gaps between the songs.
The Outcome
Once you've set up all your processing, you can use the normal Pro Tools editing interface to reorder them and set the gaps between the tracks. To save having to re-select everything to the end each time you make a small adjustment use the pre-roll option, but set it to around 20 seconds so you hear a good chunk of the preceding track, the gap and the start of the track in question to establish the correct gap.
However, the one thing it is not possible to do is to burn CDs from within Pro Tools. This used to be done with the now-discontinued Masterlist CD: my petition on Digidesign's User Conference to roll the features of MLCD into Pro Tools was top of the list for a very long time, but to no avail yet. This means you have to import your mastered files into another software package to create a master CD or DDP file for manufacture. On the PC platform, Sadie and Pyramix are obvious candidates, but in the Mac world we are somewhat limited. Possible candidates are Roxio's Toast with Jam, which enables you to set up all the extra stuff ready for CD manufacture like the PQ codes to mark the start and finish of each track, and BIAS Peak Pro, which has the option to create a DDP file, which is a much better source to manufacture CDs from.
Pro Tools & The Intel Mac
 Pro Tools M-Powered: now available for Intel Macs, and it's fast! Digi and M-Audio are so proud of their new Intel Mac-compatible version of Pro Tools M-Powered — v7.1.1 for Mac OS 10.4 — that they arranged the loan of a new Macbook Pro for us to try it out. And having tried it out, I can see why they're so excited about it. Recording and playback were flawless with my Firewire 1814 interface, and the program feels extremely responsive in use. As a rough test of its performance, I decided to see how many instances of D-Verb (stereo-to-stereo, running the default Large Hall preset) I could run before getting a CPU overload warning. With the default 512-sample hardware buffer and 85 percent CPU usage limit, I made it to 53 instances of D-Verb, running on a 2GHz dual-core machine with 2GB RAM. I didn't have a recent non-Intel Mac for comparison, but my 2GHz single-core Pentium-M Windows machine managed only 32 stereo instances at the same settings, so the dual-core CPU clearly brings a big performance increase.
Any criticisms I have of the Intel Mac implementation are very minor. As the CPU load went up, I didn't find the single CPU meter very informative, and its red overload light often appeared even at low CPU loads, though this had no effect on recording or playback; also, the CPU indication remained high even after closing the Session. I spotted a couple of other minor niggles, such as the Create New Tracks dialogue always defaulting to Ticks rather than Samples for all track types, but nothing that would cause real problems. Sam Inglis
More From Massey
Having tested Steven Massey's L2007 limiter for last month's limiter shootout, and been very impressed with the results, I thought I would try out his other plug-ins. At the moment there are three of them: VT3 is a three-band EEQ module, Tape Head is a tape-saturation and distortion processor and CT4 is a compressor.
All Steven's plug-ins are now compatible with Pro Tools LE, M-Powered, Mix and HD systems on both Mac OS X and Windows XP. Note also that the free demo versions all work without beeps or mutes — what you get when you buy the full versions is support for high sample rates, clip-light functionality, mono, multi-mono and stereo-linked versions as appropriate, Session restore functionality, save-and-restore functionality, automation, and bypass switching. All his plug-ins can be described as having a retro look, reminiscent of early valve and transistor processing units, and an analogue sound with a simple range of controls to use.


 VT3, which costs $69, is a three-band equaliser with a highly efficient algorithm — apparently an HD chip can handle up to 34 mono instances and an Accel chip can run up to 78. In addition, the TDM version operates with 48-bit precision. This EQ module is very simple: there are no frequency or Q controls, just three cut-and-boost rotary controls for Bass, Mid and Treble. I have no doubt this simplicity is a major contributing factor to its DSP efficiency, but what about its sound?
I first tried VT3 on the bass guitar in a jazz track, and very quickly got a better sound than I had had with Waves' Renaissance EQ — even though there are just three basic controls, adjusting each one seemed to give me what I wanted. I then found myself replacing all the Renaissance EQ s in the Session, including the kick and snare, and again was very impressed with the ease with which I was able create the desired sound. Next I tried it on a solo vocal, where the Treble control opened up the top end nicely without ripping my head off. However, it was at this point that I wanted to be able to adjust the centre frequency of the Mid band, as it wasn't quite centred right for what I wanted to do on this track.
Tape Head is designed to create that analogue tape sound for your drum mix or add some 'grit' to your vocals to help them cut through a dense mix. I tried this on a decent drum kit sound and found that small amounts of this plug-in added a certain something that neither EQ nor compression could do. As with all processors of this sort, it needs to be used sparingly, but it certainly helped to improve this kit's sound. Of the three, however, this is probably the plug-in I will use least, simply because its applications are less relevant to most of the type of work I do.
Steven says of his CT4 compressor "It provides clean and smooth gain reduction, with a little punch. Users have noted that CT4 is very good at preserving the 'air' of the source material. It is an original design, not modelled on anything in particular." I tried it on a range of material. On the jazz track, putting CT4 across the drum sub and dialling in 6 to 9 dBs of gain reduction brought out all sorts of lovely detail in the drum sound I hadn't heard before. Then I replaced the Renaissance Compressor on the bass guitar with CT4 and I found the two sounds were very similar, with CT4 perhaps having the slight edge by retaining more of the transparency of the original bass sound. On the solo vocal track, it handled the very wide dynamics of the vocal with ease, and it didn't sound as though the vocal was being sat on when the singer delivered the peak of the song at full tilt — very impressive.
In all three cases, the simple controls of all Steven's plug-ins impose surprisingly few limitations; the way Steven has designed what goes on behind them means they deliver a great sound without loads of fiddling and messing about. As one who rarely has the luxury of a lot of time to try loads of things, I need plug-ins that deliver a good sound quickly and easily, and the Massey stable of plug-ins do that very well. I can see CT4 becoming my compressor of choice, and if we could have a swept-mid option, VT3 could easily become my favoured EQ — I can see me using it for its treble section straight away.
 I was curious to know more about the man who has made a refreshing change to plug-in business with this cost-effective range of Pro Tools plug-ins, so though the wonders of modern technology I asked Steven to tell us more about himself. "Like with many teenagers, music was a great form of escapism during my high school years," he says. "Being technically inclined, I was naturally drawn to the production aspects of music. I began building up a small collection of gear and began recording friends' bands. I started directly into hard disk recording, using the Sunrise Studio 16 system on the Amiga computer. This was one of the earlier hard disk systems. It could record in stereo and mix down up to eight tracks to its stereo output. No plug-ins in those days!
"I've been a computer nerd from when I was nine, ever since my family first got a Commodore 64. Like most home computers of the day, it had BASIC built-in when you switched it on. I remember as my father and brother struggled to load up that first video game, I was more anxious to figure out what you could do with that big blue blinking cursor. In college I studied Electrical Engineering because I wanted to learn digital signal processing and better understand analogue electronics. From college, I went straight to work for Digidesign.
"At Digidesign I worked in the Developer Services group. This group manages the Pro Tools plug-in SDK [Software Development Kit] and provides technical support to all the third-party plug-in developers. There are a lot of unique personalities out there in the pro audio world and they always kept the job interesting for us!"
From Digidesign, Steven joined TL Labs, developing their TL Drum Rehab and TL Aggro plug-ins before deciding to 'go it alone'. "I'm always happiest when I'm creating new things," he says, "so I wanted the freedom to focus on that. When you work on large-infrastructure software, be it pro audio or database development, the bulk of the day-to-day work is often spent fixing bugs and that just isn't very inspiring!
"I'm always working on about three or four things simultaneously, but currently my main focus is an emulated tape delay plug-in. I'm borrowing an old Echoplex from a friend and loosely basing the sound on that device."