 It's often useful to set the Session Start earlier than the start of the video file, in order to leave room for line-up tones and so on.
You've got your system set up, and you've received the video files from the director. This month we explain how to get the video and its associated sound files into a Pro Tools Session ready for you to start work.
Last month, I explained the choices you need to make when setting up a Pro Tools system to work with video. Following on from that, we are going to look in detail at how you get your audio from a video editing package such as Avid Express or Final Cut Pro into Pro Tools, using Digitranslator for TDM systems and the DV Toolkit for LE systems.
Digitranslator is a software add-on for Pro Tools that enables it to open OMF, AAF and MXF audio files, video files and sequences. With the Digitranslator v2.0 option, Pro Tools supports the import and export of OMF media files and sequences as well as AAF sequences directly into Pro Tools 6.x Sessions without launching a separate application. From v6.9 Pro Tools supports import of MXF video, as well as import and export of MXF audio. Finally, with Pro Tools 7.0 and higher, you can import or export AAF files with embedded audio. If all these different standards are confusing you, take a look at the box on the next page.
DV Toolkit is a post-production bundle for Pro Tools LE 6.1 and higher, which enables various features otherwise only available on TDM systems, so providing you with the opportunity to 'work to picture' using a very cost-effective LE-based system. Firstly it enables the Time Code functions, including the Time Code ruler, and so enables you to edit to picture with time code accuracy and convenience. It also includes Digitranslator 2.0, as described above, which handles the OMF, AAF or MXF exchanges. Included in the bundle are Synchro Arts' Vocalign Project, which enables you to sync up replacement dialogue very accurately, and Digidesign's DINR Audiosuite plug-in to help with de-noising any dodgy audio that might come along your way. This is nice, though it has to be said that DINR is getting very long in the tooth these days and can't really compete with the likes of Waves' and Sony Oxford's restoration bundles.
You Put Your OMF In...
Having looked at the tools available to you, let's go through the process of getting an OMF into Pro Tools in more detail. Always remember that most problems with OMF imports stem from OMF creation problems on the video editing system. It is very important to co-ordinate in advance with the video editor to make sure they create the correct format of OMF file. (See the 'Links' box on the last page for details of some help guides available on-line.)
 To recap from last month, you should always try to get an embedded OMF, which will provide you with all the audio files and edit information in one large file. The only other file you will need is the video — which, in a nutshell, can be in any format you like as long as it is a Quicktime movie and preferably a DV movie. It is very helpful if this includes 'burnt in' time code so you have a continual visual read out of the time code on the video screen.
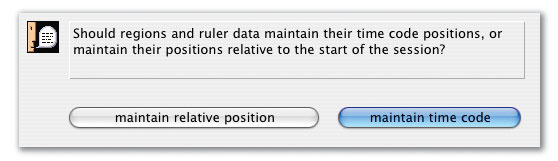
First, import the video, following the instructions described last month. Remember that Pro Tools will always put the video file at the start of the session. Your Session will now contain a Video track and a Movie. Go to the start of the Session and view the first frame of the video. Look at the burnt-in time code and set the Session Start Time in the Session Setup window to the same time code value as the first frame. Alternatively, you can set the Session start time to a value before the video start time to leave space for line-up tones and the like. To do this, Change the Session Start time in the Session Setup window to the desired time; when you hit Enter, a dialogue box will come up. We need to make sure the video stays at the correct time code position so select Maintain Time Code and you will see that the Session now starts earlier but the video has remained at the correct time code.
 The Import Session Data dialogue contains numerous parameters which will help you to ensure that data from the video editor is translated in a useful way in Pro Tools.
We can now import the OMF into this Session to bring in all the audio that has been laid up by the video editor. To do this you must have Digitranslator 2 installed and authorised on your machine. Select Import Session Data in the File Menu of Pro Tools and the usual navigation window will open. Select the appropriate OMF file, click on the Open button, and a variation of the normal Import Session Data window will open, showing a list of the audio tracks as they were in the video editing package. Leave all the tracks set to New Track, but before you click the OK button you need to look at some of the tick boxes and pull-down menus.
Take a look at the bottom left-hand corner (see screen on previous page). For instance, I tend to change the pull-down menu from 'Ignore clip-based gain' to 'Convert clip-based gain to automation'. I also untick the 'Pan odd tracks left/even tracks right' box as I find these defaults are more often wrong than right, and anyway I tend to rearrange things on to different tracks very soon after importing the OMF into my Session.
Then take a look at the left-hand middle section. I prefer to set the upper pull-down menu to 'Copy from source media' so that Pro Tools creates new audio files in the Session's audio files folder. This way, the Session doesn't remain dependent on the embedded OMF file, which may get lost if the Session is moved around to different drives and/or systems later on in the work flow. On this occasion you can ignore the Video pull-down menu, as embedded video files in OMFs are not supported by Pro Tools and anyway you already have your video file on its track in the Pro Tools Session.
Finally, you can click OK. Pro Tools will start copying the audio files across and they will appear on the Edit window as each one is done.
How Many Standards Do We Need?
Avid's Open Media Framework (OMF) was the first 'transfer file format' to come into widespread use, but two new standards, Advanced Authoring Format (AAF) and Media Exchange Format (MXF), have evolved to resolve the various interchange limitations. They are robust enough to contain all the information that any sequence contains and are extensible, meaning that new features can be added later.
OMF has become a 'standard' because Avid, who designed it, have a hold on the video-editing market and not because it came from a recognised standards organisation. However, there have been a number of obstacles to it becoming a universal standard. First, it has a history of instability, and second — partly as a result of this — Avid changed the format with the introduction of OMF2, which is actually different enough from OMF1 to be considered a completely separate format. Finally, not all third-party companies wanted to support a standard with proprietary origins.
To be fair, Avid made serious attempts at moving OMF into the public domain through both the SMPTE and AES standards bodies. Unfortunately, the attempt foundered for several reasons, the main one being that OMF uses an underlying technology called Bento, which is a 'container' format for recording data on disk. Although it is freely licensed to OMF developers, Bento was developed by and is owned by Apple, and for SMPTE or AES to standardise something, all proprietary issues, including patents and copyrights, must be formally waived, which Apple refused to do.
From the start, both the AAF and MXF formats were designed to avoid the limitations OMF came with. To speed this along and to gain some independence, an organisation was created called the AAF Association. AAF was initiated by Avid and Microsoft, who have since been joined by many other important companies and organisations. Avid and Microsoft worked together to replace Bento with a new container format, and the resulting AAF design is derived from OMF and retains its power and flexibility while refining the details and adding significant capabilities. In a further step to aid take-up and improve independence, the AAF Association have made the software developer kits to support AAF 'open source', meaning that they can be freely copied and are available at Source Forge.
Meanwhile, in true 'standards form' (why have one standard when you can have three or four?) another effort was under way. Industries beyond the professional production business, such as telecoms, Internet and computer companies, now require a universal way to transport video and audio media around. The Pro-MPEG Forum (another consortium) was formed to take up this challenge, and, in co-ordination with the European Broadcast Union and SMPTE, helped create MXF.
Even though the standardisation process is not complete, more and more companies are supporting both the AFF and MXF formats in their software. Together, AAF and MXF offer the prospect of data interchange between picture, audio and effects systems and thus the ability to cut a sequence on a picture system, hand it intact to sound, move it to the mixing stage, and finally load it back into the picture system with everything visible and audible everywhere. Through Digitranslator 2, Pro Tools supports them both as well as OMF2s.
Getting Going

Now you can start work. One the first things I do is to reorganise the track allocations making new stereo tracks where appropriate. This is necessary as, like older versions of Pro Tools, neither FCP nor Avid supports stereo tracks, so all stereo material will have been split across two tracks by the video editor. I move all stereo material across to stereo tracks and reorganise the other material on to tracks that suit my way of working. Then I can start work on the material. We will look at the following stages in next month's article.
Video On The Cheap
If you don't have Digitranslator or a TDM system, it is still possible to do some work to video in Pro Tools. Here's how...
. The first stage in working with such a project is usually to reorganise and rename the tracks to make it easier to see what's going on (above).") When you import an OMF into Pro Tools, stereo parts will be split across two mono tracks, and the order of the tracks might not be very helpful (top). The first stage in working with such a project is usually to reorganise and rename the tracks to make it easier to see what's going on (above).In your video editing package, create a copy of the finished sequence. Then you will need to consolidate each of the audio tracks so that all the material on each track is bounced into a single file, with each file starting at the beginning of the sequence — even if that includes silence — so you can line them all up again when you get them into Pro Tools. Then export the audio from each track and the finished video, making sure that you have a version of the video with 'burnt in' time code (a time code reader is one of the video effects in Avid or FCP). This will make working in Pro Tools without a time code ruler much easier. Remember to make sure the video file is a Quicktime movie and don't use the Avid codec as Pro Tools doesn't support it — go for a Quicktime DV movie file.
When you import an OMF into Pro Tools, stereo parts will be split across two mono tracks, and the order of the tracks might not be very helpful (top). The first stage in working with such a project is usually to reorganise and rename the tracks to make it easier to see what's going on (above).In your video editing package, create a copy of the finished sequence. Then you will need to consolidate each of the audio tracks so that all the material on each track is bounced into a single file, with each file starting at the beginning of the sequence — even if that includes silence — so you can line them all up again when you get them into Pro Tools. Then export the audio from each track and the finished video, making sure that you have a version of the video with 'burnt in' time code (a time code reader is one of the video effects in Avid or FCP). This will make working in Pro Tools without a time code ruler much easier. Remember to make sure the video file is a Quicktime movie and don't use the Avid codec as Pro Tools doesn't support it — go for a Quicktime DV movie file.
In Pro Tools (LE or TDM), create a new Session and remember to set the sample rate at 48kHz. Then import the Quicktime movie with the 'burnt in' time code onto a video track. Next, import all the audio files into the Region List. I tend to use Import Audio from the Audio menu at the top of the Region List. Now highlight the video file and drag each of the audio files into the Edit window whilst holding down the Ctrl key. This constrains the audio file to line up with the start of the video file. Once you have dragged all the audio files into the Edit window you are ready to continue the audio production in Pro Tools.
Because you have 'burnt in' time code on the video file you have your very own equivalent of a time code timeline. Use the Mins and Secs timeline as a guide to general position of things on the timeline and then refer to the 'burnt in' time code on the Video window for more detailed positioning.
Web Links
AAF Association
AAF Software developer kits
http://sourceforge.net/projects/aaf
Pro-MPEG Forum
European Broadcast Union
SMPTE
DV Toolkit
www.digidesign.com/products/details.cfm?template=overview&product_id=3941
Digitranslator 2
www.digidesign.com/products/details.cfm?product_id=1040
OMF export advice for Apple's Final Cut Pro
www.kenstone.net/fcp_homepage/basic_export_using_omf_jordan.html
OMF export advice for Avid
www.northbeachpost.com/audio_primer/omf_export_for_avid.html
Book Review: Pro Tools For Video, Film & Multimedia
Ashley Shepherd has written a very accessible guide to working with Pro Tools in video, film and multimedia (ISBN: 1-59200-069-X). He begins by outlining the history of the technology used, going right back to the start of the 'talkies' and Disney's Fantasia, which was way ahead of its time in both artistic and technical innovation. He then goes on to outline an overview of the possible workflows and equipment in use today.
The third chapter deals solely with the sticky topic of time code in all its different forms, before we see how to get started with Pro Tools and video. This covers machine control as well as working with video files, including the process of capturing your own using either iMovie or FCP. Chapter five looks in detail at the actual workflow of 'recording to picture' including much more detail on how to deal with OMFs and associated problems, recording foley sounds and the use of sound effect libraries.
The next chapter shows how to edit and manipulate the audio to picture within Pro Tools, and will probably be the most familiar section of the book to anyone who is already a competent Pro Tools operator. After that, Shepherd examines some of the processing techniques commonly used in sound for picture, including the use of Synchro Arts' Vocalign plug-in to help sync up replacement dialogue, before moving on to the mixing stage of the workflow. This section includes material on setting up stem mixes, the different surround formats in use, the use of 'pre-mixes' and the different control surfaces available. Finally, he explains how to deliver the mixed masters back to the client, covering line-up tones, tape formats and Dolby encoding.
All in all, this is a definite must for anyone working in this area. Ashley Shepherd has managed to combine comprehensive overviews of each phase in the workflow with detailed Pro Tools-specific techniques and tips.