When your Pro Tools mix is finished, you'll need to export it as a stereo file. We explain why the obvious Bounce To Disk option might not be the best for you...
Before the days of Pro Tools, once we were happy with the mix of a project, we would record that mix onto a stereo recorder such as a quarter- or half-inch analogue deck or DAT machine. Even in the early days of digital audio workstations, we still tended to record the mix onto another machine. Indeed, some people still do, although that machine is often another DAW system or a high-definition digital recorder.
However, as writable CDs became commonplace, a way of easily creating a file of the stereo mix was required to import into CD-burning software like Toast or, at the time, Digidesign's MasterList CD (it has never been possible to burn a CD straight from a Session in Pro Tools). Pro Tools has had the resulting Bounce To Disk feature for as long as I can remember — and that goes back to version 2.5, when Pro Tools was a four-track system on a good day with a following wind, and buying a 1GB hard drive required a bank loan.
Once you were happy with the mix, you could (and still can) select Bounce To Disk and Pro Tools would play the Session in real time, saving the output in a format of your choice. BTD has always been a real-time process except for a short while around the time of Pro Tools 4 when, on certain hardware, such as the Audiomedia III card, BTD was possible at faster than real time. At least one of my clients still bemoans the loss of that feature, but I have been assured by Digidesign on many occasions that non-real-time bouncing is unlikely to return, as it would require radical alterations to the whole audio engine.
 You can Bounce To Disk using different sample–rate and bit-depth settings from those of your actual mix. One of the advantages of BTD is that it doesn't require any changes to be made to the Session: once you are happy with the mix, it provides a simple way to get a mixed file of your Session. To bounce your Session to a file, set the left and right boundaries of the area you want to bounce by clicking and dragging in the timeline, then choose Disk from the submenu of the 'Bounce To' menu item in the File menu. Pro Tools will then open the Bounce dialogue box, where you select the source and format for the bounced file.
When bouncing the complete mix, Bounce Source should be set to your main outputs, in my case the first two outputs of my 192 interface. You can select other sources within the Session, which is useful for bouncing stems. A range of file types is available. If you are a PC user you won't be offered Sound Designer II or Sound Resource, but you will be offered Windows Media. These days I would recommend using BWF (Broadcast Wave) unless you have very good reasons not to.
The 'Enforce Avid Compatibility' box should be ticked only if your work is going to end up in an Avid or similar video-editing system. When it is ticked, other settings will be changed to make sure that the file created can be opened in an Avid suite. In addition, the boundaries will be quantised to frame edges, as Avids are not sample-accurate and so cannot handle boundaries that fall between picture frames.
If your chosen output is stereo you will get three options. Mono (Summed) will produce a mono file consisting of left and right channels mixed together. If you choose this option, you need to leave plenty of headroom, as there will be a 3dB lift. Multiple Mono will output the individual channels as two files of the same name appended with '.L' and '.R', and is best if you want to import the files into Pro Tools or Avid, as neither support interleaved files without conversion. Finally there is Stereo Interleaved, which will produce a single file with both left and right channels embedded in it, and is the one you are most likely to need if you are going to burn a CD.
As the Pro Tools mixer works at 48-bit, when you bounce, Pro Tools actually creates a 24-bit file in the background, and then converts that 24-bit file into the format of your choice. With the Convert During Bounce option selected, Pro Tools will undertake this conversion process 'on the fly', but this increases the load on the computer. The safer option is to select Convert After Bounce, but this takes longer.
There are three Resolution options: 8-bit, 16-bit and 24-bit. If you select 8-bit, an extra tick box appears, called 'Use Squeezer'. This is designed to compress the dynamic range to suit 8-bit applications and is designed to give an improvement in perceived loudness. There is no control over Squeezer settings: it is either on or off. You can also choose to export at a different sample rate from that of the Session, whereupon an extra drop-down menu offers different qualities of sample-rate conversion: the better the quality, the longer it will take.
The Import After Bounce option is greyed out unless the resulting file can be imported back into your Session without conversion. You might want to do this to either take the load off a very complex section or because the same section is repeated many times and it is easier to manage one Region rather than a whole set (although Region Grouping now provides a more flexible alternative).
Once you have set the format of the bounce file, when you hit the Bounce button you will be offered the conventional Save dialogue window, where you can choose the name of the bounced file and where on your system it will be saved to. The default location is the Audio Files folder of the current Session, but I tend to put bounced files inside the Session folder rather than the Audio Files folder, as it makes it easier to find them. Once you hit save, Pro Tools will play the Session in real time, but you are effectively frozen out of the Session: you cannot refresh the Edit window and none of the Pro Tools meters show anything, but you will hear the completed mix as it bounced, so you can verify that there are no glitches.
As mentioned earlier, you might find Bounce To Disk useful for bouncing stem mixes. A stem is a submix or section of the full mix: in a music setting, that might mean the drums and percussion, strings, or even the complete backing without vocals. In post–production it could be atmospheres, music, voice-overs, or the equivalent of the backing track called the M & E track (Music & Effects). You can create stem mixes using Bounce To Disk by muting or soloing tracks, or selecting a suitable path as the Bounce Source. The down side of using BTD to create stems is that you can only do one at a time.
Problems With Bouncing
So what's not to like? Well, you only have to take a look at the Digidesign User Conference to see that there a raft of potential problems when using Bounce To Disk. If the automation gets too busy, for instance, Pro Tools will start to simplify the automation on the fly rather than abort the bounce. This means that if you have a complex Session with lots of automation, the final bounced file may not reflect the automation accurately.

 In order to use the alternative 'bounce to track' method of exporting final mix files, you'll need to create an Aux channel in place of your Master Fader, plus an extra 'bounce' track to record the mix to — compare the top screen above with the one below it. If you have a dense Session with loads of tracks or edits, or both, you sometimes find the computer cannot cope with the additional load of bouncing, and gives up, producing one of Pro Tools' trademark cryptic error messages. If this happens, there are several things you can try:
- Increasing the H/W Buffer size and DAE buffer size can help, but if you are running v7.3 or earlier, don't use DAE Buffer (Level 8), as this has proven to cause more problems than it solves. If you get an error message that includes "FF_AudioProperty.cpp, line 33", this is the most likely cause.
- Drawing windows, especially plug-in windows with meters, takes processing power, and when you are on the edge trying to bounce that monster Session, closing all the plug-in windows can help reduce processor load.
- The "FF_AudioProperty.cpp, line 33" and "Could not save because assertion in CNeolOBlock.CPP Line 164" error messages can be solved by trashing the Digidesign Database files on the drive that has your Session and also in the Library / Application Support / Digidesign / Databases folder (Mac), or Program Files / Digidesign / Pro Tools / Databases folder (Windows). Delete the Volumes folder and the Digidesign Databases folder on your Session drive and that should silence the messages. If you get any error message with 'NeoAccess' in it, trashing these folders is a fairly safe option.
- The -1309 error means that the bounced file will exceed the 2GB file-size limit, but you can get this even if the song you're bouncing is only a few minutes long, if there are rogue automation breakpoints well down the Session. The best practice when bouncing is to highlight in the timeline where you want to bounce from and to. Otherwise PT will assume you want to bounce the whole Session and include rogue automation and small file fragments left over well after the song has finished.
Bounce To Track
If you still get a -9132 error message after you have maxed out on the H/W and DAE buffer sizes, you will need to look at other ways of bouncing your Session, one of which is called bounce to track or record to disk.
This method of bouncing is very similar to the technique we had to use to free up some tracks when an eight-track machine was as good as it got! The idea was to play tracks 1-6 and record the mix onto tracks 7 and 8, freeing up tracks 1-6 to record new parts. There were no options for Undo, but if you needed more tracks, it was the only way. Fortunately, it's not quite so destructive in Pro Tools! The basic idea is that instead of routing your mix to the main outputs, you route it to a pair of buses, then create an audio track and set the input of that track to the pair of buses.

 One of the big advantages of the 'bounce to track' approach is the ability to patch a short section of your bounce where necessary. Here, the audio on the 'Links' track has been changed: note how I've selected a wider area in the timeline.The top screen on the previouspage shows a Session with a number of subgroups or stems, including a Backing stem and a conventional Master Fader, which has a Limiter plug-in on it. The screen below it shows the same Session, but without the Master Fader. Instead, I've added an Aux channel on which I can insert whatever plug-ins would have been on the Master, in this case a Limiter. Notice that the various subgroup outputs are now routed to Buses 17 and 18 instead of Outputs 1 and 2, as they were in the upper screen. The Aux track picks up Buses 17 and 18 on its input, and its output is routed to Buses 19 and 20. A new audio track labelled 'Bounce' picks up the output of this Aux track using Buses 19 and 20. You don't have to use these exact bus numbers, of course — these just happened to be the next available buses on this particular session. Notice that the Input button is pressed on the Bounce track. This is so you can hear the mix. On LE systems, you will need to put the Bounce track into Record Ready and make sure that Input Only monitoring is selected in the Tracks menu. Also, you should make both the 'master' and Bounce tracks Solo Safe by Command-clicking (Windows: Ctrl-click) the Solo button. Now when you're ready for the bounce, put the Bounce track into Record and away you go.
Surprisingly, this method puts less load on the system than using Bounce To Disk. Indeed, Digidesign recommend this technique when Bounce To Disk won't work, and there are other advantages too, not least of which is that Pro Tools doesn't 'freeze you out'. You can freely move around the Session while bouncing, and you can even make changes ahead of the cursor if need be, but the biggest advantage is that you can patch the bounce if you need to make a small change. With BTD, if you have a problem or need to make a small change, you have to re-bounce the complete Session. This isn't too much of a problem if the Session is only a three-minute song, but if it is a one-hour live concert or TV programme, it can be a real pain. The number of times I have had a problem at 58 minutes into a one–hour programme and had to go back to the start... Now that I use bouncing to tracks it's a simple matter of dropping into Record on the Bounce track just for the section that needs changing. In the screens above, I have a Session where I need to make a patch to cover a small mix correction. You will notice that I have highlighted the section I need to patch. Note that it doesn't have to be highlighted on the Bounce track: often I find it easier to make the selection close to the material where I have made the changes. Now simply drop into Record on the Bounce track, and Pro Tools will go into record for the duration of the selection.
If we zoom in to the start of the patch (see the screen below), you will see a small blank section at the start. This is because I have a number of plug-ins in my 'master' track on this Session that have significant latency. There are a number of fixes for this: I tend to make the selection a few seconds outside the area that needs fixing, then use the Trim tool to fix the hole. I will do all the patches in a Session and then use the Tab key to work through all the boundaries of the patches, fix the gaps and audition. If all has worked correctly, none of these edits will need a crossfade, as they should be sample-accurate drop-ins. It's possible to use pre and post-roll when making the patches and save yourself some work, but personally I still want the reassurance of auditioning each transition.
The other reason for recording a patch that's longer than the section of Session you've changed is to make sure that reverbs and delays sound properly. This doesn't just apply to the tail at the end of the patch, either: it is important to let the reverb build up before the transition into the patch, so make sure your pre-roll is at least as long as the longest reverb decay time you have in a Session, or the patch won't sound right.
 One reason why you need to patch a wider area that that which has changed is to deal with any gaps caused by plug-in latency. Once you have gone through all the drop-ins and are satisfied with the transitions, you can consolidate the Bounce track into one complete region. The simplest way is to select all the regions on the Bounce track and use the Consolidate function in the Edit menu. Now you have a single file that you can rename, ready to export to the next stage of the mixing or mastering process.
Destructive Patching
An alternative, faster method of patching the Bounce track that removes the need to consolidate the end results is to select Destructive Recording from the Options menu. There is no Undo option with this feature, so you need to be sure of the drop-in and drop-out points before you do it. Make sure you have pre- and post-roll set when you use Destructive Recording, or you will end up with a gap that can't be closed.
Exporting A Bounce
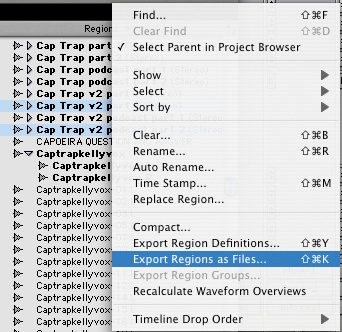
 Right-clicking in the Region List brings up the option to export your selected audio in your chosen format.Once you have a patched and consolidated Bounce track, you will need to export the resulting file in a suitable format. To do this, highlight the Bounce file and choose 'Export Selected As Files' from the Region List contextual menu. The window that comes up looks very similar to the Bounce To Disk window. Again, the location for saving the exported file will default to the session's Audio Files folder, but you can choose another location, and Pro Tools will remember that location for this Session. Hit the Choose button and use the conventional OS navigation windows to select the chosen location. When you hit the Export button, Pro Tools will create a new file at high speed in your chosen format in your chosen location.
With this method, it is very easy to save the bounced file in multiple formats. For instance, if you need a 16-bit WAV for mastering and an MP3 for approval or web site use, just use 'Export Selected' again and change the settings. If you used Bounce To Disk, you would need to re-bounce the session for each different file format: again, not too much of a pain with short songs, but a serious waste of time for long Sessions.
Other Applications

 The 'bounce to tracks' approach is perfect for outputting stem mixes. Simply create an Aux channel and corresponding stereo track for each stem you need to record, and route them appropriately.Bouncing to tracks has a number of other applications beyond exporting the final mix file. Whereas Bounce To Disk forces you to create stem mixes one at a time, bouncing to tracks allows you to do them all simultaneously within the Session, though I would recommend you work on a copy of the Session in case things go pear-shaped. As an example, in the screen below left I have rerouted the Kit Sub track via a new audio track called Kit Stem. I could then repeat this for each stem, record-enable all the Stem audio tracks, and create all the stem files in one pass.
There are times when you need to export the tracks to use in a Digital Audio Workstation from another manufacturer. You could do this using OMF or AAF exports, but if you don't have the appropriate additional software, like DigiTranslator or the DV Toolkit bundle for LE systems, that route isn't open to you. In that case the easiest way is to take the idea of 'printing' stems one stage further.
In the screen below, I have also re-routed the Bass track via buses to a new audio track called Bass Freeze. I could repeat this process for all the tracks, put all the Freeze tracks into record, and in one pass of the song, create Freeze tracks that would reflect the plug-ins and automation of their source tracks. It would then be possible to take the audio files from the Freeze tracks and import them into another platform, and as long as they were all set up to start at the same point and the faders were set to 0dB, you would have a replica of the original Session without all the Pro Tools-specific content (provided, of course, your original Session didn't use plug–ins on Aux tracks to process multiple signals simultaneously). This is also very useful if you need to move a Session from one Pro Tools system to another that hasn't got the same plug-ins. You can even use this Freeze technique to relieve the load from a heavy Pro Tools Session; in this case, I would turn off the Voices of all the source tracks after bouncing and hide them, so that if I wanted to change my mind at some point later I could reactivate the tracks and make changes.
A Change Has Come
Personally, I almost never use Bounce To Disk any more. I find bouncing to tracks so much more versatile, especially when it comes to making corrections in long-form projects. Especially given that Bounce To Disk isn't always completely accurate with Sessions containing heavy automation, it is a 'no brainer' for me. It takes a little longer to create the extra tracks and reconfigure the routing, but if you use Template Sessions, you don't have to do that very often. The ability to extend bouncing to tracks to create stem mixes and 'frozen' tracks is an incredibly useful set of tools to add to your Pro Tools arsenal.
PC Plug-in Manager
We recently covered a plug-in manager for the Mac platform. Now Ian Rich from New Zealand has developed an equivalent for the PC platform, called Lok And Load. It is designed to work with Pro Tools running on Window XP, and speeds up your application load time by filtering out any plug-ins that you don't want to use for a Session. Additionally, it makes selection of plug-ins during your Session less cluttered, as you don't have to wade through a list three miles long!
Lok And Load allows you to have multiple 'Plug-Ins configurations' and these can easily be edited to obtain a range of plug-in sets for different purposes. Finally, Lok And Load creates desktop shortcuts that enable you to launch Pro Tools and have a plug-in configuration automatically applied, all in the same process. There is a 30-day free trial if you register, or 15 days if you don't.
$24.95.