It takes five minutes to set up your Pro Tools Preferences, but getting them right can smooth your workflow and even allow you to run more tracks from your hard drive.
In this month's Pro Tools workshop article we're going to take a closer look at some of the application's Preferences and work out what the various settings do. Some of these can make a big difference to both the sound and the ergonomics of Pro Tools, and as we'll see, it's possible to come up with a general-purpose set of 'recommended' settings that should give the best results for most users.
The Pro Tools Preferences window can be reached from the Setups menu and has seven pages or panes, which can be accessed by clicking the list across the top of the Preferences window. In this article we're going to concentrate on the first five of these pages. We're not going to go through every setting here, as the Pro Tools manual does a very good job of that. Instead, we're going to review how some of the settings can affect the way Pro Tools functions, and look at some of the other settings that might have escaped your attention, especially where they have consequences that aren't obvious.
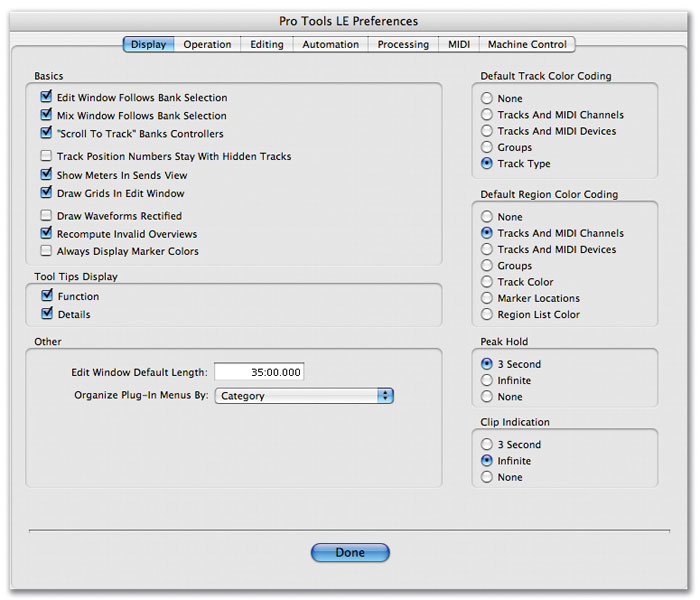
Display Preferences
This page, not surprisingly, enables you to configure how Pro Tools will display various options:

- Tool Tips Display: Pro Tools 7 brought us Tool Tips, whereby a descriptive box appears whenever the cursor hovers over a button for a few seconds. This is an excellent help feature for beginners, but can get a little annoying for power users. Fortunately, you can turn it on and off from here. There are two levels of this feature: the first is a function description, and the second is the details section, which adds items such as track names.
- The Edit Window Default Length has been around for ages, but it never fails to amaze me when I turn up at a client's premises to find they have this set inappropriately. The scroll bar across the bottom of the Edit window represents 100 percent of the Session timeline. If you are working on a one-minute commercial and the Edit Window Default length is set to one hour, the scroll bar will be very insensitive. Set the length a little longer than the total duration of the project you are working on: with a five-minute song, setting the Edit Window to six minutes will make the scroll bar work at its best.

- Organise Plug-In Menus By enables you to define how plug-in menus are arranged in the Insert menu.
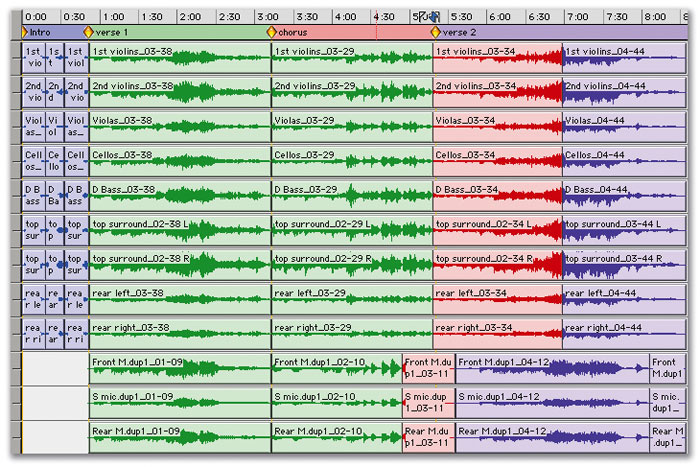
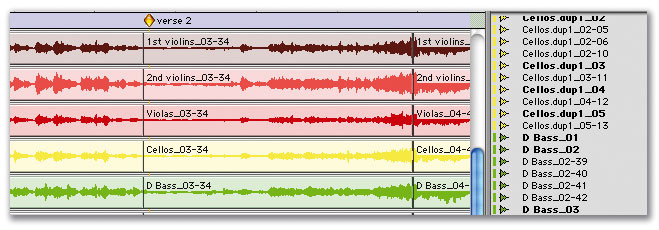
- Display Region Colour Coding has two settings worth highlighting. The first is Marker Location, which makes the colour of all the Regions on any track the same between two Markers, as well as colouring the timeline bar with the same colour, helping to identify verse 1, chorus, and so on. Note, though, that it works on Regions close to the Markers and so can throw up some odd results. The second is Region Colour List. This setting allows you to force multiple Regions to the same colour: simply highlight a range of Regions in the Region List, choose a colour from the Colour Palette and the Regions in the Edit window will have matching colours (below). Assigning colours to the Region List can help you find particular groups of Regions more easily.
Operation Preferences
This section contains some of the options that I find cause the most problems with Preferences settings, especially the first two:
- Timeline Insertion Follows Playback: If this setting is ticked, the cursor will act like a tape machine, in that when you hit Stop the cursor will stop and stay put at that point. If this setting isn't ticked, when you hit Stop the cursor jumps back to the point you played from. The second is my preferred setting and I use it all the time. I find it much easier to edit in this mode, as I can easily audition an edit point over and over. The only time I have this setting ticked is when I'm recording spoken-word material, where I might stop Pro Tools while there is a discussion about the next section; then, when I hit Record and Play again, Pro Tools picks up from where we stopped and I can continue recording the next section. You should remember that if you have the Keyboard Focus turned on (the 'a-z' button in the tool bar just below the zoom buttons) the 'N' key turns this setting on and off, and it is very easy to catch it by accident when using the space bar to play and stop.
- Edit Insertion Follows Scrub/Shuttle: If this setting isn't ticked and you scrub a section or use Shuttle to find an edit point, as soon as you let go of the cursor it will jump back to the point where it was before you started scrubbing or shuttling. With this setting ticked, once you have scrubbed or shuttled to find a point, the cursor stays at the selected point. I always have this setting on, but remember that the default setting is off, so if you have to trash the preferences, you'll need to go back and reset it to on.
- Send Default to INF: This setting determines the position of the fader on a newly created send. With it unticked, the send fader will be set to 0dB; ticking the preference makes send faders default to the bottom (-INFinity) so no signal will pass. The default setting for this one is ticked. Most of the time I leave it there, as I only want an send to come up for a short section of the song, so I'll use automation to raise the level for that section. However, for a job where I am using sends for routing, a quick visit to this setting makes things easier, although Option/Alt-clicking the fader resets it to 0dB easily enough.
- Numeric Keypad Mode: In Pro Tools you can use these settings to configure what the numeric keypad at the right-hand end of your keyboard does. Classic is the legacy setting, configuring the keypad the way it used to be before we had choices, back in the days of version 4 and earlier. In this mode, the numeric pad has two main functions. First, it selects a shuttle lock mode that works like this: hold down Ctrl on a Mac or Start on a Windows PC, and then press a number key on the numeric pad from 1 to 9 (1 is very slow, 5 is normal speed and 9 is very fast). You can use the '+' and '-' keys to change direction. For me, 6 is just too fast for listening to speech at high speed, and I always used to wish there was a 5.5 setting. Now there is, as 9 can be set to a speed of your choice using the Custom Shuttle Lock Speed setting. The default for this is 800 percent (8x speed) but set it to 150 percent and you get the 5.5 setting I was looking for!
 The other function in Classic relates to recalling Memory Locations. In Classic mode, to recall Memory Location 2 you simply need to press the '2' key on the numeric pad, followed by the '.' key.
Transport mode retains the shuttle lock functionality from Classic mode but adds a range of single-button transport functions to the keypad: '0' becomes Play and Stop, '1' is Rewind, '2' is Fast Forward, '3' is Record Enable, '4' turns Loop Playback on and off, '5' turns Loop Record on and off, and '6' toggles Quick Punch. However, to be able to recall a Memory Location in Transport mode you have to first press '.' and then the location number, and then '.' again. I keep trying Transport mode, but I can never remember to hit the full stop first, and because of this, Classic still tends to be my preferred Numeric Keypad Mode.
The third option is Shuttle, which is available only on HD systems. It enables a non-locking version of shuttle lock, where you have to hold down the keys to shuttle back and forward: '1' shuttles back and '3' shuttles forward at low speed; '4' shuttles back and '6' shuttles forward at normal speed; and '7' shuttles back and '9' shuttles forward at fast speed. You don't get the transport functions and you need to type a full stop, then the required number, and a full stop again to recall Memory Locations. I find this setting clunky to use on the keyboard and my guess is that it was done to aid shortcuts from a control surface.
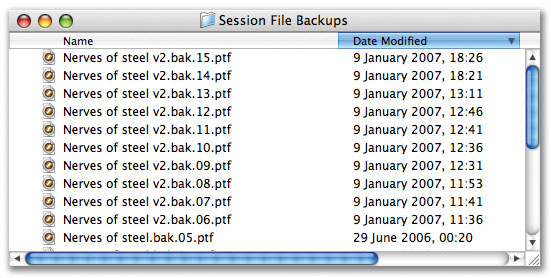
- Auto Save: I was so pleased when Digidesign adopted this Auto Save feature (below) back in version 5 days. How Auto Save works is that Pro Tools makes a Save Session Copy every 'x' minutes (you choose how frequently it happens) and puts it in a folder called Session File Backups in your Session folder. You can also choose how many versions are kept, so in this example, once 10 Session backups have been saved after 50 minutes of working, the oldest will be deleted and replaced by the most recent. This means that when you have a crash and need to use a Session backup file, the most recent backup won't necessarily be the highest numbered. When recovering a Session using a Session backup, I always view the Session File Backups folder as a list and sort by date modified, so the most recent comes to the top of the window (see the screenshot below).

- Open Ended Record Allocation is an excellent setting for squeezing the last drop of performance out of a system that is struggling to record material, when you can end up getting those dreaded 'disk too slow' error messages. To understand why, let me explain what happens if you record to a drive when the Use All Available Space option is set. The screen at the bottom of the page shows the Volume Optimisation window from Tech Tool Pro for a drive that contains a number of projects, including a Session that has 24 mono audio tracks in it. You can see that there are files peppered across most of the drive, which means that when Pro Tools comes to play back that Session, the heads on the drive are constantly having to fly from one end of the disk to the other just to play back the basic files. That's before you've done any serious editing, which will further increase the distance the heads are having to travel to pick up all the different bits. Beyond a certain point, the computer will complain that it can't get all the data back off the drive fast enough, and you get our favourite 'disk too slow' messages.
So why does Pro Tools pepper the files all over the drive like that? If you don't tell it how long you are going to record for, Pro Tools assumes it is going to be for a long time. To take a simplified example of a freshly formatted drive and a four-track Session, Pro Tools will start recording the audio for track one as near to the start of the drive as possible. Then track two's file will start a quarter of the way through the drive, track three will start halfway through the drive and track four will start three-quarters of the way through the drive. This is so that there is the maximum amount of space between each file, giving you the longest record duration possible before the drive fills up, without the files having to be fragmented (split up) to fit them all on to the drive. However, the down side of this is that the files are spread right across the drive, even if the record duration is short, as it was on the drive in the screen shown.

If you tell Pro Tools how long you want to record for, either by using the Limit To option or by highlighting the record duration in the Edit Window, then Pro Tools knows how long the files are going to be, and can bunch them up much closer together, so making life a lot easier for playback. I would recommend, unless you are routinely recording long concerts and so on, that that you set the Limit To option to a sensible amount. For example, if you're tracking a song that's five minutes in length, you could argue that you won't be recording longer than that in one single pass, so you could set Limit To at 10 minutes and still be safe. Remember, Limit To sets the maximum record duration for one take, not the project length.
Editing Preferences
- Auto-Name Memory Locations When Playing: This setting, when enabled, allows Pro Tools to auto-name a Memory Location point when you hit the Enter key as you are playing. Often, I want to establish a hit point, so with Pro Tools in Play, I hit the Enter key at the desired point and a Marker is automatically created at that point. If this setting has not been ticked when you hit Enter, the New Memory Location window comes up, allowing you to rename it and so on, but I find that a nuisance, so I always tick this setting, as the default option is off. Remember that the Enter key is the key at the bottom right-hand corner of the numeric keypad section of the normal keyboard, and in this setting is different to the Return key.
- Auto-Name Separated Regions: This setting, when enabled, allows Pro Tools to automatically rename a Region when it is created. For example, say you highlight a desired selection in another Region and either edit or capture it to make a new Region. With this setting unticked, Pro Tools will ask you to give the new Region a name before creating it, but with it ticked, the new Region is automatically given a new name based on the name of the parent Region. I have this setting ticked, as it keeps me working unimpeded.
- Conversion Quality: Although this setting is tucked under the Default Fade Settings, it in fact relates to any sample-rate or bit-depth conversions that take place when you import audio in a different format into the Session, or bounce and export from your Session to a different format. The higher the quality of conversion, the longer the process will take.
Automation Preferences
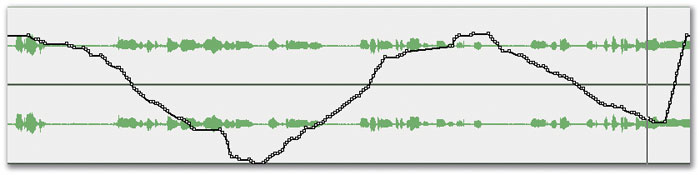


- Smooth and Thin Data after Pass: When you record automation data in Pro Tools, it samples and records the control position as a series of snapshots. This setting enables Pro Tools to smooth those series of steps, and also thin out any unnecessary steps that were recorded. Thinning is useful, because having lots of dense automation happening at once can put a heavy load onto the host computer. Pro Tools records much more automation data than is often needed, so that fast and sudden moves are captured accurately, and for the simple moves that don't need loads of automation data between the corners, data can be lost without affecting the accuracy of the automation. Degree Of Thinning is where you can determine how much thinning of the automation data Pro Tools will do. The three screens at the bottom of the page show its effects: the first is the original automation data unthinned, the second is thinned to 'Some' and the third is thinned to 'Most'. I suspect you wouldn't be able to hear the difference in the mix between these different passes, and the more thinning you allow, the less load you put on the host computer.
- ...Follow Groups settings determine what functions will follow any group you have created in your Session. With Mute Follows Groups ticked, if you hit a Mute button on a track in a group, all the tracks in that group will be muted or unmuted. The next two options do the same for Solo buttons and Mute buttons on sends, while Send Levels Follow Groups will do the same with the faders on the sends of any track in a group, so adjusting the send level of one track in a group will adjust them all, just as would happen with the main faders in a Mix Group.
Processing Preferences
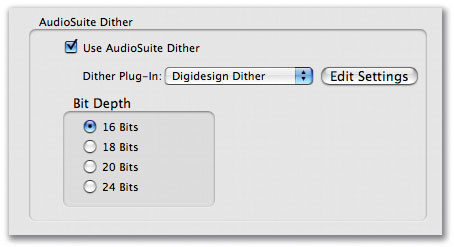


- Use Audiosuite Dither: You should have dither enabled (see below), so that whenever you use an Audiosuite plug-in such as Gain or Normalise to change the gain of a Region, the best quality is maintained. Normally, the Dither Plug-in will be the Digidesign one, which is what Pro Tools defaults to.
- Bit Depth: For Dither to work correctly, it is essential that the Dither bit depth is set to the bit depth of the Session, but Pro Tools Preferences will default to 24-bit and not the Session bit depth. So check this setting, especially if you regularly work at 16-bit, and if you have to trash the preferences to fix a problem, remember this is one of the settings that will need changing.
- Audiosuite Buffer Size: This parameter sets the buffer size used for Audiosuite processing and previewing. If the audio stutters when previewing, increasing the buffer size will help. In addition, processing times will be quicker with a larger buffer size. The down side of increasing the buffer size is that it increases the memory requirements for Pro Tools, so if you don't have a lot of memory installed in your computer, I recommend you leave this at the default setting of Small.
- The TC/E setting enables Pro Tools to use different plug-ins when using the Time Compression & Expansion Trim Tool. Note that only the plug-ins you have installed and authorised will be available to you in the drop-down menu.