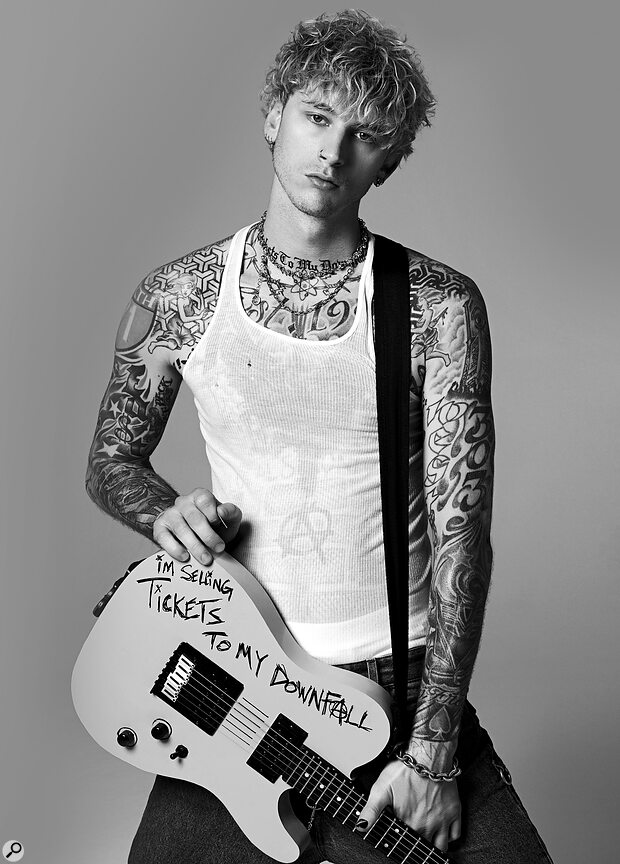
When rapper Machine Gun Kelly enlisted the help of producer and Blink‑182 drummer Travis Barker on his latest album, a shift to pop‑punk seemed inevitable. Who better to mix it than punk/hip‑hop crossover engineer Adam Hawkins...
While Serban Ghenea and Manny Marroquin have long been the US’s go‑to mixers for pop, it seems that Neal Avron and Adam Hawkins are often top of the list when distorted electric guitars carry punk pop songs. So when Hawkins received a request last summer to mix a new track for Machine Gun Kelly, better known for his rap music, he must have raised an eyebrow.
 “I’d just been working with Travis Barker on a number of projects,” explains Hawkins from his impromptu studio in his new home in Nashville, “so he recommended me for this one. They sent me the Pro Tools session of ‘Concert for Aliens’ and the rough mix, without any instructions, other than: ‘Here is a song to mix. If we like it, you can do the whole album.’ It was pop punk, but it also had a hip‑hop feel, which I purposely enhanced, because I felt that made it more unique. The track felt a bit like 1995, but it was important to make it sound like it’s from today. They obviously loved what I did on that song, because I got the gig!”
Hawkins ended up mixing most of Machine Gun Kelly’s latest album, Tickets To My Downfall. The only exceptions are the album’s lead single, ‘Bloody Valentine,’ mixed by Avron, and the third single, ‘My Ex’s Best Friend,’ mixed by Ghenea. ‘Concert for Aliens’ was released as the second single. Tickets To My Downfall is the Kelly’s fifth studio album, and the punk‑pop‑with‑hip‑hop‑undertones approach helped make it his most successful album to date, going to number one in the US and number three in the UK.
The dramatic shift to punk pop is largely explained by the involvement of Blink‑182 drummer Travis Barker, who co‑wrote and co‑produced the album. And although Hawkins is primarily known for mixing more alternative music, he also has a track record mixing commercial rap. “They had a really big and fat kick on ‘Concert for Aliens,” recalled Hawkins. “It was the first time I worked with Machine Gun Kelly, and because of what I knew of him I assumed that he was going for more of a hip‑hop sound and I kept that kick big, and side‑chained it so the bass was knocked down when the kick hits. I didn’t realise the entire album would be in a pop‑punk style, otherwise I might have tried something with less sub in the kick.”
Nevertheless, his mix of pop‑punk and hip‑hop provided the template for his other mixes. “The overall tone and character of all the songs I mixed came from my mix of ‘Concert for Aliens,’” elaborates Hawkins. “I wanted to keep everything else consistent with that. So I had similar effects on the vocals, guitars, bass, drums and everything else. I’d import the bass or guitar track from one song to the next, and then adjust the settings. It was almost like the old days where you would play the tape back for multiple songs on an album, and you would pull in the next song, and hopefully the drums, the bass, the guitars and vocals all kind of work out like the previous song.”
Escape From LA
 Adam Hawkins at his new home studio in Nashville.
Adam Hawkins is one of the US’s top mixers. He won a Grammy for Best Gospel Rock Album in 2010 for his mixing and engineering work on Hello Hurricane by Switchfoot, and has since enjoyed two further Grammy nominations — in 2016 for the Twenty One Pilots single ‘Stressed Out’, and in 2017 for the K Flay album Every Where Is Some Where.
Formerly based in Los Angeles, this interview finds him in Nashville, where he moved last September. “I like the slower pace,” explains Hawkins, “and it’s a better environment for the kids to grow up in. Also, both my wife’s parents and my parents wanted to leave Southern California for their retirement, because it’s so expensive there. I wanted to remain in a music business city, where I could still meet clients and hang out with people who do what I do. So we ended up in Nashville, which I think is becoming one of the largest cities for the music business. Also, I grew up in the South East, and wanted my kids to experience that.”
Hawkins was born in 1976 in New Jersey, but grew up in North Carolina, where he worked in a number of small studios, before moving to New York. He enjoyed an internship there at Unique Studios, and then worked in many different big‑name studios, often with rap and hip‑hop acts. He settled in LA in 2001, thinking he’d find himself more often in the studio with live bands, but still tended to work with rappers. He eventually did achieve his goal of working with a large variety of artists and genres, mostly as a mix engineer, and often with producer Mike Elizondo. His credits over the last decade include, in addition to the above‑mentioned acts, 5 Seconds To Summer, Muse, Jerry Cantrell, Avenged Sevenfold, Sia, Gary Clark Jr and Mastodon.
From A To D
Having cut his teeth at New York recording studios in the ’90s on big mixing desks and tape, Hawkins continued working on hybrid systems for many more years. In the five years before coming to Nashville he had his own studio in Los Angeles, which included quite a bit of choice analogue outboard and for a while even an SSL AWS9000 console. But despite owning some flash analogue gear, he quite quickly settled on working wholly in the box in his studio.
“I never even hooked up the outboard I had in my last studio,” noted Hawkins, “because I never really had any reason to. I prefer to have as little as possible between the speakers and my ears. Doing it all in the box makes recalls faster and much more efficient. With a console and analogue gear it takes 20 to 30 minutes to switch songs, and it still does not sound the same. So I have learned how to get the sound I want in the box. I did lots of A/B testing to make sure that I could be totally happy working in the box and re‑create the same character and flavours that outboard gear gave me.
I never even hooked up the outboard I had in my last studio... I prefer to have as little as possible between the speakers and my ears. Doing it all in the box makes recalls faster and much more efficient.
“Having said all that, the fact is that music today is not the same as it was during the analogue days, nor is the kind of mix and sound I’m asked to achieve. Of course there are moments when it would be amazing to use analogue equipment, because of the character that it brings. In digital, the plug‑ins kind of all sound the same to some extent, despite having different GUIs. An EQ is an EQ, and a compressor is a compressor. It almost seems like different user interfaces can bring different results. Also, in analogue I could not do super‑tight notches, automate anything, and there are many other things I can do in the box that I cannot do in analogue. So overall, I feel there are more advantages to digital than disadvantages.
“My new studio here in Nashville consists only of my Genelec 8351 monitors, Pro Tools Native on a PC (see box) with Avid Pro Tools Dock and S3 control systems. I’m going AES out of an Avid HD Omni, going straight into the Genelecs. I’ve considered getting a Universal Audio I/O, but because of the limits of Thunderbolt 3 cables it is difficult to place a computer far away from me. I don’t like sitting right next to my computer because of the noise it makes. My Genelecs are brutal. They’re like NS10s in that you have to work really hard to make things good on them. With other monitors you think way too soon that you’re done.”
Coming In Hot
Hawkins conducted his mixes for the Machine Gun Kelly album at his studio in Los Angeles, helped by his assistant, Doug Clarke. “I typically ask for stems, but received a Pro Tools session for this project.” says Hawkins. “I don’t really like to have to deal with somebody else’s routing, or thought process, because it slows me down to first have to reverse‑engineer what they have done, and then apply what I want on top of that. Many people work in Logic, Ableton, or Cubase, so today I probably get 50‑percent stems and 50‑percent Pro Tools sessions.
Many of the rough mixes come in super‑hot. Things get hot in the writing phase, and again during the production phase, and by the time they come to me they are really hot, and I am supposed to make it hotter!
“Doug will first go over the sessions, as I sort of have a template for how I like things organised and colour‑coded, so I don’t have to hunt for where the different instruments and the vocals are, and so on. Pro Tools sessions tend to come with lots of processing and automation. I sometimes use that, and work on top of it, or sometimes I wipe it out and start from scratch on some sounds. For example, I usually start working on vocals from scratch.
“When I start mixing, the rough obviously is a crucial reference. Everybody works really hard on their rough, and gets very attached to it. If I do something extremely drastic, unless I’ve been asked for this, it typically won’t go down well. So what I mostly do is enhance the rough, so it feels and sounds the best it can.
“One problem in this respect is that many of the rough mixes come in super‑hot. Things get hot in the writing phase, and again during the production phase, and by the time they come to me they are really hot, and I am supposed to make it hotter! I’ve had rough mixes come in at ‑3 RMS, and then I have to compete with that. I sometimes have to back it off to be able to work with a mix, but it is difficult to make a song sound more exciting than the rough when it is not as loud, and then to sell that to the artist and A&R guy.
“How I actually start a mix is different for every song. I tend to start with drums, because they are the heartbeat of the song. I get them to sound great, and then I will go to the vocals. The drums and vocals are the two things that matter the most to me. The music is important, but the priority usually is drums and vocals. You can make a bad‑sounding guitar fit in a track and it will still kind of work. But if the drums and the vocals don’t sound great, the song is not going to sound great. Of course, some songs start off softer or more mellow and the drums may not come in until later on. In this case you need to start with the vocal and build everything else around that.”
Drum Samples
Hawkins: “This track came in with quite a few kick and snare samples, but they were not 100‑percent perfectly in time with every live kick and snare. So the first thing Doug and I had to do was retrigger the kick and the snare samples so they were spot on with the real sounds. If there had been only one kick and one snare sample, I would have moved them directly in the timeline, but because we were triggering multiple snare samples, it was easier to re‑trigger them with one MIDI note.
“Doug used the Massey DRT drum replacer to create the MIDI from the live kick, snare and toms, and dropped the samples from the session in the Native Instruments Battery drum sampler, and then triggered these using the MIDI, which in turn is triggered by the live drum part. Sometimes we use XLN Audio Addictive Drums, That sound, or the Slate drums stuff for drum samples.
“I usually use the samples that are in the session, or something very similar, because I don’t want it to sound like a sample. In some cases on the Machine Gun Kelly album you can tell that it is a sample, but that was intentional. But typically I don’t want you to know that it was a sample. However, it is not as simple as just creating the MIDI from the notes and then retriggering the samples, because so far nothing accurately does the timing. Doug or I therefore have to visually go through and move each MIDI note until the samples are perfectly in time with the live drum.
“When I started the mix, with the drum samples in place, I noticed that they had some great EQ on the drums, and you of course don’t want to start messing with something that already sounds good. Another reason why I couldn’t really work with my own template tracks was that they already had mastering processing on the entire session. They had done the entire production into that, and as soon as I removed that, it lost something. So I partially left what they had done on the master bus. On some of the songs they had a multiband dynamics thing going on that was taking out a lot of the low‑mids, and as soon as I took that off, the whole mix turned to mud. Because it was a dynamic EQ, it was difficult to remove it and change things, so again, I worked with what was there.”
Session Progression
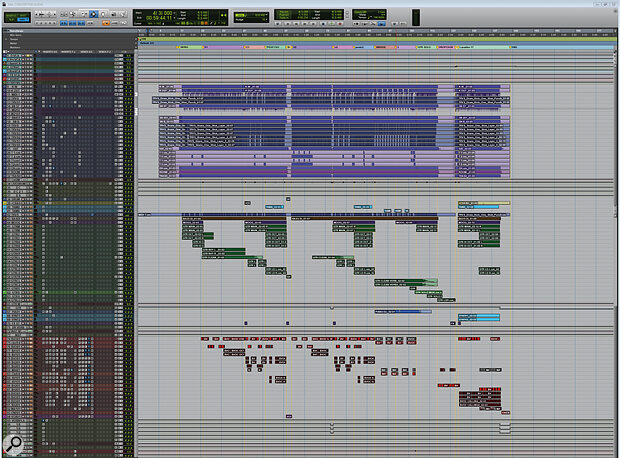 This composite screenshot shows the Pro Tools Session view for ‘Concert For Aliens’. (Download the ZIP file for a detailed, larger view.)
![]() concert-aliens-protoolssession.jpg.zip
concert-aliens-protoolssession.jpg.zip
Adam Hawkins’ mix session of ‘Concert for Aliens’ is 104 tracks large, and elements of his rough, general ‘template’ are immediately visible. At the top are eight VCA tracks, followed by 31 drum tracks. The drum audio tracks are almost all in blue, and below them are a number of drum aux tracks. Below these are a bass track (brown) and a Moog bass track (purple); 21 guitar tracks (green), again with aux tracks at the bottom; a piano track and two synth tracks; three more aux tracks, including an Instrument Master and Instrument aux; 20 vocal tracks (red), six aux effect tracks; an All Vocals Master and All Vocals aux; and finally a Master and a Mix track. Hawkins talks us through the session from the top, zooming in on some of the highlights.
“The VCAs at the top are for each group — drums, percussion, bass, guitars, keys, effects, vocals and vocal effects — and I use them mainly for my control surfaces. It allows me to quickly solo or mute each group. I use the control surface faders for volume control sometimes, but mostly it’s Clip Gain and drawing things in the edit window with a mouse.”
Drums
“Track 11 is the Kick MIDI track, and track 15 the Snare MIDI track. You can recognise the added drum sample tracks, two kick and six snare, because they’re all called TRAVIS (TRVS) and the inserts start with a 4, which is Battery 4. Some of the plug‑ins came with the session. Everywhere where you see Q, it’s usually the FabFilter Pro‑Q2, which is one of my go‑to EQs.
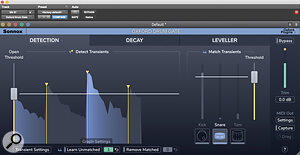 Hawkins shaped the decay of the snare drum using Sonnox’s Oxford Drum Gate plug‑in.“There’s a Sonnox Oxford Drum Gate on the live snare track, SN 57. That’s an incredible plug‑in that allows you to filter the decay according to frequency. I use it a lot on the kick, because if there’s too much boom in the decay, for example, I can gate the low frequencies but keep the length of the midrange. I also have the Avid Lo‑Fi on one of the snare samples, to get rid of some of the sharpness in the attack. 0.1 Saturation just softens it a little bit and makes it less abrasive. There’s a Waves Abbey Road TG12345 on another snare sample, on which I wanted more attack and more decay. I love this plug‑in. When I hear a sound that needs more excitement, I throw it on there. It can also make the sound wider, or narrower, or add a limiter, and so on. There’s also a FabFilter C2 on the hi‑hat, just to keep the volume under control.
“All live drums tracks go to a group aux called LIVE DRUMS (34), which has the Waves API 2500 compressor, Soundtoys Decapitator, and FabFilter Pro‑Q2 and Pro‑L2. The latter was already on the drum bus, and added some level control. There’s also a Waves Kramer Master Tape on this track, with the input level all the way down. The Flux setting can give it a bit more mid and low end. It kind of makes it sound more analogue. I added three parallel compression tracks to the LIVE DRUMS group that I mixed in according to taste. The parallel track, DC, has the McDSP 6060; DC2 has the Plugin Alliance Acme Opticom XLA‑3; and DS, aka Drum Smash, has the Eventide Omnipressor.”
Bass & Guitars
Hawkins continues: “track 42 is the committed version of the kick samples, which I sent to the side‑chain inputs on the bass DI and the Moog bass tracks just below it. As I mentioned, the kick was really thick, and I was afraid to thin it out, because I thought they were after a more hip‑hop sound, so the kicks duck the two bass tracks. I use the FabFilter Pro‑MB for that. You don’t notice it very much, but it helps to give me some headroom.
 IK Multimedia’s T‑Racks TR5 tape simulator was deployed across the guitar bus.“I have the Waves Scheps Omni Channel on the bass DI, which does various things: a little bit of saturation, high‑pass... I’m getting rid of some of the clicky attack with the de‑esser, and every time 90Hz gets too loud, it knocks it down. I’m a big fan of this plug‑in. The Moog has the Waves Abbey Road Saturator, because it sounded a bit flat. The Saturator is really good at bringing things to life. It’s great on anything that works well with some distortion!
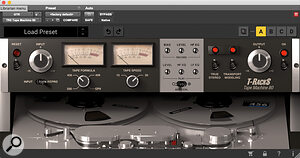
“Finally, I did not do much to the guitars, mostly just the Pro‑Q2 for some high‑passing and low‑passing. I needed to get rid of some rumble, and there was a bit too much fizz around 11‑12 kHz. All the guitars go to the GTR group track, on which I had the T‑Racks TR5 Tape Machine 80, that added something cool. I don’t know what it was, but it made the guitars sit better in the song.
“All instruments including the drums go to an INSTRUMENTS master. I also have an ALL VOCALS master, because I like to be able to adjust the levels of the instruments and vocals separately. I tried many things on the instruments group. The plug‑ins that are greyed out didn’t make it; what I ended up using are the Waves NLS for some saturation, the Slate Virtual Mix Rack, and the DMG Audio Equilibrium EQ.”
Vocals
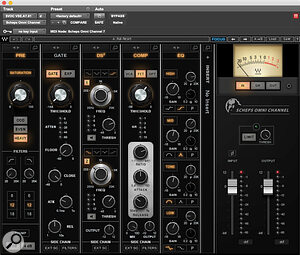 Vocal tone‑shaping was largely accomplished using the Waves Scheps Omni Channel.“Track 74 is the main vocal track. I tried to give all vocal tracks a similar treatment. The Waves C4 multiband compressor came with the session, as well as the Waves RCompressor. The insert labelled ‘D’ is a Soundtoys Decapitator, adding a little bit of character. Nothing crazy. The Q is the Pro‑Q2 with a high‑pass filter. S is the Scheps Omni, my go‑to tone shaper. It’s riding the low end a bit, knocking things down at 300Hz when they get too woofy, and also de‑essing. The compression has a very high ratio. I just turn knobs until it sounds good! Most of the de‑essing is done with the Waves Renaissance De‑Esser.
“1 is a Waves dbx 160, adding some polish and sheen. I barely touch it, but it always adds a nice finish to vocals. There’s also a Waves J37, another character plug‑in that changes the tone a bit. I mostly use that for slap delay. I love the slap delay on this plug‑in! There are tons of sends on all the vocal tracks, going to the aux tracks at the bottom. P goes to the Plate, which is a Soundtoys Little Plate; the 1s go to the delay tracks, which are eighth‑, quarter‑ and half‑note, all from SoundToys Echoboy; and M goes to the Soundtoys MicroShift, for some chorus‑like doubling effect. The ALL VOCALS master bus (101) has the same plug‑ins as the INSTRUMENTS master bus (72). I did not use Equilibrium on the vocals, but kept it in for the sake of delay compensation.”
Master Bus
 Hawkins uses FabFilter’s Pro‑L2 limiter to get a sense of how mastering will affect his final mix.Hawkins places some importance on how his mixes will sound post‑mastering, as he explains: “On my master I have the Waves 2500 for a tiny touch of compression, and then FabFilter Saturn, again barely touching, for some tape saturation, just a bit of that analogue sound. I think the mix was set to 11 percent.
"Then there’s the FabFilter L2, which I used as a limiter to approximate what mastering would do. As I mentioned mixes often come in really hot, so I need to deliver something that’s at least as hot, if not hotter. But I prefer to turn the L2 way down when I send mixes to the mastering guy, and let him or her deal with how hot it needs to be, and if necessary try to convince the client that less hot is better!”
Clearly, Hawkins’ mixes are hot by any definition, and having just moved there, he’s now also inarguably one of Nashville’s hottest mixers.
From Mac To PC
“I’ve been a Mac user all my life, but in December 2019 I built a PC, because I was waiting to see what would happen with the Mac Pro, and I urgently needed a new, powerful computer. So for fun, I built a machine that has a Gigabyte Z390, Intel i9 9900K (8‑core 4GHz; 5GHz Turbo), 64GB RAM, 1TB NVMe SSD, and multiple internal 8TB drives for storage. Not including the 8TB drives, I think I put it all together for under $2000. I started out wanting to try Hackintoshing, but this ended up taking too much effort, and I didn’t think it would be as reliable, so I gave Windows a shot. It turned out that I had built the most reliable, most powerful computer I’ve ever had!
“Earlier this year I decided to get a Mac Pro, which set me back $9000, and the specs are 7.1 Mac Pro, 16‑core 3.2GHz (4.4GHz Turbo), 64GB RAM, 1TB storage, and 2 internal 8TB drives for additional storage. It’s less reliable than the PC, and it went crazy on me a few days ago. It seems that Pro Tools is just not as stable on a Mac as on a PC at the moment. The Windows machine can play back sessions the Mac Pro can’t handle. I’ve used Mac OS all my life, and I can send iMessages with it and I’m not familiar with the PC key commands. But all this is not reason enough to stay with the Mac Pro. I think I’ll be sticking with PC for the time being and listing the Mac for sale soon!”

