In a busy recording studio, no-one wants to be hanging around while you duplicate individual tracks or try to locate 'take six'. Here we lift the lid on some essential session-smoothing tips and techniques.
In this month's Pro Tools workshop, I'm going to introduce some tips that can be handy when you're really up against it. When you're in the middle of a complex, fast-moving session and the control room is full of 'helpful advice', the last thing you want to be doing is struggling to create multiple Playlists or tracks, and I've found these techniques invaluable in difficult situations.
Take Management Using Playlists
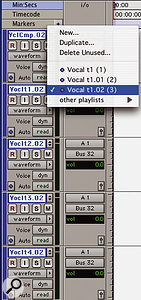
Pro Tools 's Playlists feature is invaluable when you're recording multiple takes, and if you're working on a complex session with multiple sources being recorded at once, it can provide a neat way of keeping track of all the takes. Before the studio recording session, create template Sessions with the appropriate number of tracks and set up the input and output routing, track names, grouping and so on. Group all of the tracks and create a new Playlist by selecting New Playlist in one of the track name pull-down menus in the Edit window. This automatically attaches a '.01' suffix to the end of each individual track name in the group, clearly indicating take one of the recording process. The New Playlist pop-up on a track creates new Playlists for all tracks in the same active group.
When you record subsequent takes, click the pull-down menu in one of the group of tracks and choose New Playlist again. Pro Tools now advances all of the playlists in that group to '.02', which becomes your take two, and so on. This way, you always have a numerical ident associated with the Playlist and the audio for each take, because the track names together with their suffixes are transferred automatically to the audio files as you record. The 'helpful advice' in the control room will refer to performances by their take numbers, so you can very quickly tab through to the desired takes and assemble a composite track in the original Playlist (the one without a numerical suffix). As of v6.9, if you add a new track to a group, Pro Tools will add a set of blank Playlists so that the new track's Playlist suffix will be in sync with all the original tracks.
A chronological overview of the recording session would thus go something like this:
- First, create a master template Session, label all the tracks and group them.
- Immediately select New Playlist for grouped tracks to append a '.01' suffix to each of the tracks.
- Create a Session for each song based on the template. (If you're a Mac user, don't forget that in version 6.9 it's not a good idea to open a template Session by double-clicking on it in the Finder. Instead open it using the Open Session option from the File Menu or open it from the Workspace Browser, or drag it onto the Pro Tools icon in the Dock.)
- For each subsequent take, select New Playlist to create incremental suffix numbers on the subsequent Playlist and audio files. With all takes complete, scroll through the Playlists and select the best regions chosen by the production team (otherwise known as the 'helpful advice').
- Copy the desired regions from the various takes, and paste them into the original blank Playlist group until you have created a completed composite, then label the 'blank' Playlist group 'Comp'.
Deleting Preferences
If you end up with problems for which the solution maybe 'trashing the Prefs' then make sure you delete all the preference files. They are in the Preferences folder in the Library folder in your 'User' folder and are:
- com.digidesign.Pro Tools.plist
- DAE prefs (folder)
- DigiSetup.OSX
- Pro Tools x.x preferences
In addition, make sure you delete not only the Digidesign Databases on every drive or partition attached to the computer, but also the Volumes folder located in the Databases folder in the Digidesign folder in Application Support, in the Library folder on your startup drive. Make sure you don't delete the Catalogs folder as this contains your carefully arranged catalogue files of samples and sound effects.
Speedy Overdub Track Management
 A quick way of creating an exact duplicate of any set of tracks for overdubbing: firstly, select all the tracks...
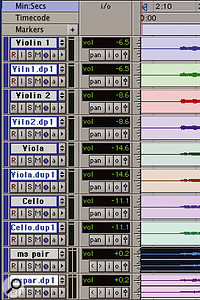
I use this trick when I am working on a session where I need to record several passes to layer up a section. A typical example would be working with a small string section where I want to use two, three or even four passes to produce a thick, luscious string sound. This can mean recording 10 to 15 tracks for each pass, so creating a new set of tracks for a quick overdub on the fly can be a time-consuming challenge, but here is a way to do it very quickly. ...then Duplicate the selected tracks.
- Select all tracks in the Session that are to be overdubbed. Go to the File menu and choose Duplicate Selected Tracks to immediately make an exact copy of each track. These duplicates will now be highlighted but will be interleaved with the original files.
- Create a new group of the newly duplicated tracks whilst they are highlighted.
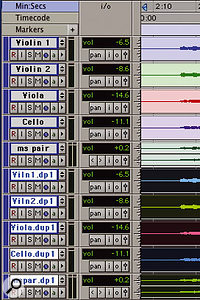
- Still while they are highlighted, drag the top track in the new group (say Violin 1) to be adjacent to and underneath the last track in the original strings group (say Double Bass). Although the 'duplicate' tracks are interleaved, moving the top track down places all the highlighted tracks side-by-side below the previously recorded tracks.
- Select all regions of audio in the new group of duplicated tracks and hit Delete. Hey presto! You now have a matching set of empty tracks ready for the next pass.
Your new tracks will have the exact same input and output routing, insert and send configurations as the original tracks. If there is time, the only other thing I do before hitting Record is to remove the '.dupl' suffix that Pro Tools attaches to the end of each track name and replace it with a continuation of my 'take numbers'. Moving the topmost duplicated track can then bring all the duplicates together...
'Section Based Automation' For Plug-ins
Plug-in parameters can be individually automated in Pro Tools, but if you need to apply a large number of parameter changes all at once, things can get fiddly — unless you use the following plug-in automation trick.
Go to the point on a track where you want to change the plug-in settings, and turn off track automation by changing from Auto Read to Auto Off. Work on the track until you are happy with its overall plug-in settings, then click the Auto button in the plug-in's window. Select all the parameters required and click the Add button and then OK. Open the Automation Enable window and deactivate all the automation types except 'Plug-in' (this is very important, because if you leave the other types active, you will mess up all the other mix data). Highlight the track from where you want the new settings to start until the point at which you want them to revert to their previous settings. Finally, delete the audio from the tracks and you're ready to go.
Here's the clever bit: press Command and Option and '/' (forward slash), or Ctrl and Alt and '/' on a Windows system, to write automation to all the plug-in parameters you just selected. Now turn the automation back on for the track. If you click before, during, and after the area you highlighted, you will see all the parameters jump to their new settings. You can also 'slope' the changes between these parameter settings by editing the automation points to ramp from one 'program change' into another.
Import Session Data (TDM Only)
This is another major time-saver in difficult circumstances. It's a very powerful and useful extension of Import Track, allowing you to import a track from another Session into your current Session, including the audio itself, plus edits, plug-in settings and routing. Import Track is still the only option for LE users, even though the Menu item is called Import Session Data, but TDM users can pick and choose which elements of a track's data they want to import into a Session. I use it a lot for bringing in a set of tracks that I have configured in a Session for one song into another one without bringing the audio or automation data across. Another way I use this trick is when bringing a group of tracks from a template Session into a working Session. I also use it to move multiple plug-ins and their settings from one Session to another, as I can do it in one go.
 The Import Session Data dialogue provides a hugely powerful way to incorporate track data from one Session into another, provided you're using a TDM system.
Go to the File menu and select Import Session Data, then navigate to the Session you want to get some track data from. Determine whether you require new tracks or want to add data to existing tracks, then use the pull-down menu list for each track to select New Track or to choose which track in the destination Session you would like to add some track data to from the source Session. From the drop-down menu at the bottom of the Import Session Data window, you can select which types of Session data will be imported. This will be the same for new tracks and existing modified tracks in the current import — if you want to import different combinations of Session data for different tracks, you need to revisit the Import Session Data option and configure it for each different combination of Session data types from this list. You can also determine if media will be referenced to the source Session, or copied. My advice is to copy, as there is always a risk with 'borrowed' material that the source Session might get deleted or moved, thus losing you the 'borrowed data' without warning.
Finally, click on the OK button and watch the data fly into your Session. The uses for this powerful option extend far beyond the examples I have given here so go ahead, experiment and enjoy.
More On Journaling (Mac OS X Only)
Digidesign now recommended turning Journaling off on all non-system drives with versions of Pro Tools up to 6.7. With v6.9, however, they recommend that Journaling should be turned on for all drives. Apparently the potential for better disk performance with Journaling on is not Pro Tools-dependent but OS-dependent and since OS 10.3.8 it should be on. To enable Journaling, you can use Disk Utility by selecting the drive from the list and clicking on the Enable Journaling button. Alternatively, a number of 'maintenance' applications have this option, my favourite of which is Cocktail.

