Find out how to create custom control mappings with EuCon when using Pro Tools.
I’ve been using an Avid S1 control surface for a few months now. I love it, but I suspect like most people, I use it only for some of the things it’s capable of. Fader moves and automation writing are the obvious uses, but while I know how to use it for plug‑in control, I rarely do. The reason for that is that, even for bread‑and‑butter plug‑ins like EQ III, I find it quicker to locate parameters on the plug‑in UI than I do on the encoders. The Achilles heel of all hardware controllers is that the unfamiliar ‘new’ hardware controller has to compete with the very familiar mouse/screen combination to be learned in the first place, and I’m sure I’m not alone in either being too lazy or too busy (or both) to give the controller a fair chance to compete.
Something I always loved about the ICON series of controllers was how the EQ and Dynamics sections mirrored the layout of the EQ III and Dyn III plug‑ins. I thought at the time that tying such a big‑ticket item as a five‑figure control surface to something as ephemeral as a plug‑in UI was a gamble, but I liked the concept so much that I bought McDSP’s Channel G plug‑in because it used the same layout to stay consistent with the ICON. In the case of EQ III, I needn’t have worried: I still use it pretty much as my go‑to EQ. The Dyn III plug‑in on the other hand is more of a distant memory, and has been replaced by newer and better options.
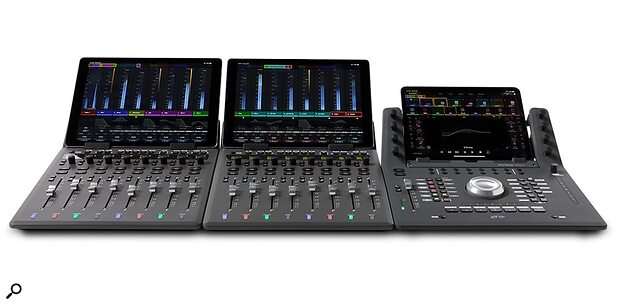
While the layout of plug‑in parameters has always been consistent on EuCon controllers, the recent EuCon 2021.6 release has made it possible to create custom parameter maps on the S1, S3 and Dock, using the new Custom Knob Sets feature. The advantage of being able to set up your own custom assignments is that if you make the decisions on what goes where, and also on what gets omitted, then learning the parameter assignments is completed by default.
EQ Mapping
The implementation is smart and deep. I’ll illustrate this using EQ III and an S1, though of course the process can be applied to any plug‑in.
There is a pressure which I’m sure I’m not alone in putting myself under when learning a hardware controller and that is to try to use it for everything. I remember when I used to use a D‑Control, regularly using the surface to instantiate plug‑ins. This was possible but not a very efficient process, involving as it did navigation through long lists using encoders and very truncated names. It was a lot quicker to instantiate the plug‑in from Pro Tools using a mouse and keyboard. The point is that the choice between mouse/keyboard and a hardware controller isn’t a binary one. You can and should use both for different tasks.
 You can reduce your reliance on the mouse and keyboard by setting up a default set of plug‑in parameters to load up every time you instantiate a plug‑in.
With this in mind, I decided that as EQ is the task I feel is best suited to hardware control I’d set up a Custom Knob Set for the seven‑band EQ III, which rather than replacing the mouse/keyboard interface, would complement it.
For general mixing tasks a simple three‑band channel EQ, of the type found on simple analogue consoles, is all I need. Something like this:
- Filter: A fixed high‑pass filter, switchable in and out from a button. Typically, console filters are set at 80Hz with a slope of 12dB/octave. I prefer 18dB/octave with a 75Hz turnover frequency.
- Low Shelf: The default settings for EQ III, 100Hz and the default Q.
- Mid Band: Set to 1kHz, the default setting. Actually most of the mixers I used in the console days had two mid bands but I chose to only have one in this custom map so I could have all my EQ on a single bank of eight encoders on the S1. Of course all seven bands are available in the plug‑in, and even if not included in the custom map, they are still mapped in the default map. More on this later.
- High Shelf: The default is 6kHz, I’ve set it to 10.
What I want from this arrangement is for me to be able to instantiate an EQ from my S1 with my preferred settings ready to go. To do this I need to set up and save a user default and change the Setting Preference in EQ III to load my user default rather than the factory default. This is a useful and overlooked option in AAX plug‑ins, and one which I first used when I finally snapped at having the ‘Beneath The Waves’ patch load up every time I instantiated Xpand! 2. I saved an electric piano preset as a user preset, set it as my user default, and then set the plug‑in default to User Setting. Now when I instantiate Xpand! 2 I get a Rhodes rather than that ponderous synth pad...
Using the same technique I changed a couple of settings in the EQ III default patch, specifically changing the HPF to 18dB/oct and 75Hz and the frequency of the high shelf to 10kHz. With this setting saved as user default and the setting preference set to User I get my desired settings each time I load an EQ.
Another thing which needs to be done, if it isn’t already, is it that the default EQ needs to be set to EQ III in the Pro Tools Preferences. You can set a default EQ and Dynamics plug‑in in this tab and they appear at the top of the plug‑ins list but if you have an S1 they also can be created from the S1.
 The Avid Control app lets you drag and drop parameters to any of your available physical controls.
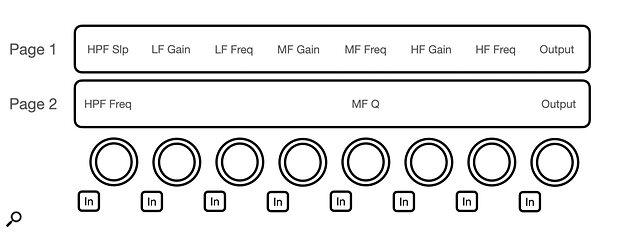
Plug‑in parameter mapping is straightforward. In the channel view in the Avid Control app you select the plug‑in you wish to map and hit the Custom button. From the custom map page, parameters can be dragged and dropped to the available encoders. Multiple pages can be mapped and some parameters have multiple sub‑parameters, for example Frequency and Q in the EQ. An option to choose between them is offered in the setup page.
A frustration when it comes to this example is that in spite of mapping the output to encoder 8 on both pages, there is no way to toggle the bypass on EQ III from the surface (though if the plug‑in you’re mapping has a power switch as part of the UI, you can assign that). Another limitation is that, in the default map, although the buttons and the encoders control different parameters, the function of the button is tied to the function of the encoder. In the case of the HPF, to assign filter in/out to the button on encoder 1 I had to assign HPF slope to the encoder. There is no way to assign Frequency to the encoder and In/Out to the button on the same layer.
Custom & Default Maps
Custom Maps are an alternative to the default maps which have always existed. These are created by the plug‑in manufacturers and, while largely consistent between plug‑ins of the same type, the flexibility offered by custom maps allows so many more options. For example, in the Custom Map I set up for EQ III I chose to have a limited set of controls mapped so that almost everything I wanted was available from a single set of eight encoders. I then built a second page of assignments which offer a couple of extra options, specifically the mid band’s Q and the HPF’s turnover frequency. The Output is mapped to encoder 8 on both pages, so it is always available for level matching.
 The author’s Custom Map for Avid’s EQ III plug‑in.
I could have mapped a second mid band but, returning to my earlier point, the plug‑in UI is always available for more detailed work, and for EQ and Dynamics there are two knob mappings available on an S1 courtesy of the dedicated EQ and Dyn buttons.
All inserts in a session are available via the Inserts button. Select a track, page through the inserts slots and press the encoder to spill out the parameters across the eight encoders. Unless a custom map has been set up this will be the default assignment map as set by the plug‑in manufacturer. If the insert is an EQ or a dynamics plug‑in then it is also accessible via the EQ or Dyn buttons, and a different custom map can be set up for this mode too. In this way, for EQ and dynamic plug‑ins, it is possible to access either the default map, or up to two custom knob assignments. Because of this added flexibility I’m perfectly comfortable with my choice to have such a reduced number of parameters mapped in my custom knob assignment. Fewer controls make it easy to navigate, but if I need more control I can still have it via the default map, which is still available.
EuCon is still far and away the best way to control Pro Tools...
There has been a lot of progress in the development of EuCon, and while there are still occasional surprising gaps in the provision of features, these are being addressed and EuCon is still far and away the best way to control Pro Tools from hardware. This EQ example is only one of the options, another obvious choice is building custom assignments for complex plug‑ins with large numbers of parameters, such as reverbs. I do look forward to the Bypass button in the plug‑in header being assignable though...

