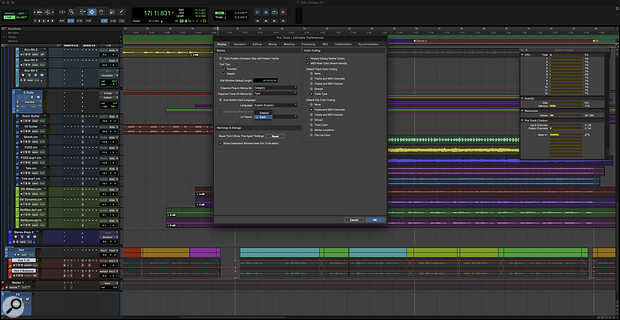
 The new Dark UI Theme in v2020.11.
Melodyne Essential now comes bundled with Pro Tools 2020.11, so let's explore what it offers.
After what seemed like a long period of what I’d describe as ‘tweaks’ from Avid, November 2020 was a month of satisfyingly significant developments. There was of course the release of Pro Tools | Carbon, Avid’s first piece of in‑house audio hardware for roughly a decade and a return to a type of product many believed Avid were no longer active in. Carbon has been covered in some detail in these pages by Sam Inglis and I won’t add anything, apart from to say that I have spent a significant amount of time with Carbon and I give it my wholehearted approval.
Coinciding with the release of Carbon was an update of Pro Tools to version 2020.11, and a few days later the release of a new version of EuCon.
The most attention‑grabbing feature of Pro Tools 2020.11 was the Dark UI Theme. There is no denying that the dark grey re‑skin of Pro Tools is striking and looks thoroughly modern. Whether or not you get on with it is very much a matter of personal preference; I found it disorientating and switched it to the old, light‑grey Classic Theme almost immediately, though I have retuned to Dark mode since. To switch from the default Dark Theme, go to Preferences and you’ll find the new Theme option. Disappointingly, changing it requires restarting Pro Tools.
I’m sure many users will prefer the Dark Theme for aesthetic reasons but there is a group of users who will value it for practical reasons. People working in Post Production spend a large amount of time on dark dubbing stages, and for them this Dark UI is a godsend. For the rest of us it makes Pro Tools look like Logic or Studio One, and whether or not you think that’s a good thing is entirely personal.
As for the other new features in Pro Tools 2020.11, there are more tweaks of the kind we’ve become accustomed to. That’s not a criticism: small, targeted changes which make Pro Tools more useful to specific groups, presumably as a response to specific requests, are exactly the kind of thing I’d hope a responsive developer would engage in. As well as new features like tweaks to the Bounce window, an increase in the number of Master Faders and a new Space Clips feature, which allows a user‑specified amount of space to be inserted between clips (apparently very useful for game sound), MIDI to Audio is the big feature for typical music users of Pro Tools, along with the bundling of Melodyne Essential into Pro Tools 2020.11.
Dyne Be The Glory
Melodyne has been available as an AAX, and before that as an RTAS plug‑in, for a long time, so the remarkable features it enables have been accessible to Pro Tools users for ages, but it is still the case that while many people have and use Melodyne in Pro Tools, many do not. With tuning being such an integral part of modern production it’s been increasingly difficult not to feel that a standard install of Pro Tools having no pitch manipulation features more sophisticated than Elastic Pitch was getting increasingly difficult to defend. (Elastic Pitch was introduced with Pro Tools 8 in 2008!)
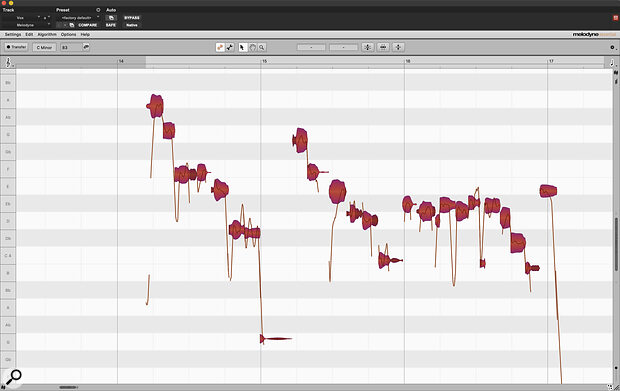
 The latest version of Pro Tools includes Melodyne Essential, which can perform monophonic pitch correction as well as polyphonic pitch detection.
Melodyne Essential has a reduced feature set compared to the flagship Melodyne Studio. The key difference between the two is that Essential isn’t polyphonic or capable of multitrack operation. The technology behind it is the same as Studio though, so while you can’t manipulate polyphonic material, the analysis is still polyphonic, which opens up some useful features even if you can’t re‑harmonise a piano recording.
For basic vocal tuning, Essential has all the necessary features. If you’re not familiar with its operation there are excellent learning materials available from the Help menu of the plug‑in but first you’ll need to get your serial number. Melodyne Essential appears under the My Products tab of your Avid account. Once installed, working with Melodyne Essential is a little different to working with a standard AAX plug‑in.
Firstly it is recommended that Melodyne is the first plug‑in on any track you are using it with, and to work with it, it is necessary to transfer audio into the plug‑in. This is a real‑time process, and while we have become rather unused to doing anything at all in Pro Tools in real time, it is possible to transfer multiple tracks at once into multiple plug‑ins, and if you wish you can transfer only the sections you plan on processing. If you change your mind later, missing sections can be added in any order so the real‑time requirement isn’t too onerous. Remember when real‑time bounces were the only way to bounce in Pro Tools?
Tuning Tips
The more audio that is transferred into Melodyne, the more resources it uses. If your preferred method is to tune before progressing with a mix then transferring everything, tuning and then using Commit to render the results is an excellent way to both keep flexibility and save your system’s resources. Something to understand, particularly if you are in the ‘tuning should be invisible’ school, is that Melodyne doesn’t affect the sound of audio unless a change is made, so just inserting Melodyne won’t change the audio at all.
Algorithm choice affects the results, in a similar way to Elastic Audio’s choices of polyphonic versus rhythmic or monophonic modes. Melodyne has six different algorithms, and the default Automatic setting lets Melodyne choose the most appropriate setting. If you disagree then changing algorithms on the fly is easy and quick.
Melodyne is deep software and it takes time to get to know, but a few useful tips for a new user would have to include double‑clicking within the Melodyne window to start and stop playback when in solo. I’d been using Melodyne longer than I care to admit before I discovered this feature, and it allows quick auditioning of material both in and out of context with the track — simply double‑click to hear the vocal in solo, or hit the spacebar to roll transport in Pro Tools to listen to the material within the track.
The other tip I’ll share is to make sure you familiarise yourself with Note Assignment Mode. Melodyne usually identifies notes correctly but in cases where it doesn’t, this mode, accessed by clicking the little spanner button at the top of the UI, shows the next best guess Melodyne made when it analysed the material during transfer. If a note has been misidentified, it can be changed here.
As well as tuning monophonic material, Melodyne Essential can be used to generate MIDI...
Audio To MIDI
As well as tuning monophonic material, Melodyne Essential can be used to generate MIDI, and it is here that the polyphonic analysis becomes useful.
 Converting audio to MIDI in Pro Tools.Audio To MIDI in Pro Tools is an integration with Melodyne which makes generating MIDI versions of pitched and unpitched performances, whether mono or polyphonic, as simple as clicking or dragging in the Edit window. Let’s take generating a set of MIDI triggers from a kick drum track as an example. It has been possible to do this manually in Pro Tools for a long time, but even in this simplest of examples it is laborious. By tabbing to transients, and pasting MIDI notes at each kick, it is possible to create triggers, though velocity information is ignored. My favoured third‑party solution recently has been the amazing Oxford Drum Gate from Sonnox which, as well as lots of other very useful features, creates MIDI triggers with ease, but this new integrated workflow with Melodyne is so quick and so accurate that I can’t see a reason to do it any other way.
Right‑clicking on a clip on the timeline and selecting Copy Audio as MIDI, or simply dragging an audio clip to a MIDI or instrument track, brings up an algorithm selection menu. An alternative is to select an audio track and either right‑clicking it or going to the Track menu and selecting Extract MIDI to New Track. This opens a dialogue which adds options for what to do with the source audio track, with options of Delete, Hide and Make Inactive, Make Inactive, or Do Nothing. Clip separations can be preserved, or not. While you can drag audio from the Clips List to MIDI tracks, you can’t drag from the Workspace or Finder/Explorer windows. If you prefer to copy and paste, you can copy audio and paste it as MIDI. Use Copy as MIDI with a standard paste command.
 New audio‑to‑MIDI conversion tool uses Melodyne’s algorithms when extracting note data.Converting MIDI to audio works flawlessly on percussive material, making drum augmentation child’s play, not only the timing but also the velocity of percussive information is captured with ease. Spill is a potential issue, but rather than gating I’ve found using Strip Silence on a duplicate trigger audio track to be the fastest and most flexible solution. Pitched monophonic material is captured well too, but the stand‑out feature for me has to be the results with more complex polyphonic performances. When I tried converting a stack of backing vocals to a string part it was completed in seconds. For experiments with orchestration, this is my favourite addition to Pro Tools in years!
