We explore the new bounce options in 2020.11 and reveal their benefits.
Pro Tools 2020.11 and the release of Pro Tools | Carbon brought some exciting new features to Pro Tools. The production possibilities of Audio to MIDI, the highly visual changes of Dark Mode and some rare new hardware grabbed the headlines (and were covered in March 2021’s Pro Tools workshop). Other new features are perhaps not as exciting, but have the potential to really make a difference to working professionals. A great example is the Bounce Mix window.
Formerly known as Bounce to Disk, the new Bounce Mix window may underwhelm some music users as its benefits might not immediately be apparent. As is often the case, many of the new features have been driven by the needs of post‑production users. How much a music user can benefit from the Bounce Mix window might well be a reflection of how ‘post‑like’ your working methods are.
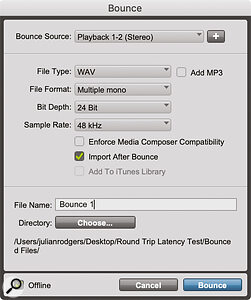
 The old Bounce to Disk window (light).The question is to what extent your working practices are based around the use of mixing templates, standardised session layouts, collaboration with others and the production of multiple versions and deliverables. If you tend to build sessions as you go on a per‑session basis and your deliverables are limited to bouncing a stereo version of your mix, then the Bounce to Disk window probably met your needs already. The new features address the need to be able to create specific deliverables quickly and consistently.
The need for different versions in post is a big subject and beyond the scope of this article, but the important point about that way of working is that there are well‑established conventions in post‑production that don’t quite exist in the same way in music. The more standardised your workflow is, and the more you work in the same way (in terms of session layout rather than artistic decisions), the more you can exploit the principal difference between the new Bounce Mix window and the old Bounce to Disk options.
Bounce To This
Comparing the new and the old Bounce windows, you can see that many of the same fields exist, but there has been something of a reorganisation. The Bounce Mix window is now divided into distinct areas. File naming and the save location of the output files are set from here, and the audio properties such as bit depth and sample rate are available in the same way as previously. Pad To Frame Boundary is a welcome addition to those working on video projects. On the subject of video, there is a beta version of Bounce to QuickTime included, and an option to bounce to MXF, but the headline format for the increasing number of music users whom it affects is Bounce to Dolby Atmos ADM files.
 The new Bounce Mix dialogue (dark).Dolby Atmos is an excellent example of a workflow which would be unmanageable if you didn’t use a template. However, templates are equally valuable in all sorts of other situations. In particular, using templates ensures your busses remain consistent from project to project, so even a user who is working in stereo can use Bounce Mix to create stems and mix‑minus versions for collaboration or easy exchange between DAWs.
Unlimited numbers of Bounce presets can now be stored using the drop‑down menu and shared with other users if required. Plus, in the same way as you can with Zoom or Clip Effect presets, five presets can be stored and recalled from the press buttons at the top of the Bounce Mix window. Zoom or Clip Gain presets can be recalled using the 1‑5 keys on the alphanumeric keyboard; adding Ctrl on a Mac or Start on a PC recalls the Bounce presets. Storing the current setting to one of these five preset slots is the same as storing to the Zoom presets: Command‑click (Ctrl‑click on a PC) on one of the buttons and hold until it flashes.
While we’re talking key commands, the shortcut to open Bounce Mix remains the same as for Bounce to Disk: Command+Alt+B on a Mac or Ctrl+Alt+B on a PC.
Folder & Wiser
Adding new mix sources is as simple as clicking the + next to the existing source. The sources can be outputs or busses, and they can be reordered using the Move Row buttons, which appear when two or more sources are displayed. Confusingly, the blue border which surrounds the source when grabbed using this button doesn’t animate to show the reordering but everything updates when the repositioned row is released.
 The Location options let you determine where in your session’s folder hierarchy your bounces will be saved.File names are automatically generated as a combination of the file name (as displayed at the top of the window) with the mix source as a suffix. The Location options offer a neat way to keep consistent folder structures between projects. If you choose Session Folder instead of specifying a destination manually or letting Pro Tools prompt you for a location, you can customise the default location to whatever you like as a sub‑folder of the Session folder. The default for this option is Bounced Files, but if something else is specified it will be automatically created.
Paths can be specified using the appropriate slash for your operating system. As these custom destinations can be stored with presets, this adds up to a very useful, automatic system for keeping your stems and mixes in consistent, organised locations from session to session. If you are working on a Collaborative Pro Tools Project then there is no local Session folder and the Documents/Pro Tools/Bounced Files folder is used instead.
Track Bounce
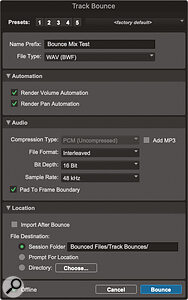
 The old Track Bounce dialogue (light).
Most of this new Bounce window is replicated in the Track Bounce window. Track Bounce was first introduced in 2015 with Pro Tools 12.3, and the contents of the Track Bounce window mirrored the Bounce to Disk window. The presets system is now available in Track Bounce too, and while I can see less use for it compared to Bounce Mix, it is good to remind ourselves of this feature.
At the time of its introduction it was overshadowed by the introduction of the Commit feature, and when I want to bounce out a single track I usually consolidate all that track’s clips into one continuous clip by right‑clicking in the clips list and selecting Export Clips As Files. Or, if I want the audio from the track complete with automation and plug‑in processing, I’ll usually just solo it and Bounce to Disk.
 The Track Bounce window has also been overhauled, and now benefits from the same Location options and presets system as Bounce Mix.This is lazy, but it’s because the Command+Option+B shortcut for Bounce to Disk (now Bounce Mix) is so completely embedded in my muscle memory. The Shortcut for Track Bounce just adds Shift, and it is worth committing to memory, because Track Bounce has the big advantage that you can bounce all selected tracks in a single operation. This is a case of slowing down (ie. not hitting the familiar shortcut) to save time (bouncing all your tracks in one operation)!
Using the new Destination settings, creating a custom path in your session folder, and saving that as a preset is an excellent way to quickly create track bounces in the same way as you’d create stems in the Bounce Mix dialogue. I’ve seen how Cubase handles exports like these and have always thought that a similar workflow in Pro Tools would be a great thing. It’s presented differently, but the new Track Bounce dialogue ticks the same boxes for me.
For the post‑production user there is the flexibility and repeatability that professionals need, and for music users, as long as the session structure is consistent, a request for stems can be handled quickly and thoroughly, whether or not the person asking for them means submixes of related tracks (what I understand ‘stems’ to mean), or the very common (mis)usage of the term as meaning track bounces. In either case, by pulling up either the Bounce Track or Bounce Mix window and selecting the appropriate preset, what used to be a laborious process becomes at least semi‑automated.
What A Drag: 2020.12 Update
Since the release of Pro Tools 2020.11 there has been an update. Version 2020.12 is mostly bug fixes, but one of the more significant of the limited number of new features is the ability to drag audio from an operating system window or from a Workspace browser onto a MIDI or an Instrument track, and automatically convert to MIDI — an addition which makes Audio to MIDI a bit more complete.
Now, if the ability to drag audio clips into Structure Free were to return I’d be a very happy man...
