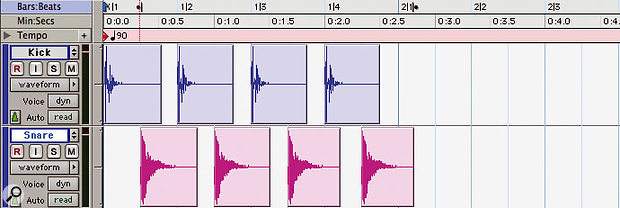
 1: Here's a kick drum track recorded at a tempo of 60bpm: you will see all the regions are on the beat.
We take a closer look at one of the more understated improvements introduced in the version 6.7 upgrade. What are tick-based audio tracks, how do they work, and what can you do with them?
Before version 6.7, all audio tracks in Pro Tools were sample-based. With a sample-based track, when you place a region at a certain point on the timeline, that's where it stays until you move it. Choosing a different type of timeline display doesn't change the absolute position of any regions, it simply makes Pro Tools report the region's position in something more user-friendly than samples, such as minutes and seconds, or bars & beats.
Normally this is all fine, unless you want to change the tempo after you've already laid down some audio tracks. It has certainly happened to me: part-way through tracking a song, we realised that the tempo was too slow and needed to be a bit faster. Changing the tempo at this point had no effect on the existing audio — it stayed put — and we had a major job sorting it manually.
The first of the two screens (above) shows a kick drum track recorded at a tempo of 60bpm: you will see all the regions are on the beat (and as the tempo is 60bpm they are every second). In the second screen below, I've increased the tempo to 90bpm and the regions still play every second, but they are no longer on the beat. It has all gone wrong! 2: Regions on a conventional sample-based track keep their absolute position in time when the tempo is changed, which means they no longer line up with the beats.
Tick-based Tracks
Pro Tools 6.7 incorporates a new feature designed to make this sort of problem easier to tackle: tick-based tracks. In tick-based mode, when you position a region on the timeline you are positioning it at a specific 'tick' point — say one bar and three beats. Now, when you change the tempo, Pro Tools 'moves' the region start point in time so it still starts at one bar and three beats in the new tempo. Take a look at the third screen and see what has happened when we change the tempo in tick-based mode: Pro Tools moves the kick drum regions time-wise so they remain on the beat.
 3: In tick-based mode, the regions follow tempo changes.
However what tick-based editing doesn't do is time-compress or expand regions to make them fit the new tempo. The fourth and fifth screens show two drum tracks, both set to tick-based operation. The Kick track follows tempo changes perfectly, because each hit is a separate region.
 4: The hits in our single snare region line up with the beats.
 5: Changing tempo affects the position of regions on a tick-based track, but not their length, so the hits in our single snare region no longer line up with the beats.
The Snare track, however, is one region and so stays at the original tempo! In order to have the snare hits move in time and remain at the same musical positions, we need to separate it into one region per hit, as shown in the sixth screen.
 6: If we separate the snare region into individual hits, they will now follow tempo changes in the same way as our kick part.
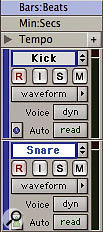
 The kick track is sample-based (clock icon), but the snare track is tick-based (metronome icon).
When you create a track, you can choose between sample or tick-based modes, but you can change your mind at any point. In the screen (right) you will see a new icon has appeared at the bottom left-hand corner of the track header section in the Edit Window. Pro Tools uses a clock icon to represent sample-based mode (as on the Kick track in this example) and a metronome icon to represent tick-based mode (Snare track). MIDI tracks are always tick-based: as you change the tempo, note positions and lengths are adjusted so they retain the same musical position and length.
Using Tick-based Tracks
I'm going to walk through a simple example where we want to introduce a rallentando to a two-bar drum pattern.
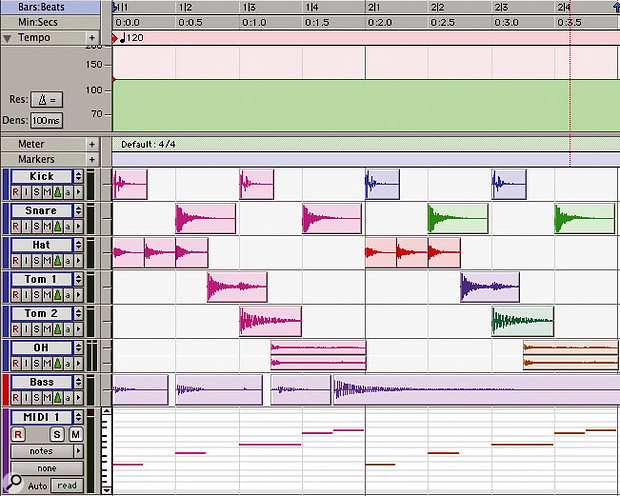
With all the tracks set to tick-based mode (below), we use the pencil tool set to 'parabolic' to draw a basic shape in the Tempo track, as shown in the centre screen (don't worry about accuracy at this point, just aim to get the start and end points roughly correct).
 A two-bar drum part in Pro Tools with each track set to tick-based mode.
 We can draw in a tempo change in the Tempo track...
When you've finished drawing your tempo change, Pro Tools will smooth the shape out (see screen below) and leave you with three 'adjustment points' with blue diamonds: one at the start, one in the middle and one at the end. When you go close to any these with the pencil tool, the cursor will change to a 'pointed finger' icon and you can adjust them accurately. To the right of the Tab to Transient and 'A to Z keyboard focus' buttons (outlined in blue) is a button allowing you to unlink the Edit and Timeline Selections.
It is also worth getting your head round the unlinking of the Edit and Timeline Selections. You can do this by deselecting the strange-looking button to the right of the Tab to Transient and 'A to Z keyboard focus' buttons under the zoom preset buttons (left).
Once you have unlinked your edit selection and your timeline selection, you can use the timeline to select the two-bar phrase, but then whilst playing it, you can trim, edit or move regions as well as adjust the tempo and so on without losing the two-bar phrase selection in the timeline. If you have the timeline and edit selections linked, all appears well until you stop playing, when the timeline selection will be updated with the latest selection, which may be the last region you just edited.
 A two-bar drum part in Pro Tools. With each track set to tick-based mode (top), we can draw in a tempo change in the Tempo track (centre) and the regions will move in time whilst retaining their position in terms of bars & beats.
Pro Tools 6.7 CS Updates
To date Digidesign have released five 'cs' (customer service) updates for Pro Tools 6.7. I recommend you check the Digidesign web site or the Digidesign User Conference for details of the latest updates and then download and install the ones that are relevant to your system; most apply to both TDM and LE systems on both Mac and Windows platforms.
What has been fixed in Pro Tools TDM 6.7cs5:
- When using a plug-in on a track that is assigned to a surround path, the volume and pan automation were being advanced improperly when using delay compensation.
- CS5 solved an infrequent system freeze where the mouse was frozen and the CPU required a reboot. Sometimes this freeze would result in a grey screen with a multilingual 'please reboot' message, otherwise known as a 'kernel panic'. This problem was more likely to occur at high track counts, and with Firewire storage (Mac only).
- Random characters appearing when using Chinese Simplified OS with Pro Tools 6.7r2.
What has been fixed in Pro Tools TDM 6.7cs4:
- Attack and Release controls on Smack! plug-in would respond slowly when adjusted by an external control surface such as Command 8 or D-Control.
- Launching, or creating a session with over 16 mono buss or output paths may have resulted in a crash. However this didn't occur when using mono subpaths of a stereo path, or when using a Pro Tools system that did not contain a Surround Mixer plug-in.
What has been fixed in Pro Tools TDM 6.7cs3:
- When setting a value other than zero for the Auto Region Fade In/Out Length preference, pops could occur on region boundaries when using non-native format audio in a Session.
- When making a selection across more than one MIDI track, it was not possible to trim notes on both tracks at the same time.
What has been fixed in Pro Tools TDM 6.7cs2:
- If the user ticked 'copy all audio' but also ticked 'don't copy fade files', the result of a Save Session Copy In would be an empty Pro Tools Session.
- When using the MIDI to Tap Tempo feature, pressing more than one key on a MIDI keyboard to enter a tempo caused an 'integer divide by zero' error.
- When selecting patch names Pro Tools would unexpectedly quit if the user clicked on a second 'assign patch' button after assigning a first patch.
- It was possible for the Ls output of a surround mixer to be 6dB too hot when new summing mixers were created.
What has been fixed in Pro Tools TDM 6.7cs1:
- Attempting to reset the tempo slider to 120bpm by Option-clicking on it would result in a crash.
- When Pro Tools was playing with a track record-enabled, stopping playback could result in a pop if the input source was bussed or was a hardware insert.
- With some external hardware configurations, an audio glitch could be recorded to the beginning of a file when pre-roll was activated.
- When using a control surface, it was possible to assign a multiple-output instrument plug-in's output to its own input, thereby causing a crash.
