One of the major new features in Pro Tools 8 is a system for easily assembling comp tracks from multiple takes. We explain how it all works.
Back in April 2005, I described the two main techniques that Pro Tools editors typically use for 'comping' a vocal or other track from multiple takes (/sos/apr05/articles/protoolsnotes.htm). Many changes have happened to Pro Tools in the meantime, but it's only with the release of Pro Tools 8 that we have new tools dedicated to this function.
The screenshot above 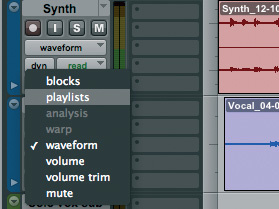 shows how I used to comp up a vocal. I would record a number of takes and then pull them out onto separate tracks, then route all these tracks to an Aux track so I could audition them all through the same processing chain. I would then cut and paste the best bits onto a 'master' track to create the finished vocal comp. The other main technique used by many people is to keep the separate takes as Playlists on a single track, and copy the best bits to a new Playlist on that track to create a comp. This had some advantages, such as not forcing you to mute and unmute individual tracks manually, but had the big disadvantage that you could only see one Playlist at once.
The new comping feature in Pro Tools 8 allows us to combine the best of both techniques, because you can now display each Playlist on a track in its own separate lane. You will find a new option in the track display drop‑down menu called Playlist, the 'Copy Selection to Main Playlist' button and corresponding shortcut 'promote' it to the master Playlist for that track.") Once you have made a selection within a Region on a comp lane (left), the 'Copy Selection to Main Playlist' button and corresponding shortcut 'promote' it to the master Playlist for that track.. When you select this view, Pro Tools will display the most recent Playlist on the main track, and the previous takes on 'sub‑tracks', or as Digidesign call them, 'comp lanes'
Once you have made a selection within a Region on a comp lane (left), the 'Copy Selection to Main Playlist' button and corresponding shortcut 'promote' it to the master Playlist for that track.. When you select this view, Pro Tools will display the most recent Playlist on the main track, and the previous takes on 'sub‑tracks', or as Digidesign call them, 'comp lanes' 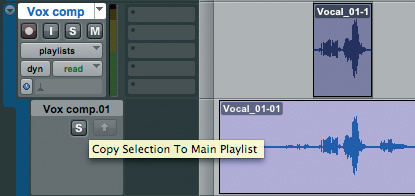 . (You can see which are comp lanes, as they are inset on the Edit window.) As before, all Playlists on a track share the same voice, so you can only listen to one comp lane at a time. The Edit window's Show/Hide list displays the Playlists on a track inset below the track itself, so you can show or hide the complete set by selecting the track, but also show and hide individual comp lanes
 Regions comped to the master Playlist retain the colour of their source comp lane so you can see where they came from..
Each comp lane has a solo button that enables you to hear that take (unlike a normal solo button, this button leaves all the other tracks in the Session playing; you are simply soloing that individual take), or you can place your cursor on a track and use the shortcut Shift-S to achieve the same thing. (This also works on normal tracks and for recording: Shift-R puts the track with the cursor on into Record Ready mode, Shift-M will mute the track, and with HD rigs Shift-I will put that track into Input Monitor mode.)
The other button that appears on each comp lane is an upward‑facing arrow. This is the 'elevate' or, to give it its official title, 'Copy Selection on the Main Playlist' option, and is at the core of the new comping feature. Make a selection on a comp lane track, and this button will become active. If you click it, the selection you made will be 'elevated' or 'promoted' to the master Playlist for that track (above) displays an empty comp lane, to which Regions can be dragged from the Region List.") You can comp material that was not originally recorded to Playlists. Where there are no Playlists on a track, Playlist view (top) displays an empty comp lane, to which Regions can be dragged from the Region List.
You can comp material that was not originally recorded to Playlists. Where there are no Playlists on a track, Playlist view (top) displays an empty comp lane, to which Regions can be dragged from the Region List. , so you can progressively work your way through your vocal takes choosing the best bits and elevating them to the main Playlist
 . You don't even need to separate the Regions first — just highlight the section you want to elevate, click the button and up it goes! Notice how the colour of each of the comp lanes transfers to the main Playlist too, so you can see where each Region has come from. There is a keyboard shortcut equivalent for the button, which is Ctrl-Option-V for Mac and Start-Alt-V for Windows. (At the time of writing, this is incorrectly listed in the Pro Tools Reference Guide as being all three modifiers plus 'V'.)
As well as the Copy to Main Playlist option, Digidesign have provided two further copy options, Copy to Alternate Playlist and Copy to New Playlist. These are accessible from the Edit menu, and unfortunately lack shortcuts, but do enable you to create multiple or alternate comps if you need to.
To further help in the comping process, Digidesign have added a new feature that is hidden away in the Preferences. At the bottom of the Record section of the Operations tab there is a new option called Automatically Create New Playlists When Loop Recording. With this option ticked, Pro Tools automatically creates a new Playlist each time it loops round when loop recording, so that when you go into the Playlist comping mode, there are all the takes ready to go.
If you have Sessions where you didn't, or weren't able to, use the new Playlist creation option, all is not lost. If there are no Playlists on a track, you'll see a miniature empty comp lane under the master track when you select Playlist view. You can drag audio from the Region List into this small area under the main Playlist and Pro Tools will create a new comp lane for it. Using Ctrl‑drag (Windows: Start‑drag) makes sure each Region from the Region List lines up.
You can resize the comp lanes and the master Playlist together by clicking on the line between one of the lanes and dragging it up or down. You can also click on the vertical scale in the normal place and select from the contextual menu: again, all the comp lanes and the master Playlist will resize together. If you want to resize individual comp lane tracks, you can Ctrl‑right‑click and choose a new size from the contextual menu.
Rate It
When auditioning each segment of each take to determine the best ones, it's often handy to write down a rating scheme to try and put some sort of quantitive value on each segment. Pro Tools 8 lets you do this without mucking about with paper and pencils, because Digidesign have incorporated a rating system — which is, of course, saved with the Session. If you right‑click on a Region and select Rating from the bottom of the contextual menu, you can give it a score of between one and five Right‑click, choose from a menu or use a shortcut to apply a rating to a Region.
 ; alternatively, choose Ratings from the Regions menu or use the shortcut of all three modifier keys plus numbers one through five. (Digidesign haven't decided for you whether one or five is the best — you choose!) You can even apply a Rating on the fly during loop recording using this shortcut, as long as you do it before the take has finished. You can also display this rating scheme in the Regions by selecting Rating in the Regions submenu in the View menu
 Ratings can be displayed within Regions..
Once you've rated all your takes or Regions, you can choose not to see the duff ones. If you right‑click on the master Playlist track name and then select Filter Lanes, you can then choose 'Show Only Lanes With' and 'Regions Rated >= 1‑5', and select a threshold number such as three You can filter what's visible so that only Regions rated above your chosen threshold value are displayed.. Pro Tools will now only show comp lanes that contain at least one Region rated three or higher. (If your rating scheme works the other way round, you can hide lanes rated higher than a threshold value instead!)
The other filter options, Regions Within The Edit Selection and Regions Outside The Edit Selection, are very useful if you work separately on different sections of a song. For instance, if you loop recorded around the first verse until you were happy, then did the same for the chorus, and so on, you might end up with lots of Playlists, most of which were empty at any given point. These options allow you to see only the comp lanes that have Regions within whichever section of the Session is defined by the edit selection.
When You've Finished
To hide the comp lanes away again, you can either select another track view option, such as the Waveform view, or, alternatively, you can Command‑Ctrl‑click (Mac) or Ctrl‑Alt‑click (Windows) on the Playlist Selector button on the Playlist selector button toggles the lane display on and off.") Command-Ctrl‑clicking (Windows: Ctrl-Alt‑clicking) on the Playlist selector button toggles the lane display on and off., which toggles the lane display on and off.
Command-Ctrl‑clicking (Windows: Ctrl-Alt‑clicking) on the Playlist selector button toggles the lane display on and off., which toggles the lane display on and off.
All the team at Digidesign HQ have to be congratulated for developing such an excellent new comping feature — enjoy!
Templates In Pro Tools 8
 The new Quick Start window allows you to create a new Session from a template. A variety of factory templates is supplied.
Template Sessions have been a bit of a fiddle since OS X came along in the Mac world, and haven't been a bed of roses in the Windows world either — for more about templates in a pre‑Pro Tools 8 world, take a look at my article in the April 2008 issue (/sos/apr08/articles/ptworkshop_0408.htm). This is another area that has been sorted out in Pro Tools 8.
Digidesign have added a Quick Start window that appears when Pro Tools has finished booting up, and they have also consolidated the templates into a dedicated location inside the Pro Tools folder in the Digidesign folder in your Applications folder. From the Quick Start window, Open a Session takes you to the normal OS Open dialogue box, while Open Recent Session brings up a list of the Sessions you have recently used. When you select Open New Session, the window changes and offers you the usual settings to create a new Session from scratch. Configure the settings to taste, click on the OK button, and up will come a Session of the desired flavour.
The other option is Create Session from Template. Digidesign have included a raft of templates, which the beginner should find helpful as examples of how a Session and mixer can be constructed, and your own templates can be added to this menu too. Open or create a Session that you want to make into a template, and when you are happy, select Save as Template from the File menu. You have the option to include media files with a template Session, which is great if you have standard media elements that you use in your Sessions week in, week out. Once you are happy, hit the OK button, and the next time you want to create a Session from a template it will be there in the menu.
As I have a good number of template Sessions already created, I wondered if I could simply drop them into the Session Templates folder. I tried it, but when I opened the appropriate folder in the Quick Start window, nothing was visible. I discovered that Pro Tools 8 templates have a new file extension — '.ptt' instead of '.ptf' — so I took one of my existing templates, and copied it into the template folder, and changed the file extension to '.ptt'. Sure enough, Pro Tools now recognised it in the Quick Start menu and opened it fine, except that once it had opened, it asked if I wanted to Edit the Stationery or Create New Session, just like Pro Tools used to before Pro Tools 8. Checking the template folder again, I found that PT8 template files don't have the Stationery Pad box ticked. So if you change the file extension and untick the Stationery Pad option, you can copy your existing template Sessions into the Pro Tools Template folder.
This new template option is not only accessible from the Quick Start window: you can also access your templates from the New Session window. A dialogue box now comes up giving you the option to Create Session from Template or Create Blank Session. If you don't want the Quick Start window to appear every time you boot Pro Tools, simply tick the box at the bottom left‑hand corner and it won't trouble you again unless you go into the Operations tab of Preferences and reverse this — down near the bottom right hand corner is an option you can tick to get it back.