If you edit audio in Pro Tools, you need to know about fades and crossfades. As well as being vital editing tools, they can also be used in surprisingly creative ways...
In this month's workshop we're going to look in detail at how to use crossfades and fades, and how they can be applied in batches as well as singly. Crossfades are transitional Regions that span the end of one Region and the beginning of another. They can be used to smooth the sudden transition between two adjacent Regions, and help to prevent pops and clicks at Region boundaries. Fades are similar to crossfades, but apply where there is no overlap between Regions, for fading up the volume of a Region from nothing (fade-in) or fading down to nothing (fade-out). The duration, shape and position of fades and crossfades are all fully adjustable within Pro Tools.
Fade Files
Pro Tools renders each fade and crossfade as a separate, small audio file, and stores these away in a special folder within the Session folder — called, not surprisingly, Fade Files. Not all digital audio workstation systems work like this: in fact, most actually calculate fades and crossfades in real time and play them from RAM as required. So why doesn't Pro Tools? Well, in the very early days, the first digital audio workstations could only manage a maximum of four tracks playing simultaneously! The problem was that if you had a crossfade between two stereo Regions, for the duration of that crossfade you were actually playing four tracks back from disk, thus blowing the possibility of having the other two tracks playing at that point. Digidesign got around this limitation by having Pro Tools render an audio file of the transition, so that for the same scenario it would play the normal stereo file up to the crossfade, then play the rendered stereo crossfade file, before picking up the second stereo file from then on. This enabled the other two tracks to continue to be used all the way through, without limits. Of course, nowadays, with fast computers and hard drives, that feature isn't really necessary, but Digidesign have seen no reason to change it, and there is no doubt that when a system is working close to its limits, the use of rendered fade files will keep it going that bit longer before it falls over.
Creating Crossfades
 Crossfades don't have to be centred around the edit boundary.
 Before and after: a crossfade is used to smooth the transition between Regions at an edit boundary.There are two ways we can create crossfades in Pro Tools. The first is to use the Fades dialogue window:
- First, select an edit between two adjacent Regions, using the Selector Tool to highlight where you want the crossfade to start and finish.
- Then, select Create Fade from the Fades option in the Edit menu, or hit Ctrl+F (Windows) or Command+F (Mac).
- Next, choose the shape of the fade from the Fades dialogue (see the separate 'Fades Dialogue' box).
- When you are happy with the crossfade, click the OK button. Pro Tools will render the crossfade and include the basic shape in the graphic of the fade region (see screens below).
- You can also have crossfades that are not centered round the edit between the two Regions, by highlighting the area accordingly (see screens above).
The other way of creating crossfades is to use the Smart Tool.
- With the Smart Tool on (hit F6 and F7 together to turn it on), when you move the mouse close to an edit and near the bottom of the track, between two adjacent Regions, you will notice that the cursor changes to an icon that represents a crossfade (top right).
- Then click and drag the cursor, either to the left or right — it doesn't matter which — and you will see the basic outline of a crossfade form (centre right).


 Using the Smart Tool to generate a crossfade: when the tool is positioned in the right place it changes to the fade icon, and you can click and drag to create the fade.
- When you are happy with the duration of the crossfade, let go of the mouse and Pro Tools will render the crossfade (bottom right).
 When creating crossfades, you need to be careful to set the start and end points so that no unwanted material is included.
- Note that a crossfade created with the Smart Tool will always be centred round the edit between the two Regions, and will have whatever shape is set in the Editing tab of the Pro Tools Preferences window. Clicking on the Crossfade button here will bring up a simplified crossfade window in which you can set the default shapes of crossfades created by the Smart Tool.
Whatever method you use to create crossfades, you need to be careful what to include in them. If you look at the screen above, the top green track shows an edit before a crossfade has been applied. The red track shows what continues in the left-hand region, if allowed to play, and the purple track shows what was going on in the right-hand clip before the edit. Now look at the fourth track. See how one of the drumbeats from the right-hand-side clip can now be heard? If you change the crossfade shape, as in the bottom brown track, the same drumbeat doesn't make it through. So you need to be aware that as you extend the crossfade out you will reveal more and more of the regions that you have edited, and sooner or later, that will be something you don't want to hear.
Creating Fades
You can create fade-ins and fade-outs using the same techniques as with crossfades. Again, the first option is to use the Fades dialogue (below): If you're doing a fade in or out rather than a crossfade, the Fades dialogue is simplified.
- Highlight the section you want the fade to cover; you can safely highlight an area beyond the end of the Region, as Pro Tools will ignore the empty space when creating the fade.
- Select the Fades dialogue window, choose your fade shape and then click OK. Pro Tools will then render the fade.
The Smart Tool can create fades, too:
- The process is similar to creating crossfades with the Smart tool, except that you place the cursor near the top of the track, close to the start or finish of the Region, and the cursor will change to a fade icon (see top left screen overleaf).
- Click and drag the cursor into the Region, and again, you will see the outline of the fade (see centre top screen overleaf).
- When you are satisfied with the fade length, let go and Pro Tools will create a fade using the default fade shape set in the Editing tab of the Preferences window (see centre left screen overleaf).
Fades Dialogue
 It's worth having a closer look at the Fades dialogue window to see exactly what is going on when you make a crossfade. Down the left-hand side is a column of buttons. The top one, with a Speaker icon, enables you to audition the crossfade while you try things out in the Fades dialogue and before you render the fade. The next one down, which looks like a diagonal cross, allows you to turn the waveform display on and off in the crossfade preview section; switching it off displays just the fade shapes.
The next button down enables you to view the waveforms of the two Regions separately and displays the pre-edit region waveform in blue and the post-edit one in red; alternatively, the button below that displays the two Regions' waveforms superimposed on top of each other, but retaining the same colour codes. Below that is a button that displays the waveforms merged completely, without colour coding. Finally, the two arrow buttons at the bottom enable you to zoom in and out vertically on the waveform display in the Fade dialogue box.
 Under the display that shows the waveform and curves you have the controls that select different fade shapes. Both the In and Out Shape sections have three radio buttons:
- Standard allows you to continuously change the fade shape by clicking and dragging with the mouse. Notice that the waveform is constantly updated as you change it. If you have both fade shapes set to Standard, the shapes change in sync with each other.
- When S-curve is selected, the fade changes from a smooth curve to an S-shape curve.
- Finally, the bottom button selects a fixed curve which is chosen from a drop-down menu (right).
 Unlinking the two curves that make up a crossfade allows you to have them starting and finishing in different places, as well as permitting the use of completely independent shapes.Three more radio buttons come under the heading Link, and controls whether, and how, the shapes of the in and out curve will be linked together. When either Equal Power or Equal Gain is selected, as you change one fade shape the other one is automatically changed in response. An equal-power crossfade is recommended for material that isn't phase-coherent as, in a crossfade between two different types of material, it will mean that the overall volume will be maintained through the crossfade. An equal-gain crossfade, by contrast, is recommended for material that is likely to be phase-coherent, such as two loops of the same sound. If you used an equal-power crossfade in this situation you could get a sudden sound level boost through the crossfade. The None option allows you to select completely different shapes on each side, with no linking. When you select None, you will notice that small black squares appear at both ends of the fade shape lines. You can get hold of these with the mouse and move the ends so that you can, for example, have the fade-in on the second Region starting much later than the fade-out on the first.
Finally, the Use Dither tick box enables a preset dither function that will improve the audio quality, especially when you are crossfading low-level sounds. Disabling the Dither function, on the other hand, will speed up previews and fade recalculations.
If you're doing fades in or out, rather than crossfades, the Fade dialogue box is very similar except that one side of the controls is greyed out.
Keyboard Focus Shortcuts
If you have the Keyboard Commands Focus switched on, you can also create fade-ins, fade-outs and crossfades using single-key shortcuts. Place the cursor in the Region at the point where you want the fade to start or finish: press 'G' for a fade-out or 'D' for a fade-in, and Pro Tools will create a fade appropriately. To create a crossfade, highlight where you want the crossfade to go and press the 'F' key. Just as with the Smart Tool, all these fades will be created using the default fade shapes set in the Editing tab of the Pro Tools Preferences window.

 The Smart Tool can be used to generate fades in and out by positioning it near the top of the Region.
Batch Fades
 The Batch Fade dialogue appears when you have multiple Region boundaries in a selection and choose the Fade dialogue.It is possible to create a set of crossfades in one go. However, they all need to be on consecutive edits, and all the crossfades will be the same shape and length. If you do have a suitable set of Regions, such as in the Bass guitar comp shown right, select the set you want to apply fades to and choose Create Fade from the Fades option in the Edit menu, or Ctrl+F (Windows)/Command+F (Mac). A modified version of the Fade dialogue will appear (see screen, bottom left). Choose your fade shape, as before, then choose one of the three options listed under Operation:
- 'Create new fades' creates fades at every Region boundary (see screens above).
- 'Create new fade ins & outs' will create fades in and out on the first and last edits within the highlighted section.
- 'Adjust existing fades' (below) changes fades to the length and shape specified in the Fade dialogue, but won't add new fades unless you tick 'Create new fades'.

 A batch fade can be used to apply the same fade parameters to every Region boundary in a selection.
 The Trimmer can be used to adjust existing fades.
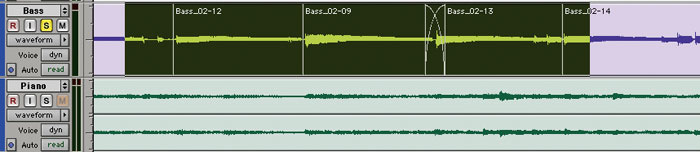
 Unless you tick 'Create new fades' or 'Create new fades in & out', a batch fade will simply change any existing fades in the selection to your chosen shape and length. You can set the length of all the fades in the batch by entering a number into the length box in milliseconds, and under Placement you can determine whether the crossfade will be centred around the edit, placed wholly before the edit or wholly after the edit. The four group of screens overleaf shows the same Region boundary before a fade is created, and with Pre-splice, Centred and Post-splice fades applied.
Editing Crossfades & Fades
You can edit your fade and crossfade lengths using the Trim Tool or the Smart Tool in its Trim guise, but often I find it easier to select the fade file with the Grabber, delete it and then recreate it, as you have to zoom in to a certain point before the Smart Tool will change to Trim. If you want to amend the shape, double-click the fade Region with the Grabber Tool and the Fade dialogue window will come up: make your changes and then click OK for Pro Tools to render the new version of the fade file. I use this often when the default fade shape doesn't work for a particular transition, as it is easier to change it for the odd one whilst making maximum use of the Smart Tool and its default fade shapes.
Recreating Missing Fades
Although Pro Tools renders each crossfade and fade and files them away in the Session Fade Files folder, all the information about how they were created is also held in the Session document, so even if you delete or lose the Fade Files, Pro Tools will recreate the missing fades for you when you open the Session. When you open a Session with missing fades you will get a warning dialogue box, and the missing fades will be displayed in sky blue, showing that they are 'off line'. Providing there are only fades missing and no audio or video files, set this warning dialogue box to 'Regenerate missing fades' and click OK. Pro Tools will then recreate the missing crossfades and the Edit window will return to normal.
Crossfade Tips


 and the three options: Pre-splice, Centred and Post-splice.") Batch fades can be applied in different positions: here you can see the unfaded edit (top) and the three options: Pre-splice, Centred and Post-splice.Let's conclude by looking at some examples to show how you can use fades creatively.
Batch fades can be applied in different positions: here you can see the unfaded edit (top) and the three options: Pre-splice, Centred and Post-splice.Let's conclude by looking at some examples to show how you can use fades creatively.
- I have an equal-power crossfade and a linear fade as my default fade shapes, and find they work best for about 90 percent of my fade and crossfade requirements. Sometimes on fades in and out, if the material is fairly loud I will create a linear fade with the Smart Tool and then immediately double-click it with the Grabber Tool and change it to an equal-power fade-in.
- The wide range of crossfades available in Pro Tools enables you to pull off some otherwise impossible edits. For example, I have just completed an album of improvised pieces, which meant of course that no two takes were the same, so when it came to the edit, some very creative editing and use of fades was called for, as you will see in the screen below. The Session ended up full of edits in different places, on different tracks, with different lengths of crossfade!
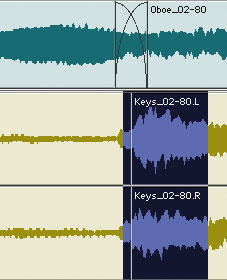
- In another example, I had recorded an orchestral arrangement of 'Gabriel's Oboe', the theme tune from the film The Mission. When the ensemble play this piece live, they start with a strong chord for dramatic effect, before the oboe comes in with the melody, and this was how we recorded it. However, when it came to the edit and mix it was agreed that this treatment wouldn't stand repeated listening, so we needed to reconstruct the opening. As the chord continues under the oboe, we couldn't simply chop it off and come in clean on the oboe, and the producer still wanted the sustained chord at the start to lead into the oboe. However, as recorded, the chord was dying away when we now needed it to swell. So I reversed a section of the sustained chord and stitched it onto the rest of the chord just before the oboe entry, and tried a range of fade shapes until I got the transition perfectly smooth.
 In a complex multitrack Session, you often get best results by using different edits and fades in different places on the various tracks.
- In my post-production work I often use sound-effect atmosphere beds laid under material to help the sense of 'place'. These usually need to be looped, and here an equal-power crossfade usually works best at the loop point.
The subject of fades and crossfades can seem like a complex one, but once you get the hang of what crossfades can do for you, they become an extremely powerful and creative tool.