

You are here

Zoom LiveTrak L6

32-bit Multitrack Recorder, Mixer & Audio Interface By Matt Houghton
Published December 2025

LiveTrak L6

Zoom’s smallest LiveTrak ever is a mobile production powerhouse.

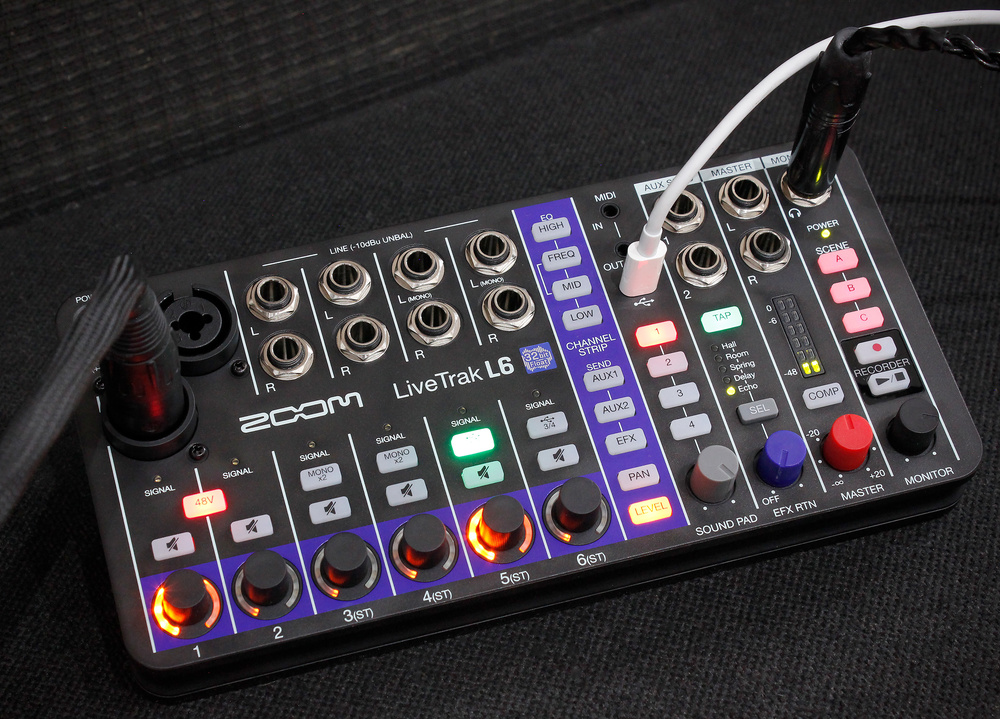
Being only a mosquito’s proboscis wider than my Korg Volca Keys synth, the L6 is the most compact LiveTrak I’ve used, yet into it Zoom have crammed so much, including 10 analogue inputs, two aux outs and MIDI I/O, up to 12‑in/4‑out USB audio interfacing, and a host of digital facilities. As well as channel EQ, there are also four built‑in sampling Sound Pads, a digital effects engine, and a handy ‘Scene’ facility to store and recall mixer settings. What’s more, all this can be powered by four AA batteries or USB, and two USB ports (one dedicated to power, one for interfacing) can deliver power, so there’s even power redundancy if needed. While the range of potential applications is huge, you’d expect limitations on any device such as this, and I’ll explore those alongside the many plus points. But in case any of it comes across as sounding overly negative, I’ll stress up front that overall, I’ve found the L6 to be hugely impressive, and believe it offers remarkable bang for buck.

Orientation

There’s a decent PDF manual, and a software editor makes more possible, but the best way to get your head around this thing is to start by exploring the hardware. You’ll find almost everything in terms of I/O and control on the top panel, the exceptions being the battery compartment underneath, and the USB‑C power inlet and microSDXC card slot on the right panel.
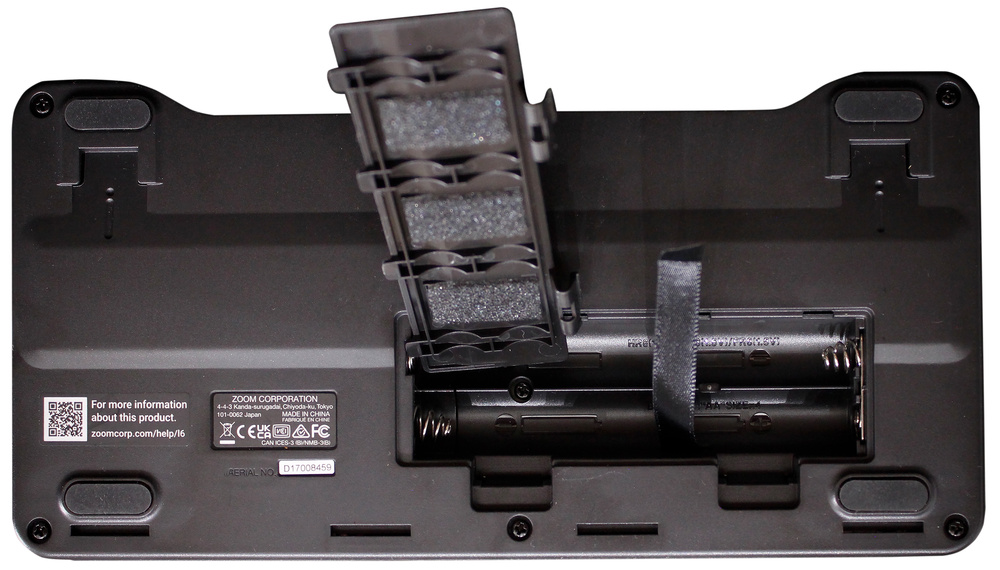
The LiveTrak L6 has a dedicated USB power inlet on the side, but it can also be powered by AA batteries or via the other USB port on the top — so you have plenty of options for portability and redundancy.The LiveTrak L6 has a dedicated USB power inlet on the side, but it can also be powered by AA batteries or via the other USB port on the top — so you have plenty of options for portability and redundancy.

The first two input channels are mono, and accept mic/line signals on combi jacks. They share a button for +48V phantom power, and each has a signal‑present LED, a mute button and an encoder whose default role is as the channel fader. All onboard recordings are 32‑bit float format, but these channels are the only ones to have dual switching A‑D converters and, as on similar devices, they have no gain knobs (because they’re unnecessary), so are great for beginners or those in a hurry. The flip side is that you have no control over when switching happens, and when it does a short fade is applied to camouflage the change in noise‑floor level. This normally works very well, but you may want to double‑check the auto‑fades on edits made later in your DAW or NLE.

Four more inputs again have a mute button and rotary encoder. These are stereo channels, to give you 10 analogue inputs in total, and accept unbalanced ‑10dBV line‑level sources on quarter‑inch TS jacks. They can be used for mono sources too, and the approach is different for each pair of stereo inputs. Tracks 3 and 4 have a Mono x2 button. When engaged, both inputs appear on the left and right mixer channels, and they share the volume, pan, EQ and send settings — but they’re recorded as separate mono files on the SD card. Tracks 5 and 6 instead have a button to select the analogue jacks or a USB return as the input source. The latter are ‘hardwired’, meaning channel 5 can receive only USB return 1+2, and channel 6 USB return 3+4, so you might find you need to re‑patch an analogue source when selecting these. For mono on these tracks, plug into the left jack.
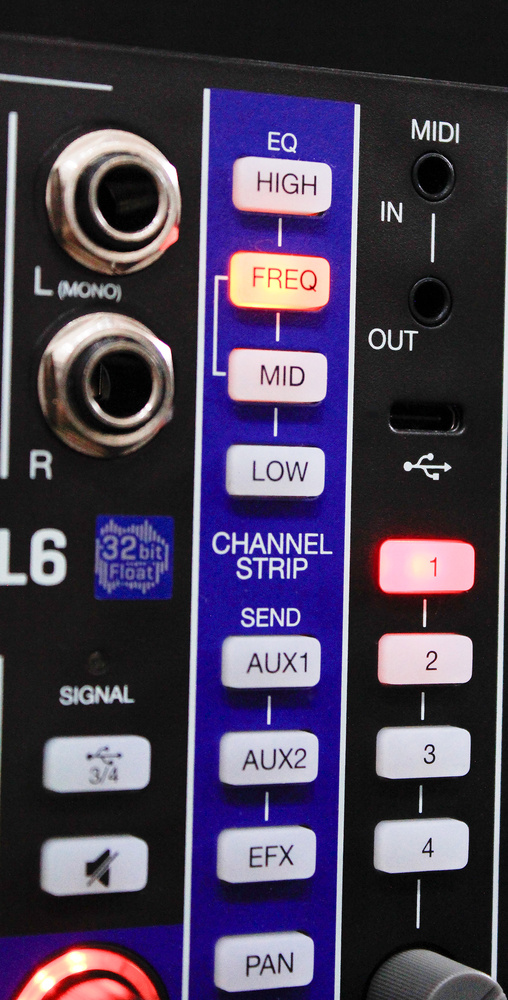
The function of the channels rotary encoders’ is set by the column of buttons: options include panning, send levels and EQ.The function of the channels rotary encoders’ is set by the column of buttons: options include panning, send levels and EQ.All the input channels feed the master bus automatically (unless you engage their mute). On the right, there are master output jacks at the top, a master output level knob (minus infinity to +20dB) at the bottom, and a stereo LED bar meter between them. There’s also a master‑bus compressor with automatic make‑up gain. This offers no controls besides an on/bypass button, but can work well for raising levels of dialogue or taming filter sweeps during performance/streaming, without sullying any multitrack recordings. Top right is the quarter‑inch TRS headphone output, also with its own monitor level knob. This always delivers the master mix to your headphones: there’s no separate solo facility, and, short of unplugging them, no way means of muting your speakers if recording vocals while monitoring on headphones. Above the headphone monitor level pot are four buttons: Record and Play for the multitrack recorder, and the three Scene buttons.

Immediately to the right of the main input channels, a profusion of buttons set the function of the channel encoders, and the selected function applies to all channel encoders simultaneously. In addition to the default level function are pan, the effects send levels, aux 1 and 2 sends, and four buttons for the channel EQ (comprising two shelves and a sweepable mid). Hit a button and the LED rings around the encoders will indicate that parameter’s current settings. There’s more you can do with the software, but there’s a decent amount of physical control for such a small device. My only gripe is that the LED rings can sometimes be obscured by the encoder knobs, and the light from the LEDs can, from some angles, appear blurry, making it hard to be certain of the setting.

Sends & Scenes

To the right of these buttons are more I/O and a couple of internal channels. At the top are MIDI in and out on TRS mini‑jacks, and the audio interfacing USB port. Immediately to their right are two aux sends on quarter‑inch jacks. Note there are no dedicated aux return channels (so external effects must occupy input channels), and that the aux sends are mono even from stereo channels, which won’t suit everyone (eg. if trying to incorporate a stereo sampler into a live rig).

There are two aux sends, which can be set to operate pre‑ or post‑fader.There are two aux sends, which can be set to operate pre‑ or post‑fader.

The Scene buttons allow instant storage/recall of mixer snapshots, and can include parameters that are only adjustable using the editor software.The Scene buttons allow instant storage/recall of mixer snapshots, and can include parameters that are only adjustable using the editor software.The built‑in digital effects may be rudimentary but sound decent enough. A Sel button toggles between three reverbs (Hall, Room and Spring) and two delays (Delay and Echo). When controlled from the hardware, these are pretty much on‑or‑off affairs, but there’s a tap‑tempo button for the delays (tempo will also slave to a MIDI Clock signal), and a pot to set the overall effects level. The final channel, to the left of EFX, is for the Sound Pads, of which more below.

To save a Scene, you just hold and press one of the three buttons, and press again to recall. Most parameters are covered, including some that can only be set using the software editor. For example, it will store the channel levels and mute states, and the EQ settings. So you could prepare Scenes in advance and recall them during a show, for instance one Scene to solo a podcast host by muting only the guest mics, and another to reverse that. Something it doesn’t do is recall the encoder function that was ‘in view’ when saving; if that’s important, you’ll have to select it manually.

Multitrack Recording & Sound Pads

To make a multitrack recording, pop your microSD card in the slot (extracting it again proved unusually fiddly!), set the desired channel levels and press Record. When you’re done, hit Play/Stop. That’s it! The multitrack comprises mono files for channels 1+2, mono or stereo files for channels 3‑6 (depending on how you configured them), and the stereo mix, complete with the effects and Sound Pads. All files are 48kHz/ 32‑bit WAVs. Playback is equally simple: hit Play, and the last recording plays back.

For a budget device, it sounds beautifully clean and detailed, but I would ideally have liked more features. For instance, using the hardware you can only play back the last‑captured recording; there’s no way to access previous takes. Also there are no transport, marker or other file‑navigation facilities, and there’s seemingly no way to rebalance the multitracks on playback. Finally, during playback you cannot monitor the input channels, and you can’t overdub. These are the sort of limitations I had in mind at the top of this review — while they will, I’m sure, put off some potential users, most probably won’t see any problem here.

Recording to the Sound Pads is almost as easy: hold down the main Record button, hit the target Sound Pad, and it will almost instantly start sampling the stereo mix. Hit the pad again to stop. Thereafter, hitting the pad triggers the captured sound. You do need to get your timings spot‑on when recording to avoid unwanted sound/silence at the start of the sample, since there’s no built‑in sample editing. But you soon get the hang, and can always record a new sample to the pad (the previous recording remains on the SD card, but can’t be accessed without a computer). Note that you can’t send the Sound Pads to the effects or auxes, there’s no access to EQ or pan, and when using the hardware alone you can’t adjust the individual pads’ playback levels, or delete a recorded file...

You can record direct to the Sound Pads, or use them to sample the mix bus.You can record direct to the Sound Pads, or use them to sample the mix bus.

Software & MIDI

Which brings us neatly to the LiveTrak L6 Editor software! Installation was quick and easy, despite my macOS v12.4 not officially being supported. When connected over USB, the software accesses various functions unavailable on the hardware. It can set the L6 to file transfer mode too, making it a card reader: you can use your OS file browser to move/copy files, or third‑party software to edit Sound Pad files. You can also load new Sound Pad samples onto the SD card (pre‑recorded segments to trigger during a podcast show, for instance, or a backing rhythm track for busking). The file names for the onboard recordings have a date/time format, and until I’d connected the L6 to the software that date/time wasn’t, erm... up to date! So it’s worth hooking it up once before you do any serious recording.

The LiveTrak 6 Editor software offers a range of useful functions, from managing the Sound Pads to changing the aux send point, tweaking the effects parameters and assigning MIDI control.The LiveTrak 6 Editor software offers a range of useful functions, from managing the Sound Pads to changing the aux send point, tweaking the effects parameters and assigning MIDI control.

When not in file transfer mode, the software lets you tweak or assign MIDI control for various functions, including more than you can access on the hardware. For example, you can set up direct MIDI control of the individual EQ bands and aux sends, and can assign different MIDI controls to those functions for different channels. You can also do things like set the L6 to record the master mix only (saving card space/increasing the available recording time), change the aux send points (pre‑ or post‑fader on a per‑channel basis), and access additional basic effects parameters. Usefully, while that last one can’t be done using the hardware controls, the settings can be saved/recalled using the Scene buttons.

A window for the Sound Pad files accesses more useful functionality. You can select which of a pad’s stored files is loaded, set each pad’s playback behaviour (one‑shot plays through the full sample, loop does the same repeatedly, while hold gives the pad a momentary action, the sample restarting each time it’s pressed) and, importantly, adjust the playback level of individual pads, using a drop‑down menu (‑10 to +15dB in 1dB steps). You can even map MIDI notes to trigger the pads’ samples, which could be handy. Yet again, what’s here is decent, but I feel more could be possible. Basic sample‑editing tools (trim, fade and gain), for instance, would be really convenient, as would a MIDI Learn feature for attached devices.

I can think of nothing else that offers so much in such a compact form, for so keen a price. It’s hugely impressive, fun and really immediate to use.

The Bottom Line

As I said above, though, the L6 can’t be all things to all people, and I’m sure we could all write very different feature wish lists! But I can think of nothing else that offers so much in such a compact form, for so keen a price. It’s hugely impressive, fun and really immediate to use. For some, the L6 could be the only preamp, recorder or interface they need. For others it might prove an attractive backup tool for the kit bag.

USB Audio Interfacing

The L6 worked as a USB audio interface straight off the bat with my Mac and my Samsung Android phone, but Windows users need to install a driver. The 48kHz sample rate is fixed, but you can choose a 32‑bit float or 24‑bit fixed‑point word length. As well as recording to and playing back from your DAW, you can easily use a phone to play a backing track into the mixer during a live performance. When I received the L6, it had v1.0 firmware installed, and updating it to v1.2 introduced new features. Notably, button combinations during power‑on now configure how the L6 presents itself to attached devices. By default, the host determines how many I/O are used, but you can choose a fixed 12‑in/4‑out format, or a simpler 2x2 stereo configuration. The latter is particularly welcome: it means it’s now possible to hook the L6 up directly over USB to my DJI Osmo Pocket 3 video camera! So I can record a mix in sync with the video, and (albeit without any timecode support) pretty easily line up any SD multitracks in post.

Pros

  • Sounds decent.
  • Switching 32‑bit conversion for the mic preamp channels.
  • Incredibly portable, with multiple power options.
  • Super‑easy to use.
  • Great bang for buck.

Cons

  • Some routing limitations.
  • Software could use more features.

Summary

The L6 packs a frankly insanely good feature set into an immensely portable package! There may be limits to what it can do, but there’s much to love.

Information

£295 including VAT.

Sound Service UK +44 (0)3301 222 500.

sales@soundservice.uk

www.soundservice.uk

zoomcorp.com

$329.99

Zoom Corp North America +1 888 799 9666.

zoomcorp.com

When you purchase via links on our site, SOS may earn an affiliate commission. More info...

Sweetwater Affiliate logo 14px

When you purchase via links on our site, SOS may earn an affiliate commission. More info...

G4M logo