 Initial track (top) and isolated pops copied to second track (bottom).
Pesky pops proving problematic? Here’s how to pull them down...
No matter how carefully you set up a mic’s position or pop filter, when vocalists sing close to the mic some pops can still make it through, so you have to deal with them after the fact. Traditionally, most pop removal relies on filtering extremely low frequencies. But reducing these low frequencies often also affects the warmth and depth of the vocal. This may or may not matter, but when it does then filtering out pops with EQ becomes problematic. And while there are clever AI‑based tools out there now, in my experience they don’t always quite hit the mark. Thankfully, attending to pops manually is really easy...
Cancel Culture
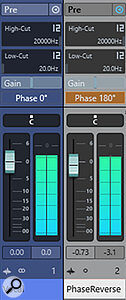
 Cubase’s MixConsole showing the setup for this simple pop‑cancellation technique.
My preferred method uses good old‑fashioned editing and polarity inversion: first I copy only the pops to a second track (as shown in the screenshot, above), then I flip that track’s polarity so that, with the levels at unity, the copied pops cancel those on the original track. You can then adjust the second track’s level and use processing to ‘uncancel’ some of the pop sound and shape its timbre to taste. Not only does this technique not affect the vocal itself, but also the pops themselves don’t sound ‘thin’, and changing the reduced pop’s timbre doesn’t affect the timbre of the vocal itself. Even a little high‑pass filtering at a very low frequency will usually do what’s needed.
It really is that simple, and you can do this in any DAW, but below I’ll take you through it step by step in Cubase. First, identify the pops at the beginnings of words, and slice at the beginning and end of the pop. Remember to zoom in close enough to make sure that the slice is before any attack‑related part of the pop, and that the slice after the pop is on a zero crossing (there’s an option in Cubase and most other DAWs to do this automatically when you make a cut). Then, create a second audio track.
Now, select all the pops on the first track, and click on a selected pop and hold the mouse button down. While continuing to hold the mouse button down, press and hold the Command/Ctrl and Alt/Opt keys. While still holding these modifier keys, drag the pops down into the second track and release the mouse. The order of clicking, holding down the mouse button and using these modifier keys will prevent the pops from moving left or right as you copy — perfect alignment on the timeline is crucial for proper cancellation. In the MixConsole’s Pre section, simply invert the second track’s polarity. Then play the two tracks together: the pops will be gone!
Simply adjust the second track’s level to set the desired amount of pop cancellation.
Tonal Tweaks
Then, simply adjust the second track’s level to set the desired amount of pop cancellation across the whole track. If necessary, add a touch of high‑pass filtering to alter the tone of the pops. Of course you’ll probably want any more general vocal processing to apply to the whole vocal including your treated plosives, and you can do that if you submix the two tracks to a group track (use that track for your processing and effects sends), or by rendering a sum of the two tracks.
Audio Example
This audio file demonstrates the ‘copy and cancel’ technique for plosive control described in the Ultimate Plosive Control text above.
Pop Cancellation.mp3
- The first third of this file is the raw, untreated track.
- In the next part you can hear that the pops have been cancelled.
- While in the final third I’ve adjusted the blend of the pops for a more natural result.
