We delve once more into the power hidden in Pro Tools' unassuming Region List window.
In this month's column, we look at some of the more advanced possibilities for Session management afforded by the Pro Tools Region List.
To help keep the Region List as short as possible, it has a nested structure, so when dealing with multi‑channel (stereo or surround) Regions, Pro Tools displays a short triangle to the left of the Region name. If you click on the triangle, the Region List then displays each of the component files that make up the multi‑channel file.  Stereo files are displayed in a nested structure.It is possible to drag out one of these files onto a mono track should you need to. I often do this when mono material has been recorded into a stereo file, rather than play the same content twice — which takes up another Pro Tools voice, more processing power and disk bandwidth.
Naming & Renaming
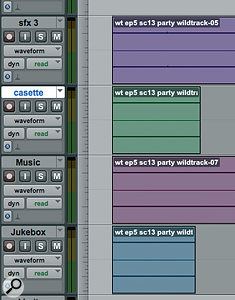
When you create new tracks in Pro Tools, the track names default to 'Audio 1', 'Audio 2' and so on. When you record on a track called 'Audio 1' the first Region will be named 'Audio 1‑01', the second 'Audio 1‑02', and so on, and before you know it, you have a Region List full of nearly identically named Regions, making it hard to tell one from another. So always name your tracks before you start recording, and then rename your Regions to help keep track of them in the Region List.
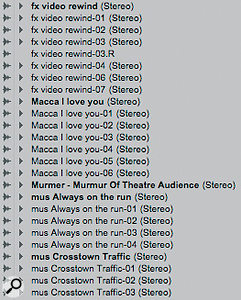
You can rename a Region by double‑clicking it in the Region List or on a track, by choosing the Rename option on the Region List pop‑up menu, or by right‑clicking a Region name in the Region List. Rename your Region using an appropriate naming convention and click OK. For example, in the drama I am working on, I prefix all music as 'mus', followed by the music clip's name; for sound effects I use the prefix 'fx' In this Session I've renamed all sound effects with the prefix 'fx' and all music with the prefix 'mus'. . As this is a multi‑episode drama, I am using a naming convention for the rushes to easily identify the appropriate file — so a file named 'ep2 s3 t5' is for episode two, scene three, and is take five of that scene. It's worth devising your own naming conventions in order to produce a naming scheme that not only works for you, but is clear enough for others to follow it too. This strategy alone will make Session management so much easier.
It is possible to rename multiple Regions at once and apply your own naming scheme. Highlight some Regions in the Region List, choose 'Auto Rename…' from the pop‑up menu and the relevant window will appear  Renaming multiple related Regions is easy, thanks to the Rename Selected Regions window.(see screen below). The Name box will determine the base name that will be used when the selected Region is edited. The Starting Number sets what number you want to start from with the renamed Regions. The Number of Places sets how many zeros will be added and the Suffix sets what will come after the name and numbers in the auto‑renamed Regions.
Right‑click Said Fred
In recent versions of Pro Tools, you don't always need to access the Region List pop‑up menu to use a lot of its features, thanks to the huge number of right‑click options that are now included. The following can be accessed by right‑clicking on a Region in the Region List:
- Clear: removes the selected Region.
- Rename: brings up the Rename Region window described above.
- Time Stamp: enables you to redefine the Region's time stamp. When audio is first recorded, the User Time Stamp will match the Original Time Stamp, but you can change the User Time Stamp at any point. This is particularly useful in audio post‑production work, where the timecode on video 'work prints' can change from one version to another. You can enter a new timecode value either by typing the numbers directly into the User Time Stamp box, by clicking the Current Timecode button, which will capture the incoming timecode and transfer it to the User Time Stamp, or by clicking on Current Selection to transfer the current cursor position to the User Time Stamp
 Pro Tools Regions contain both an Original and a User Time Stamp; the latter can be edited to fit changes in video timecode..
 - Compact, Export Region Definitions, Export Regions as Files: see below for more details.
- Recalculate Waveform Overviews: recalculates the waveform overview for the selected files (in other words, the visual display of the waveform in the track lane), which can become corrupted for reasons that are never quite clear!
- Select Parent in Workspace: selects the parent file of the selected Region in the Workspace window, to help you track down where on disk the audio is located.
- Object Select in Edit window: selects chosen Regions as Objects in the Edit window. This is useful when you want to work several non‑contiguous Regions as a set (perhaps you need to move them to another part of the Session but retain their relative positions, for instance).
Compact Yet Powerful
The Compact… option can be very useful if you're short of drive space. I often find myself in a position where a Session, and my drive, contains a 30‑minute file of which I am actually using perhaps 20 seconds. Compact trims this to create a new file consisting of the 'used' segment plus some 'padding' at either end (often called handles) so I can still put a crossfade in right up to the edge of my 20‑second segment. However, there's a health warning: once you have compacted a file it cannot be undone. You can't reclaim anything from that file outside the part you've chosen to keep, so it needs to used with caution, but it can be very useful to slim down a Session.
Once you have selected Compact from the Region List pop‑up menu, you are warned very clearly about what is about to happen When you have a lot of unused audio in a Session, the Compact option can save hard drive space, but needs to be used with care!. This is probably the biggest warning window that comes up in Pro Tools. Once you click Compact, there is no going back! You can also set the length of the 'handles' here, in milliseconds.
The Export Business
When you edit an audio file, the edit information about the new Region is stored by default in the Session file and not in the host audio file. However, the Region definitions can be added as metadata to the host audio file, which is where the Export Region Definitions option comes in. The reason you might want to do this is so that the edits and Region data will be available in either another Pro Tools Session that is sharing common audio files, or another application that supports the same conventions. A good example of this is mastering a live album for CD, where the entire album is one file but you want to be able to insert track markers at the beginning of each song. By carving up the mixed file in Pro Tools, you can easily create a Region for each song, but unless you use Export Region Definitions, your chosen CD-mastering application won't know where the start and end of each song will be. Using Region Definitions makes this very easy: it is simply a matter of selecting the appropriate Region for each track.
Export Region As Files, meanwhile, is an excellent way of turning Regions into fresh complete audio files for use in other Sessions or applications. I use it a lot when I bounce a Session. Because I bounce using another track in the Session rather than the Bounce to Disk option (see my article on bouncing in the July 2008 issue: /sos/jul08/articles/ptworkshop_0708.htm) when I want to create stereo interleaved files from my mix track, I use Export Selected as Files to create files in the format of my choice.
Like Regions, Region groups are stored in the Session, so if you want another Session to have access to the same groups, you must first export them. Highlight a Region group from your Region List (they will normally be at the bottom of the Region List) and select the Export option. You can set where on your system the Region Group data will be stored, and this location defaults to the Session folder of the Session you are exporting from. You can choose any destination on your system, but be aware that if you are exporting your Region groups to another drive, you should make sure that the audio relating to them is also copied to that drive. The best way to do this is to open the Session you will be bringing these Region Groups into, go into the Processing tab in Preferences, and select Automatically Copy Files on Import. Then, when you drag your exported Region groups into the destination Session, the audio files relating to them will automatically be copied and put into the destination Session's audio files folder.
A Hidden Gem: Timeline Drop Order
 How do you want your Regions: in a column or in a line?
This excellent little feature is hidden away at the bottom of the Region List pop‑up menu, and sets what happens when you drag multiple files from the Region List into the Edit window. When set Top to Bottom, if you drag four files out they will be laid on four consecutive tracks all at the same start time. When Left to Right is selected, the four files will be placed on the same track, one after the other.
