The point of Pro Tools' option to unlink the timeline and edit selections isn't obvious, but there are situations in which it can be a life‑saver.
The ability to unlink the timeline and edit selections is a 'feature' in Pro Tools that, until recently, struck me as little more than a pitfall for unwary users. Clients who unwittingly unlinked the timeline and edit selections would find the cursor didn't do what they expected, with playback starting somewhere other than where they had put it. My answer was always "I don't know why this feature is there. Even I can't get my head around working with separate timeline and edit selections at the same time, so turn the link back on and carry on as normal.”
However, a while back I came across a description of how this feature could actually be useful. I tried it out and found it to be a very worthwhile addition to my Pro Tools toolkit, so this month I wanted to share it with you.
A Level Playing Field
Take a look at the differences between the two screens above.  Breaking the link: the screen to the left shows the default mode whereby the selection in the timeline corresponds to the selection made in the Edit window. In the right‑hand screen, they have been unlinked.
  The first one is the normal mode in Pro Tools, where the edit selection (the highlighted area on the tracks) is the same as the highlighted section on the timeline between the blue flags. Notice that the link button under the Grabber tool, with an up and down arrow representing the timeline selection, and the dot, two vertical lines and another dot representing the edit selection, is lit.
In the second screen, I have turned off the link between timeline and edit selections, so that button is no longer lit. There are two separate selections now showing. To the left is the edit selection, shown by the highlighted regions on the tracks and the edit selection icons on the timeline, which are a red dot and line at both ends of the selection. To the right is the original section, which now only shows on the timeline between the blue flags.
Now we have a way of making different timeline and edit selections, we need to be able to play each of these selections separately. You can do this from the Edit menu, but going into the Edit menu every time is a pain, so thankfully there are shortcuts for these two functions. Alt-[ (left square bracket) will play the edit selection, while Alt-] (right square bracket) will play the timeline selection. Alternatively, if you enable the key-command focus, by highlighting the a/z button at the right‑hand end of the timeline on the edit window, the square bracket keys by themselves will play either the edit or timeline selections. Another shortcut you need to learn is for turning on and off the timeline and edit link: this is Shift-/ (forward slash).
I now want to show you how Pro Tools displays the start, length and end of the edit and timeline selections. The main counter always displays the point which Pro Tools will play from when you hit the space bar, which is the start of the timeline selection. When the edit and timeline selections are de-linked, the Start, End and Length fields at the top of the Edit window correspond to the edit selection, while the same fields in the extended Transport window show the timeline selection. The main counter's start, length and end will display the edit selection, and if you have the extended view enabled on the Transport window, its start, length and end will display the timeline selection.
In key-command focus mode, the letter 'O' and the number '0' on the QWERTY keyboard provide shortcuts to enable you to copy the timeline selection to edit selection (letter O) and the edit to timeline selection (number 0). If you're having trouble remembering which is which — especially if you haven't got a Pro Tools keyboard with all the shortcuts printed on it — remember that the '0' (zero) is above the (letter) 'O' on the keyboard, just as the timeline is above the edit selection in the Pro Tools window.
Short Work
Having learned how to identify, edit and copy separate edit and timeline selections, it's time to introduce the techniques that make this feature useful. First, there are three shortcuts that enable the edit selection to be snapped to the timeline selection, as in the 'before' and 'after' screen shots (above). Unlinking the edit and timeline selections enables a kind of 'four‑point' editing, where at a single keystroke, a selection from the Edit window can be moved to the position defined by the timeline selection.
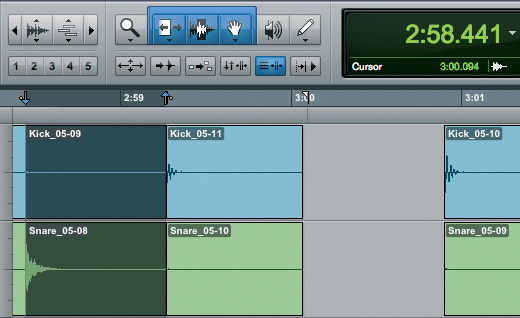 With the keyboard command focus enabled, using the 'H' key will cut the edit selection and paste it in such a way that its start point is snapped to the start of the timeline selection. 'J' will do the same, except that it snaps the sync marker in the moved edit selection to the start of the timeline selection, while 'K' will snap the end of the edit selection to the start of the timeline selection.
So how will these options actually help me in working on my Sessions? Well let's take two scenarios as examples to demonstrate how to use this feature.
Elastic Auditioning
 If you want to separate the main playback start point from both the edit and timeline selections, you can switch on Dynamic Transport and position its blue arrow within the timeline.
Consider the situation where you need to use Elastic Audio to manipulate each phrase of a take to get it in tune, or in time with the groove. It can really help the person doing the editing to get the timing and feel right if he or she hears a good run‑up to the segment being edited. You can use the Transport window's pre‑ and post‑roll settings, but this will mean that as you adjust the edit selection, Pro Tools starts playback from a slightly different point each time, making getting the sense of timing more difficult. By separating the edit and timeline selections, you can edit in detail the segment you are working on, using the Play Edit Selection command to hear just that segment, while always being able to listen to the whole phrase from the same start point by using the Play Timeline Selection command.
Pinpointing Part Of A Region
There have been countless times where I have needed to go and find a small segment out of a large region. For example, while editing a radio drama, I'll often find there is a line in a scene that the actor hasn't delivered perfectly, so I want to check the other takes to see if there is a better version of that line. The line maybe only a couple of seconds long in a take that lasted several minutes, so if I try to drag another raw take from the Region List onto a track close to the problem line, it is unlikely to fit between other existing regions. To make sure I don't go over the adjacent regions, I drop the alternate take at the end of the Session, out of the way, and identify the specific line, but then have to scroll back down the Session to drop the alternative nearby, then compare and finally drop the alternative in the correct place. Now, with this feature, I identify the problem line using the timeline selection, then go to the end, pull out an alternate take, find the appropriate line as before with the edit selection, compare the two by using the two different Play modes, and then use the 'Snap to Play' shortcut, 'J', to cut and paste the alternative straight into place in one press of a key. This saves lots of time and effort, with no scrolling back and forth.
Now that we've seen what you can do with two playback points, what about a third? You can achieve this using Dynamic Transport, which is selected from the Options menu. A blue Play icon will appear, which can be placed anywhere on the timeline. Now, as long as the command focus is enabled, using the space bar will play from the Dynamic Transport Play marker, while the square bracket keys will play the edit selection and timeline selection respectively. That should be enough for any complex edit you find yourself undertaking.
Unlinking the edit and timeline selections is one of those working practices that takes a little getting used to. However, it will be worth the effort once you've got through the pain barrier!