With their first update since buying this innovative spectral editing software, Steinberg have integrated it into ARA-compatible DAW programs.
Spectral editing is a powerful, if specialised, tool that has applications in audio restoration, creative sound design, vocal/instrument isolation and forensic audio analysis. As yet, though, it hasn't become a staple technique in mainstream music production. There are perhaps three main reasons for this. First, the most popular software choices operate as stand-alone editors, with limited DAW integration. Second, spectral editing is very different in nature from conventional waveform editing. Third, the available spectral editing software generally comes with a suitably specialist price tag.
With the release of SpectraLayers Pro 6, Steinberg are beginning to tackle the first of these issues. One of the major new features of this release — Steinberg's first update since they acquired it from Magix — is support for the ARA2 plug-in protocol. If your DAW or audio editing host supports ARA2, as Steinberg's own Cubase Pro 10 and Nuendo 10 both do, you can now run SpectraLayers within that host as an ARA2 extension. This should help to integrate spectral editing more easily within a music-production context.
On Spec
Unlike conventional waveform-based editing, where you work with a two-dimensional representation of your audio showing amplitude against time, spectral editing displays frequency against time, and superimposes the amplitude of the audio at any given frequency using brightness (or colour) gradations. Most spectral editors, SLP6 included, also offer a 3D representation as a display option, giving you a perspective view on the amplitude dimension.
Although even inexperienced users will soon begin to 'see' elements of their audio within the spectral display, such as transients, sustained sounds and melodic lines, editing within this view is a completely different experience from conventional waveform splicing. It can therefore take some time to become comfortable with the spectral editing process and feel you can do something useful with it. That said, the potential of the approach has been evident since SOS first looked at (then Sony's) SpectraLayers Pro 1 back in the October 2012 issue, and a quick dip into the SOS archives would be worthwhile as I'll focus here on the more significant changes and additions in this first Steinberg release.
A couple of introductory points are worth emphasising though. First, spectral editing may be an unfamiliar environment, but the process (and the SpectraLayers user interface) has something in common with photographic image editing. This is a comparison Steinberg are keen to encourage, describing SLP6 as the "advanced audio editing tool you already know". Second, having reached version 6, the rough edges Nick Rothwell mentioned in his 2012 review have received plenty of extra polish, and SLP6 now feels like a mature application. It's also worth noting that SLP6 can work with mono, stereo and surround audio formats. So what's new?
 Display options include the ability to show a 3D perspective on the spectral data.
Under & Over
Under the hood, Steinberg have undertaken some extensive re-coding of the SLP6 engine, apparently achieving performance increases of up to 400 percent for some processes. All I can report is that everything seemed pretty responsive on my (now modestly specified) 2013 iMac, and the only thing I was occasionally left waiting for was the spectral display to catch up when I was scrolling or zooming at speed.
Externally, Steinberg have made some adjustments to the UI and menu structure, but there is little to disorientate existing SLP users. The basic layout of the UI strongly resembles something like Adobe's Photoshop, with a tool palette at the left side, main menu items and project tabs at the top, collapsible sub-panels for controlling display, history, channel and layer options on the right and transport controls at the bottom, all surrounding the main visual editing panel.
Selection Box
The Display panel offers plenty of options for optimising the spectral view for a specific task, whether that's in terms of temporal or frequency resolution, choice of FFT algorithm, or adjusting colour and brightness to visualise amplitude or differentiate between audio content on different layers. This is not an insignificant feature, as the ability to visually tease out the spectral elements you wish to work with is an important prerequisite to fully exploiting the various selection tools.
 SLP6 automatically applies fades around your selections to smooth the results of any subsequent edit processes.
Steinberg have revamped many of the available tools, adding a new Transient Selector and improving the processes of making multiple selections, adding and removing elements from the current selection and moving selection masks independently of the actual contents. The ease with which you can build a complex selection area in stages using a combination of different tools is impressive. Many of these are very reminiscent of image editing software, and options exist for time- or frequency-based selection (or both), a freehand or polygon lasso tool, a selection brush, a 'magic wand' tool, harmonics-based selection (a powerful option for melodic instruments and vocals) and the new Transient Selector. The latter is a welcome addition but, in this first iteration at least, you have to manually make the selection for each transient. Perhaps the advanced automatic transient detection algorithms within Cubase will make their way into SLP6?
SLP already included the option to apply fades at the boundaries of a selection: analogous to feathering in a photo-editing context, these basically create a crossfade between the selected and non-selected portions of the audio in order to smooth transitions. As well as being able to adjust the size of the fade, you can now preview it visually and adjust the intensity of the visual display using the Selection Opacity slider in the Display panel.
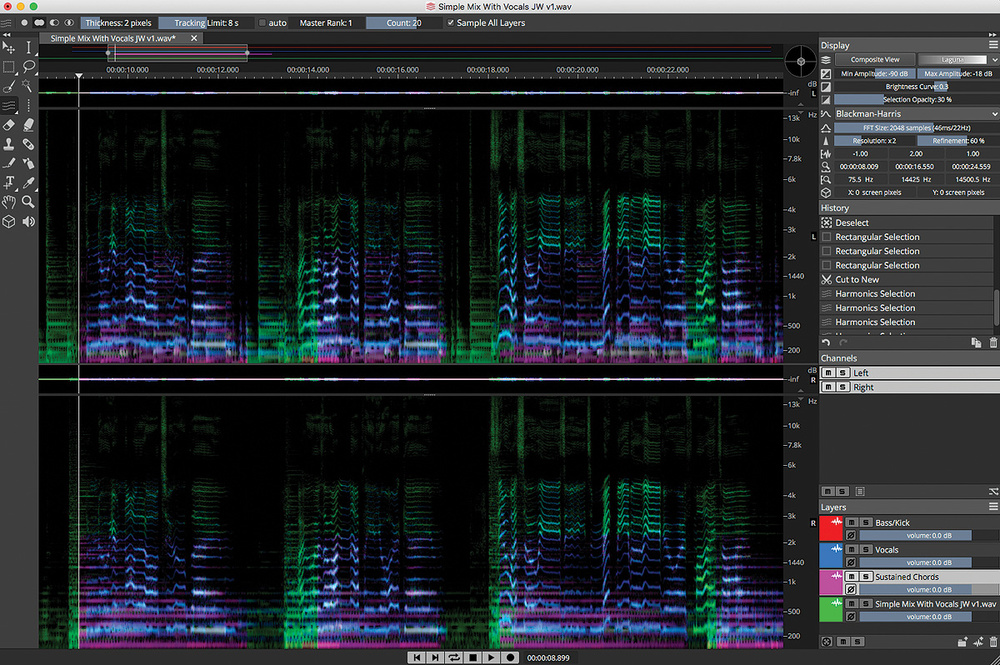
 SLP6 includes a range of powerful selection tools including the Harmonics Selection tool used here to select a vocal melody from within a stereo mix.