
Joe Colmenero hit the big time with Lil Tecca — and one of the smallest mixes he's ever done!
"My goal is that when I deliver my mix, all my clients do is turn up the volume, and that's it! Having said that, it is just so funny that this relatively modest and humble session that I have done for Lil Tecca is the thing that tons of people are calling me about now. I have done fully analogue mixes, using 48 channels on an SSL, and tons of vintage gear and crazy routing and multiple mix busses, and the whole Brauerising thing [Michael Brauer's technique of using multiple bus compressors on sends], and spent three days on it. The results were really cool mixes, that would get like 10,000 plays. Yet I did the this mix on my laptop, most of the time with some headphones, of a fairly small and simple session, and I didn't change that much, and it turned out the biggest thing I have ever done."
 'Ransom' Written by Tyler-Justin Sharpe, Danny Snodgrass Jr & Nick Mira. Produced by Nick Mira & Taz Taylor.Joseph Colmenero laughs. The track in question is Lil Tecca's breakthrough hit 'Ransom', which has racked up 200 million streams and counting, and reached the top 10 in dozens of countries. And although Colmenero loves analogue gear and expansive mixing techniques, his experience with Lil Tecca is in some ways typical of modern hip-hop/trap music, where short songs with few elements are often mixed by the beatmaker or tracking engineer.
One consequence of this development is that the world of mixing no longer seems like a closed shop dominated by a few elite names. It gives less well-known engineers a chance to mix big-time records and build a career, and Colmenero is one of those who looks set to benefit, having mixed most of Lil Tecca's debut album We Love You Tecca, which was a US top 5.
Cloud Cover
Like virtually all artists breaking through these days, Tecca's climb to the top involved trending on social media, in his case SoundCloud, before a management company and then a record label picked the artist up. Colmenero: "I happen to know Tecca's manager, Giuseppe Zappala, and he sent me some artists he was developing, and Tecca was one of them. I did a few tracks with Tecca, recording his vocals and mixing them, one of them being 'Love No Thot', and he put that straight onto SoundCloud. His fans really liked it, and that's where we realised that we got along. Tecca only uses a Neumann U87 for his vocals, and I have used a couple of different preamps, the Neve 1073 and an Avalon 737. Though just last night I used an SSL VHD Pre on him, and we really liked how that sounded.
"The way Tecca works is all freestyle. It's not like he spends four days listening to a bit, writing stuff with a notepad. He's very much in the moment. Go in, do a line, think about it, do another line, and so on. It's one level above stream of consciousness. These songs are very short, no more than three minutes, and very much geared towards the SoundCloud market. They just kind of crank them out, and they keep making tracks until one of them really feels right, and then they upload it. So Tecca has a lot of material. I think they only release about 40 percent of it!
"I have done a lot of sessions for the mixtape [We Love You Tecca]. I did most of the sessions in my own studio, though they also flew me out to LA, because many of the producers that he works with are out there. Sometimes I tracked vocals with him, sometimes he did them with somebody else, and then he just gave them to me to mix. Some of the mixes for the mixtape were done by Rambow. 'Ransom' was sent me by his manager. The producers, Taz Taylor and Nicholas Mira, are based in LA, and they had already recorded Tecca's vocals. The idea was for me to spruce it up, though it was already very good as it was, so no need for me to do tons of things. I finalised that mix at The Cutting Room."
Joseph Colmenero: "My first step is to get the session to sound exactly like the rough mix. Then I move from there."
Matching The Rough
"The screenshots you see of my mix session of 'Ransom' is pretty much what I was sent. I go in and organise the session the way I like it, and then I start working with it, and add my own effects, and so on. The thing is, I don't generally go far from what I was given. I mostly try to make it technically better, but it still needs to sound like what they fell in love with. I get sent both the rough and the session, and I need the rough, because some guys forget that delay compensation is a thing. Sometimes I don't have the same plug-in that they do, so I need to get a demo version, or buy it, so I can figure out what it does, and whether I like it, or prefer to do something similar with the plug-ins I have.
") This was the entire Pro Tools session for Joseph Colmenero's mix of 'Ransom'. (You can download a larger hi-res version as a ZIP file from the right-hand sidebar.)
This was the entire Pro Tools session for Joseph Colmenero's mix of 'Ransom'. (You can download a larger hi-res version as a ZIP file from the right-hand sidebar.)
"The rough is the point of reference. The artist, the producer, the label, everyone who is involved has made decisions based on a rough they like. You have to figure out what it is about the rough that they love. That's the first existential crisis (laughs)! So my first step is to get the session to sound exactly like the rough mix. Then I move from there. I start with trouble-shooting, and the biggest problem in this track was that the 808 and kick were not distinct from each other. All the other tracks were a matter of flipping phase, maybe rolling off some low end, to make space for the kick and 808, things like that, and then making the vocals sound great."
The 'Ransom' mix session definitely falls in the 'small is beautiful' category. Of 31 tracks in total, four are unused, one is a click and one is a record track, meaning that the active part consists of only 25 tracks. The beat comprises eight audio tracks — all in pink, and each with an instance of the Waves NLS Channel and API 550B plug-ins — while the vocals are spread over five audio tracks (red). On top of that, there are a couple of brief producer tags, two beat aux tracks, one with effects and the other a bus, aux effects tracks for reverb, eighth-note and quarter-note delays, a Master track and two vocal bus tracks (Lead Vox and Harm VOX). The other two vox aux tracks, STACK and BG VX, came from the original session and Colmenero did not use them. The top two of the four inactive tracks contain the original two-track that the vocals had been recorded to, a bounce of the stems ("which helped me line up the eight individual beat stems to make sure it's all in sync"), and the rough mix.
![]() inside-track-1119-pro-tools-large-screen.zip
inside-track-1119-pro-tools-large-screen.zip
Kick Boxing
 the API EQ plug-in is cutting 12dB at 30Hz and the FabFilter EQ boosting the lower mid-range, but the 808 receives 12dB boost in the upper mid-range.") The main mix issue was that the kick drum and 808 were fighting one another for the low-end headroom. Colmenero solved this problem using the same three plug-ins for each, but with very different settings. In the kick-drum chain (top) the API EQ plug-in is cutting 12dB at 30Hz and the FabFilter EQ boosting the lower mid-range, but the 808 receives 12dB boost in the upper mid-range.
The main mix issue was that the kick drum and 808 were fighting one another for the low-end headroom. Colmenero solved this problem using the same three plug-ins for each, but with very different settings. In the kick-drum chain (top) the API EQ plug-in is cutting 12dB at 30Hz and the FabFilter EQ boosting the lower mid-range, but the 808 receives 12dB boost in the upper mid-range.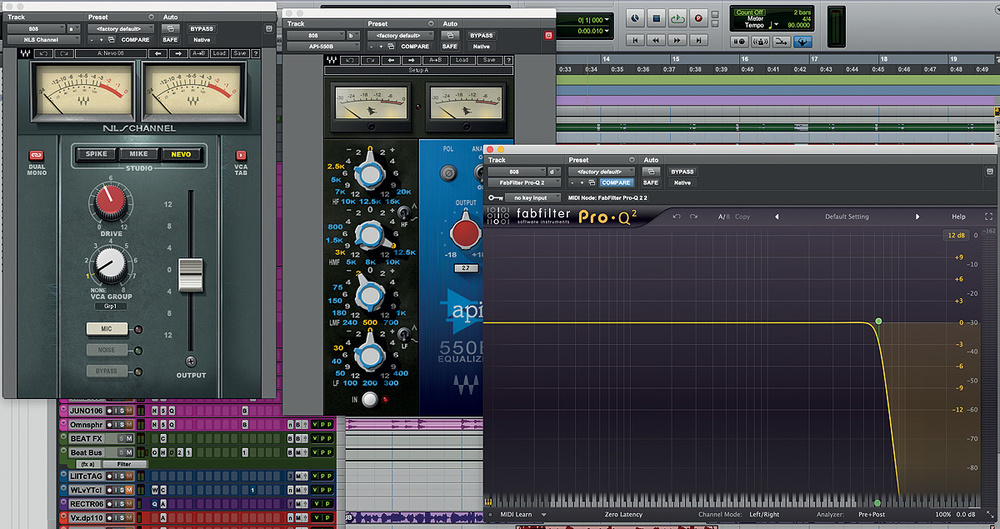 The main challenge with the beat, says Colmenero, was that "Some of the kick hits and 808 notes were in phase and added to each other, and some were out of phase and subtracted from each other, so I could not get a consistent groove. The kick sounded very pillow-like. When you combine an 808 with a kick, the latter has to have more of a woodblock feel, because you already have the low-end push from the 808. In rock music it is different, because you have the bass above the kick, but in hip-hop and electronic music and in general, including EDM, the kick needs to be above the bass, which in trap is the 808.
"In this track the kick and the 808 were trying to live in the same space, so I needed to raise the kick to get it out of the way of the 808. I used the API 550B to take out 12dB at 30Hz on the kick, which in effect is killing it. I just completely wiped out the sub low end. I also used the FabFilter Pro-Q2 to add some low mid-range to the kick, to give it a chest-thump feel, rather than a butt-kick feel, and the NLS plug-in, set to Nevo, added the analogue saturation. On the 808 I normally use the Mike setting on the NLS, which is like an EMI console, but there was plenty of distortion on the 808 in the original session, so I opted for the Nevo setting here as well, because it adds a little bit more brightness. I also added 3kHz to the 808 with the API, which is where the fuzz lives for me. I then rolled off 48dB at 6.5kHz with the Pro-Q2, because I want fuzz, not hair! I don't want that annoying high-end stuff in an 808.
"The other thing of note that I did on the inserts of the drums tracks is that I left a lot of low end in the hi-hat. Usually I roll off the low end of the hi-hat, because hi-hat samples often have bursts in them that don't help the track, but this one felt like a percussion thing, so I left the low-end in. It had a kind of clicky thing that moved the speaker in a nice way."
Finding Space
"The lower pink tracks, which each have sends, are the main melodic/chordal elements in the track. One is from a [Roland] Juno 106 and the other from [Spectrasonics] Omnisphere. The bell sounds like a pad-like synth sound. I extended the tails on them, because they are the only things like this in the track. To have them occupy more space, I have a send on them to the Beat FX aux, which has the Waves CLA Effects. It's a collection of six effects, and I have them set to 100 percent wet, and engaged the delay, phaser, really long reverb, some shining top end, and some distortion. I just needed to add a bit more interest, otherwise the parts fell a bit flat.
"All beat tracks go to the Beat Bus, and that has the Waves OneKnob. It's a DJ-style filter, which I automated at the end of the last chorus, where it takes the high end out really quickly, and then slowly brings it back in, like a frequency sweep. The producers had achieved the same effect by duplicating the track and putting a plug-in on the duplicate, but I prefer to automate things. The next plug-in on that bus is NLS, and then the Waves API 2500, set to a 1.5 ratio, just to even out some of the bumps, and I get extra clipping and volume out of it. This plug-in definitely chops off the top end. The Waves S1 Imager adds more width. It's set to 30 percent. '16' in the sends is a bus, because I wanted to side-chain it to the vocal, using the Waves Vocal Rider plug-in, but I ended up not doing this. I sometimes do that to make sure the vocal remains on top."
Vocals
"Just below the two producer tag tracks — one didn't make it — is the RecTR606 track, in purple, which is the record audio channel. Obviously I didn't use this, but it's interesting, because there are so many collaborations between people working at home, or at studios in LA and NY and so on, that you're starting to see standard templates, with the same bussing and layout used by many people. It certainly makes me happy, because it means you don't have to spend the first two hours of your mix working out where everything is and what the routing is. A record track like this is handy when working with someone like Tecca, who writes freestyle, because it's all Playlists below this track, and you can continually record, very quickly.
"Many of the plug-ins on the vocal tracks came with the session. The vocal audio tracks all have Antares Auto-Tune Pro because the session came with Auto-Tune Live, and I didn't have my licence with me, so I put Auto-Tune Pro on. Without seeing the Live plug-in I had to use my ears to make sure that the settings were exactly right. They had recorded Tecca's vocals with Auto-Tune on, playing Auto-Tune like an instrument.
"All audio tracks go to the LeadVox bus, on which there is a stack of plug-ins. Again many of them came with the session. The chain starts with the Waves Q6 EQ, the FabFilter Pro-C2 compressor, then a Waves SSL Channel, two Waves De-Essers, a Waves RVox used as a noise gate, the SoundToys Decapitator for vibe, and a Waves C4 to bang down some peak frequencies. There's a track with distant ad-libs that goes to the Harmony Vox aux, which has some similar plug-ins, and adds a D-Verb for some extra reverb. There are sends on the vocal busses to the reverb aux, with the Waves RVerb, and delay quarter-note aux, with the Waves H-Delay. I also have the Avid EQ7 before the reverb, to take out the low end and high end. You don't want to have esses all over your reverb. The other two aux tracks that I did not use are part of the producer's template."
Magic Masters
"My master bus again has the NLS, for yet more of that analogue grit. I didn't add it to the vocals in this session, although I sometimes do that. In this case I like that analogue feel it added to the entire track, because it sounds so familiar. I really like the signature finisher plug-ins that Waves have been doing, and I've been using the CLA MixDown a lot. CLA is well known for using the SSL E console, and the MixDown plug-in has a Drive knob on it, which is really an excellent clipper. I am always looking for that clipping thing! One of the distinguishing sounds of the E-series console is how it clips audio, and it helps you to make things louder.
 All of the music parts in the song are routed through the Beat Bus and this plug-in chain.
"However, I used the Greg Wells MixCentric on this song, because I wanted it to sound poppier. The Greg Wells and Tony Maserati mix bus plug-ins both are very much about the high end, but the Greg Wells one is softer. It kind of brightens the whole thing up, but more gently. When that plug-in compresses, it's like wideband compression, and it's very slow, and that doesn't work with an 808, so I didn't let it go into compression.
"The FabFilter Pro-L2 in this session is not active. I send my mixes for approval at -9LUFS, because it won't sound too different from the rough mix, but once it's approved, I take it off before sending it to mastering. Pro-L2 is my preferred limiter. Clients really want things to be at a certain level, no matter what it does to the audio, and to my ears the Pro-L2 is the most transparent one, even though it has a sound.
"Finally, after the Pro-L2 I have the Sample Magic AB plug-in. This is actually my favourite plug-in. I put it last on your master in the chain, before the Waves Analyzer plug-in, and it's a reference plug-in that allows you to A/B the track you're mixing with commercial masters. So instead of having iTunes open and putting that on a track in your session, this kind of does the same thing. I love it.
"I am constantly in different studios, working on my headphones, or I am at home, or at the Cutting Room, or at a mansion with a little setup in the corner, or in LA, so I constantly need to be readjusting where things sit in different environments. Instead of using frequency analysers or meters, Magic AB really works for me. I will load in all sorts of different tracks that I think have good mixes. I will throw in things like Future or Ariana Grande, anything that is trending at the moment, and I can then quickly hit A and B, and flip between my mix and something that has already been mastered and released. I subscribe to Apple Music, so I am able to get good resolution tracks. Apple Music also doesn't punish loudness as much as Spotify or YouTube, so that means I don't have to buy the CDs anymore to be able to A/B.
"This makes it possible for me to compare what I'm doing to what's out there, and also to the rough. Once again, if they don't feel that same thing that they heard when they listen to the rough when they hear my mix, I will probably lose the job (laughs)! You want to improve it, but keep it as same as possible. They have already fallen in love with the song, and they don't make a distinction between the song and the mix. It is all one and the same. If it is different, you are fucked. You don't want to do different, you want to do better!"
Joe Colmenero
Originally from Texas, a teenage Joseph Colmenero played bass and built his own studio in the family garage. His talent for the recording metier was immediately obvious, and soon people began paying him to record them. Colmenero continued by doing an audio engineering course at CRAS, the Conservatory of Recording Arts and Sciences in Arizona, where he learned to work with tape and SSL and Neve consoles as well as DAWs. Back in Texas he worked for "old-school Latin labels", one of which was in the compound of the Quintanilla family of singer Selena (who was tragically, and famously, murdered in 1995). Colmenero spent time there digitising and archiving old tapes and mixing TV shows. He also worked on Jennifer Peña's album Dicen Que El Tiempo, which received a Grammy nomination for Best Latin Pop Album in 2008.
 Joseph Colmenero is chief engineer at New York studio The Cutting Room.That same year, Colmenero took his big jump into the deep end and moved to New York, where he knew no-one. It was the time when many studios were closing, so even working as a studio intern meant long hours and very little money, despite being involved in the making of the short musical documentary Music By Prudence (2009), which won an Academy Award and an Emmy nomination. To make ends meet Colmenero worked at the Sam Ash music store, which was the unlikely scene for his lucky break. He met RZA of Wu-Tang Clan there, who needed someone to rewire his SSL. Colmenero had decommissioned large-format consoles in Texas and maintained SSLs at The Cutting Room Studios in New York, so he ended up working for RZA, and also engineering sessions for him.
Fast-forward several years, and Colmenero is chief engineer at The Cutting Room Studios and still works for RZA — he recently worked as an engineer and mixer on the Hulu TV series Wu-Tang: An American Saga. Colmenero has also clocked up quite a few other impressive credits, including James Arthur, Cardi B, Lil Yachty, J Balvin and Jon Bellion, and he owns and runs an audio post-production company Rythmograph. Colmenero remarks: "I touch anything that involves audio! I build equipment, I can install a large console, build a studio, do A/V post-production, and also do video and photography. I've even been a boom operator! But the main thing that I do is audio engineering, and recently, a lot more mixing."
Think Analogue
Joseph Colmenero says that he "loves to find esoteric stuff online, like a modded Chameleon Labs 7720 compressor, which is my favourite toy at the moment". Because of this he's an avid reader of the reviews in this magazine ("I definitely do due diligence before I buy defunct gear!"), and it also comes as no surprise that his studio in New York is full of analogue and esoteric goodies, like the Chameleon, Ensoniq DP4, and also a 32-channel TAC Scorpion console, plus a UAD Apollo interface, Blue Sky and Yamaha NS10 monitors.
The last thing he did at his studio, he says, was a country record, and very little of this gear sees any action when Colmenero is mixing pop and trap. His mixes for Tecca were done entirely 'in the box', on his laptop, with his favourite Beyerdynamic DT770 headphones. When working with his laptop he also carries a UAD Arrow soundcard, and the Sonarworks Reference 4. So why the investment in analogue hardware?
"The thing is," he says, "that I like engineering. Just straight engineering. I like the math of it, I like the thought process that goes into building a chain, I like researching the topology of gear, and how that translates into what it sounds like, why certain emulations in plug-ins work and others don't, and so on. That's one reason why I have my analogue setup in my studio. But I don't use it too often, because I move around so much. I'm always trying to figure out whether it's worth doing something with analogue, but with my laptop and the cloud, I can work anywhere. The Sonarworks speaker and headphone calibration thing also helps flattening frequency responses in any space I am in, though you don't want to rely on it too much.
"People who prefer analogue, myself included, like that it sounds bigger, warmer and wider. All that kind of stuff. I think that has to do with saturation and non-linearities. Analogue also forces you to have a good gain structure. So when things get summed on an analogue board, it feels right. I've done mixes in Pro Tools, and then spread everything out on a board, making sure every single channel is the same as it was in Pro Tools, and the end result spreads out better. I think the non-linearities are a big part of that. It gives you the warmth and the imaging. So I always look for plug-ins with which I can emulate that. Of recent I use the Waves Non-Linear Summer."