 Linearising your headphones with tools like dSoniq’s Realphones or Sonarworks’ SoundID can be valuable in its own right, but what’s often even more useful is the instant change in perspective you get from toggling correction on and off.
Subtle issues with the frequency balance can stop mixes from translating well to different listening systems. We offer a couple of suggestions that can help.
Mixing was once called ‘balancing’, and there are at least two senses in which a mix needs to be balanced. The obvious one concerns the level of each individual source or instrument. We want the vocal to be clearly audible. We want the drums to be powerful but not overwhelming. We want the guitars to drive the song along without overshadowing the vocals. And so on.
Less obviously, a mix also needs to contain a satisfying balance across the frequency spectrum. Some low bass is often desirable, but too much low bass causes all sorts of problems. We want the midrange to be full and punchy, but we want to avoid pushing it so far that the mix sounds boxy or tinny. We want to retain detail and excitement at the top end without taking the listener’s head off.
The two goals are, to some extent, interconnected; fading up the bass guitar or the kick drum will mean more low bass in the mix, and so on. But it’s still very possible to end up with a mix that is ‘balanced’ in the first sense yet not in the second. In fact, I’d go as far as to say that this is the single biggest problem I hear in mixes not done by professional engineers. It’s also one of the challenges I find hardest to overcome in my own work. Familiar techniques such as A/B’ing with level‑matched reference tracks can be a big help, but in this article, I thought I’d share a couple of less obvious strategies I’ve developed.
Light & Dark
A word you’ll hear a lot in articles about mixing is ‘translation’. One of the mix engineer’s key skills is to make the song sound good not only on their own playback system, but to anticipate how it will work on other systems, including consumer devices. To this end, many engineers employ secondary monitoring systems, including ‘grotboxes’ deliberately chosen for their low fidelity. However, in my experience, these are more useful for fine‑tuning level balances than frequency balances. A two‑inch cube speaker can be very helpful for highlighting how well the vocal is sitting in the mix, but it won’t tell you whether you have too much going on at 50Hz. However, switching from speakers to headphones can also give you a useful change in perspective, and my first tip for checking frequency balance builds on this idea.
Over the years, I’ve reviewed lots of different headphones, as well as several software correction tools designed to linearise their frequency response. It’s not hard to hear the difference these tools make, or to notice that one pair of headphones has a ‘scooped’ sound and another a midrange focus. But what has surprised me in practice is that if I’m forced to mix on headphones, linearising them doesn’t help as much as you might expect. I don’t consistently do better mixes on uber‑flat cans costing £2k than I do on closed‑back models costing £150, and I think that’s because there are other, more important factors that make it hard to mix on headphones.
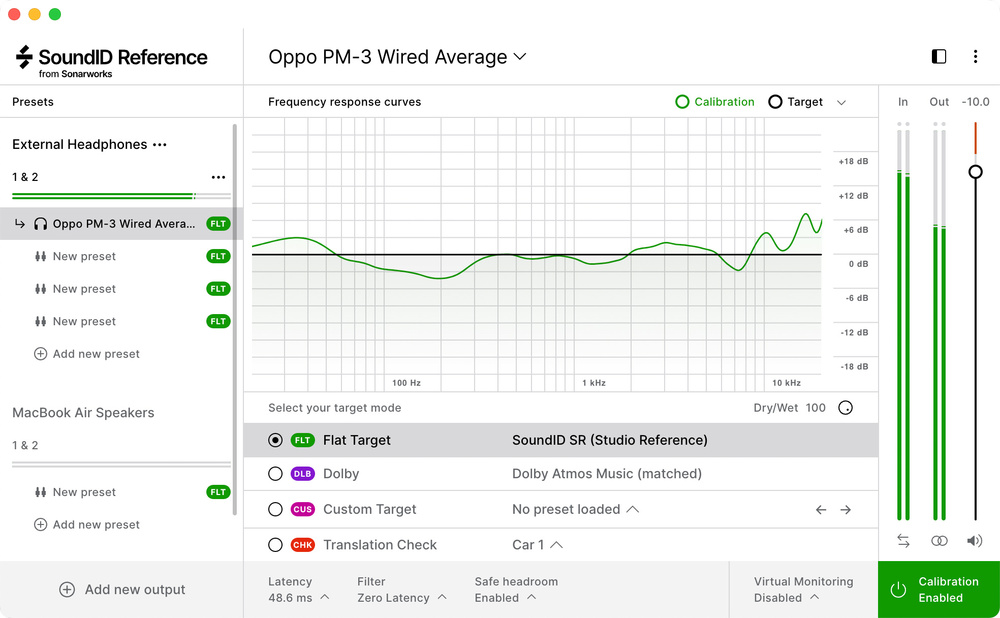
Despite this, I’ve come to rely very heavily on headphone correction as a tool for checking mixes, and specifically for judging frequency balance. The way I use it is as follows. I’ll carry out a mix at my studio, listening mainly on my Genelec main monitors and occasionally switching to my NS10s. When I think the mix is getting close, I’ll bounce it out, bring it home and fire up my laptop running either Sonarworks SoundID or dSoniq Realphones. (Other headphone correction tools are available too, including Acustica Sienna and Toneboosters Morphit.) I’ll then listen to the mix on my trusty Oppo PM‑3s: headphones that I know well, which have a full frequency response but which, like almost all closed‑back headphones, aren’t completely flat in their raw state.
What’s important is that the raw and the corrected sound be noticeably different, but both within the realm of normal for headphone playback.
In the specific case of the PM‑3, which are planar magnetic headphones, the correction curves apply a broad high‑frequency boost, a dip around 1kHz, and another dip in the low midrange; with typical moving‑coil headphones it’s more likely that the correction will tame an upper‑mid boost instead, but it doesn’t really matter. What’s important is that the raw and the corrected sound be noticeably different, but both within the realm of normal for headphone playback. In my experience, toggling correction on and off during playback then does a uniquely good job of highlighting frequency anomalies in the mix.
Very often, for example, I’ve played back one of my mixes with headphone correction disabled, thought it sounded great, then winced when SoundID reveals that the cymbals are sounding vicious at 10kHz. Other times I’ll be feeling pleased with myself when the ‘flat’ response sounds perfect, only to discover that it sounds horribly honky or muddy on the uncorrected ’phones. And, in general, the less the spectral balance appears to change when I switch, the closer it is to being right, and to translating well across other systems.
Blooming Marvellous
Having found this technique surprisingly effective, and often brutally revealing of my limitations as a mixer, I’ve also evolved a related habit which helps to forestall too many nasty surprises at the translation stage. Last year I gave a glowing review to Oeksound’s Bloom, a plug‑in that dynamically rebalances the frequency response of your audio to push it towards an idealised target. As with most such tools, it’s very easy to overdo things with Bloom, but you don’t have to use it as a corrective tool: it’s also invaluable as a diagnostic tool. Put Bloom in the last insert slot on your mix bus, crank up the Amount dial and listen to the results. Does the frequency balance of your mix change significantly? If so, is it improved, and which regions are most affected? If Bloom suddenly makes the lower midrange clearer, chances are you have some mud in there that needs sorting out. If it radically brightens up your mix, you probably need to revisit your EQ choices in the upper midrange. The same applies right across the spectrum.
 Oeksound’s Bloom will ‘push’ the spectral balance of your mix towards an ideal target. The changes it makes in doing so can be useful clues as to what’s wrong with your mix in the first place!
Like most plug‑ins, Bloom is available for free for a trial period, so you can see whether it works for you. Alternatively, you could try other automatic tone‑shaping plug‑ins such as ProAudio DSP’s Dynamic Spectrum Mapper, or the Stabiliser module in iZotope’s Ozone 11. The same approach can also be made to work with a ‘match EQ’ plug‑in and a suitable set of reference tracks — just be aware that the genre, crest factor and even the key of those tracks can make a big difference. Software is no more infallible than the human ear, but like headphone correction, it can give you that fresh perspective on your mix, making you aware of issues you wouldn’t otherwise have spotted.
Information
SoundID Reference sonarworks.com
dSoniq Realphones www.dsoniq.com
Oeksound Bloom www.oeksound.com
Acustica Audio Sienna https://sienna.acustica-audio.com