You can save time and cut down on mouse-clicks by using Pro Tools' window management features.
Window Configurations is a feature Digidesign added in the v7.3 release of Pro Tools. It's easy to overlook if you don't know it's there, but can be incredibly useful, so in this month's workshop we'll go through the ways in which it can speed up your Pro Tools work.
In essence, Window Configurations is similar to the Screensets that are beloved of Logic users: it enables you to save and recall different arrangements of the various Pro Tools windows, including their position and what is displayed in each window. To get started, go to the Window menu, select Configurations, and a submenu pops out to access the various options. These are also available in the floating Window Configurations window, accessed through the shortcut Command–Alt-J (Mac) or Control-Alt-J (Windows). 
Next, set up an arrangement of windows into a configuration that you want to save. Choose the New Configuration... option from the submenu, and the Window Configuration setup window will pop up. Leave the setup options in their default settings for now, give the configuration a name, use the Comments section to explain what this configuration does, and then click Done. Repeat this for any other configurations you frequently use — in the screen shots, I've saved three Edit window configurations, one with just the main area visible, a second with the Tracks & Groups open, and a third with the Region List open The Window Configurations setup dialogue allows you to choose a name for your configuration, add comments, and set what is stored and what isn't.
 Here, I've set up three Window Configurations to switch instantly between different Edit Window setups, showing or hiding the Tracks, Groups and Region List.. The Configuration window thus shows three configurations, of which the entry displayed with a black diamond is the active one. To switch between them, you can click on the appropriate item in this list, but there are also keyboard shortcuts: using the numeric pad on your keyboard, type '.' (period), then the number of the configuration you want to switch to, then '*'.
Other elements of the Edit window can be shown and hidden as part of Window Configurations, too. When I am working on a single screen, for example, I prefer to have at least I/O and Inserts views on in the Edit Window. That way I rarely need to access the Mix window, which I always find a pain on a single-screen system. The down side of this is that they take up space, so one of my Windows Configurations is to hide these when I need the screen space for maximum visibility while editing.
You can also create and edit Window Configurations from within the drop–down menu in the Window Configurations screen, by clicking on the button near the top left-hand corner (see screen, right) . Note, though, that the Window Configurations window itself is never included in a configuration.
Advanced Configurations
So far we haven't fully taxed Window Configurations. Where they can really come into their own is setting up complete configurations best suited to a particular task. For example, when I am working on the tracking and mixing for a broadcast audio post-production job, I like to see the mixer on my right-hand screen, and will also keep open a small Video window, the plug-in window for my final mastering limiter, to check I am not driving it too hard, and the TC LM5D Loudness Radar, which helps me to manage the loudness and consistency of my mix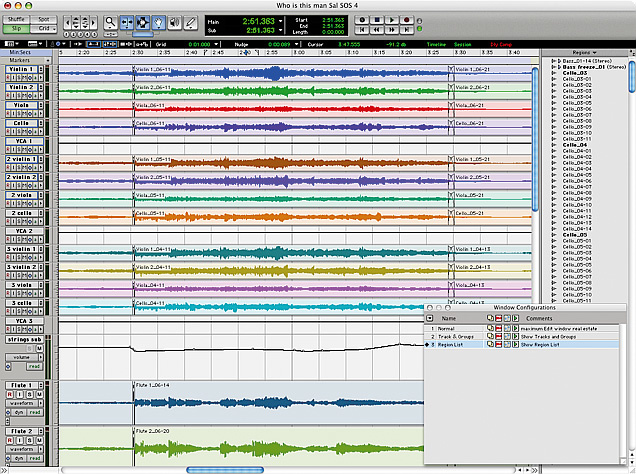 . When it comes to the final lay-off, however, I prefer to have a large Video window, but I still need to have the two plug–in windows open, which inevitably means much more of my Mix window is covered up. The beauty of Window Configurations is that if I need to stop and make some changes, one keyboard combo will switch me right back to my tracking configuration.
One of the other great features of Window Configurations is that they can be set to apply only to one or two windows. For instance, when I am editing broadcast programmes I often use Audiosuite plug-ins to modify Regions, perhaps using a high-pass filter to tame pops or the Gain plug-in to lift the level of a poorly recorded clip. Previously, I would need to go into the Audiosuite menu, scroll down to Other, and select Gain to get to the plug-in window. Now, there's an alternative: a Window Configuration that just opens the Gain plug-in window. You can do this by opening the plug-in window, creating a new configuration, and turning off the option to Include Edit, Mix, and Transport Display Settings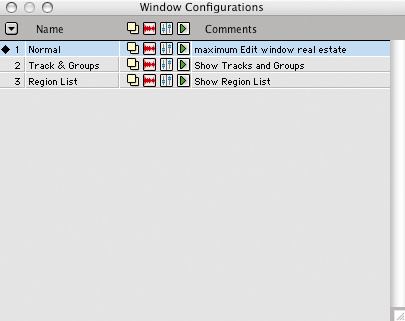 . I find these especially useful as I tend to use the Waves Renaissance EQ2 plug-in for my high-pass filter, and as its name starts with the letter 'R', it is a long way down my Audiosuite EQ menu list!
So far we've looked at Window Configurations that store both the display settings and the position or layout of the windows, but it's also possible to set up configurations that only store the former. For instance, suppose you want to use Window Configurations to switch between the three possible states of the Transport window, so that you don't have to keep going to the View menu to switch between Expanded, MIDI and Basic versions. Create your configurations, select the lower radio button next to the Window Display Setting drop-down menu, and change the menu to Transport . Now, when you recall the configuration, the Transport window will open wherever it last was, with the appropriate display settings, and no other windows are affected.
 but have it much larger at lay-off time (right).") Another real-world use for Window Configurations: I like to keep the Video window small while tracking and mixing (left) but have it much larger at lay-off time (right). You can do similar things with the Edit and Mix windows: indeed, arguably, all the Edit window settings, like Show Tracks and Groups, would be better set in this way. As a bonus, you should notice the configurations will change quicker, as they aren't having to modify all the windows within Pro Tools. It doesn't work so well with the Mix window, however, as the window doesn't resize itself properly when you recall only the Display Settings. To make sure the Mix window resizes correctly, use Window Layout and tick the Include Edit, Mix, and Transport settings, which will, of course, recall settings for those other windows even if you don't want to.
Another real-world use for Window Configurations: I like to keep the Video window small while tracking and mixing (left) but have it much larger at lay-off time (right). You can do similar things with the Edit and Mix windows: indeed, arguably, all the Edit window settings, like Show Tracks and Groups, would be better set in this way. As a bonus, you should notice the configurations will change quicker, as they aren't having to modify all the windows within Pro Tools. It doesn't work so well with the Mix window, however, as the window doesn't resize itself properly when you recall only the Display Settings. To make sure the Mix window resizes correctly, use Window Layout and tick the Include Edit, Mix, and Transport settings, which will, of course, recall settings for those other windows even if you don't want to.
Changing Configurations
 As well as editing your window configurations from the drop-down menu in the Window Configurations floating window, you can also update a particular configuration to reflect what's visible on screen if you have changed the window arrangements or resized them, either using the Update... option from the drop-down menu or from the Configurations submenu of the Window menu. Holding down the Control key (Windows: Start) and clicking on the configuration in the Configurations window allows you to do likewise. Other options include Clear, which erases the selected Window Configuration without deleting its 'slot' in the list, Insert Slot Before, which inserts a new slot before the selected Window Configuration and, if necessary, increments the number for each of the subsequent slots, and Delete Slot, which erases the selected Window Configuration and its slot, re-numbering each subsequent slot. You can also Delete All Window Configurations.
 Turning off the option to Include Edit, Mix and Transport Display Settings allows you to use Window Configurations to recall Audiosuite plug-in windows while leaving everything else untouched.The Auto-Update Active Configuration option will automatically update the active Window Configuration as you make changes to the layout and settings of windows. If Auto-Update Active Configuration is enabled, the number of the active configuration is also displayed in the Window menu, and the Update command is also available from the Configurations submenu of the Window menu. Note that Window Configurations that do not include Window Layout and only store Window Display Settings cannot be made 'active', and thus won't automatically update. If you want to update a Window Configuration with changes to the Window Display Settings (such as the width of the Region List in the Edit window), use the Update command in the Window Configuration List.
Moving Configurations Between Sessions
 You can set up Window Configurations to recall only Display Settings for a single window, such as the Transport window.Window configurations are saved as part of a Session, but they often store layouts and settings that you want to use all the time, so it is very useful to transfer Window Configurations from one Session to another. Select Import Session Data from the File menu, and take a look near the bottom left-hand corner of the Import Session Data window. There is a column of tick boxes, one of which is Window Configurations. Tick this, make sure nothing else is selected (unless, of course, you want to import other data from this Session), and click OK. The Window Configurations will be imported into your current Session, so you can work in the same way, with the same shortcuts doing the same things.
 Different vertical zoom levels across multiple tracks: easy when you know how!As ever, the best way to get to grips with Window Configurations is to try things out and see what works best for you. I have found that they have increased my productivity and saved a shedload of mouse work opening, moving and closing windows and doing the same processes over and over. The more I use them, the more I find I am taking my right hand off the mouse and using it to work the numeric pad on my keyboard instead. This may seem unimportant, but as someone who uses Pro Tools all day every day, what I do with my hands to keep RSI at bay is highly relevant to my future employment opportunities.
Window Configurations Keyboard Shortcuts
| Function | Mac | Windows |
| Open Window Configurations List | Command-Alt-J | Control-Alt-J |
| Create a new Window Configuration with a specific numbered slot | Period (.), a number from 1 to 99, and Plus (+), all on the numeric pad | Period (.), a number from 1 to 99, and Plus (+), all on the numeric pad |
| Recall a Window Configuration | Period (.), a number from 1 to 99, and Asterisk (*), all on the numeric pad | Period (.), a number from 1 to 99, and Asterisk (*), all on the numeric pad |
| Revert to previous window layout and window setting | Period (.), zero (0), and Asterisk (*), all on the numeric pad | Period (.), zero (0), and Asterisk (*), all on the numeric pad |
| Update active configuration | Control-click | Start-click |
| Hide all floating windows | Command-Alt-Control-W | Control-Alt-Start-W |
| Useful tip for opening more than one plug-in window or track/send output window | Shift-click on any subsequent plug-in or track/send output window | Shift-click on any subsequent plug-in or track/send output window |
Flexible Vertical Zooming
How many times have you had a Session where the waveforms are different heights on different tracks? You can, of course, adjust the vertical audio zoom, but that changes it for all tracks. What would be really great is to be able to vertically zoom one particular track on its own. Well, you can!
Select the Zoom tool, either from the toolbar or using the F5 button on your keyboard, hold down the Control key (Mac) or Start key (Windows), and by dragging, you can continuously adjust the vertical zoom on a track. Drag up to increase the vertical zoom, and drag down to reduce the vertical zoom. You can also drag left or right to continuously adjust the horizontal zoom, but of course this affects all tracks. Here are some other useful zooming tips...
- Instead of clicking on the vertical zoom buttons in the toolbar, try clicking and dragging them. You can then continuously vary the vertical zoom, rather than moving in discrete steps.
- As well as the keyboard shortcuts Command–square brackets (Windows: Control–square brackets) to zoom horizontally, if you have Keyboard Focus enabled on the Edit Window, the 'R' and 'T' keys will do the same.
- To return to the previous zoom setting — which is especially useful when you have zoomed right in to look at a waveform — Alt-click on either of the horizontal zoom buttons, or use the keyboard shortcut Command-Alt-E (Mac) or Control-Alt-E (Windows).
- There are two modes to the Zoom Tool: Normal and Single. Normal works as you'd expect, while when Single is selected the previously selected Edit tool is automatically reselected after zooming. This works really well in conjunction with the 'return to previous zoom setting' shortcut above.
- To zoom out all audio tracks and reset waveform display to the default settings, either double–click the Zoom tool or use the keyboard shortcut Alt-A.
- To set all audio-track waveform heights to match the waveform height of the topmost audio track in the Edit window, hold down Control-Shift (Windows) or Command-Shift (Mac) and click on any of the Zoom buttons. Note that when you do this, any waveform height offsets will be lost.
- If you have a mouse with a scroll wheel, you can use it to zoom in and out of tracks, both vertically and horizontally.
- To continuously zoom horizontally in the Edit window, hold Alt while turning the mouse scroll wheel.
- To continuously vertically zoom audio tracks in the Edit window, hold down Alt-Shift while turning the mouse scroll wheel.
- To continuously vertically zoom MIDI tracks in the Edit window, hold down Alt-Start (Windows) or Alt-Control (Mac) while turning the mouse scroll wheel.
- To scroll the contents of the Edit window or Mix window horizontally, focus the window you want to scroll by clicking in it or bringing it forward, and then hold down the Shift key while turning the mouse scroll wheel.
In my experience, Zoom Toggle is another misunderstood feature in Pro Tools. It's activated by clicking on the button under the Zoom Tool in the toolbar or, if the Keyboard Focus is switched on in the Edit window, hitting the 'E' key. Pro Tools will then jump to a different set of horizontal and vertical zoom, track height, view and grid settings, providing an instant 'zoom in' on whatever you want to inspect in more detail. These Zoom Toggle setting are configured from the Editing tab of the Pro Tools Preferences window.
The recommended settings for MIDI are Vertical Zoom to Last Used, Horizontal Zoom to Last Used, Track View to Waveform/Notes, Track Height to Fit to Window. The recommended settings for audio tracks are Vertical Zoom to Selection, Horizontal Zoom to Selection, Track Height to Fit to Window, Track View to No Change.